


Combining scroll animation with icons can elevate the design of your website in unique ways. In this tutorial, we are going to explore how to add scroll-animated icons to section backgrounds in Divi. With hundreds of icons to choose from and with numerous built-in animation effects available in Divi, we’ll show you how you can create countless background animations to bring our designs to a whole new level.
Let’s get started!
Sneak Peek
Here is a quick look at the design we’ll build in this tutorial.
And here is a bonus design that shows you what is possible with a few tweaks.
Download the Layout for FREE
To lay your hands on the designs from this tutorial, you will first need to download it using the button below. To gain access to the download you will need to subscribe to our Divi Daily email list by using the form below. As a new subscriber, you will receive even more Divi goodness and a free Divi Layout pack every Monday! If you’re already on the list, simply enter your email address below and click download. You will not be “resubscribed” or receive extra emails.
@media only screen and ( max-width: 767px ) {.et_bloom .et_bloom_optin_1 .carrot_edge.et_bloom_form_right .et_bloom_form_content:before { border-top-color: #ffffff !important; border-left-color: transparent !important; }.et_bloom .et_bloom_optin_1 .carrot_edge.et_bloom_form_left .et_bloom_form_content:after { border-bottom-color: #ffffff !important; border-left-color: transparent !important; }
}.et_bloom .et_bloom_optin_1 .et_bloom_form_content button { background-color: #f92c8b !important; } .et_bloom .et_bloom_optin_1 .et_bloom_form_content .et_bloom_fields i { color: #f92c8b !important; } .et_bloom .et_bloom_optin_1 .et_bloom_form_content .et_bloom_custom_field_radio i:before { background: #f92c8b !important; } .et_bloom .et_bloom_optin_1 .et_bloom_border_solid { border-color: #f7f9fb !important } .et_bloom .et_bloom_optin_1 .et_bloom_form_content button { background-color: #f92c8b !important; } .et_bloom .et_bloom_optin_1 .et_bloom_form_container h2, .et_bloom .et_bloom_optin_1 .et_bloom_form_container h2 span, .et_bloom .et_bloom_optin_1 .et_bloom_form_container h2 strong { font-family: “Open Sans”, Helvetica, Arial, Lucida, sans-serif; }.et_bloom .et_bloom_optin_1 .et_bloom_form_container p, .et_bloom .et_bloom_optin_1 .et_bloom_form_container p span, .et_bloom .et_bloom_optin_1 .et_bloom_form_container p strong, .et_bloom .et_bloom_optin_1 .et_bloom_form_container form input, .et_bloom .et_bloom_optin_1 .et_bloom_form_container form button span { font-family: “Open Sans”, Helvetica, Arial, Lucida, sans-serif; } p.et_bloom_popup_input { padding-bottom: 0 !important;}


Download For Free
Join the Divi Newsletter and we will email you a copy of the ultimate Divi Landing Page Layout Pack, plus tons of other amazing and free Divi resources, tips and tricks. Follow along and you will be a Divi master in no time. If you are already subscribed simply type in your email address below and click download to access the layout pack.
You have successfully subscribed. Please check your email address to confirm your subscription and get access to free weekly Divi layout packs!
To import the section layout to your Divi Library, navigate to the Divi Library.
Click the Import button.
In the portability popup, select the import tab and choose the download file from your computer.
Then click the import button.


Once done, the section layout will be available in the Divi Builder.
Let’s get to the tutorial, shall we?
What You Need to Get Started


To get started, you will need to do the following:
- If you haven’t yet, install and activate the Divi Theme.
- Create a new page in WordPress and use the Divi Builder to edit the page on the front end (visual builder).
- Choose the option “Build From Scratch”.
After that, you will have a blank canvas to start designing in Divi.
How to Add Scroll-Animated Icons to Section Backgrounds in Divi
The Key Concept Briefly Explained
The process of adding scroll-animated icons to section backgrounds involves 4 key parts.
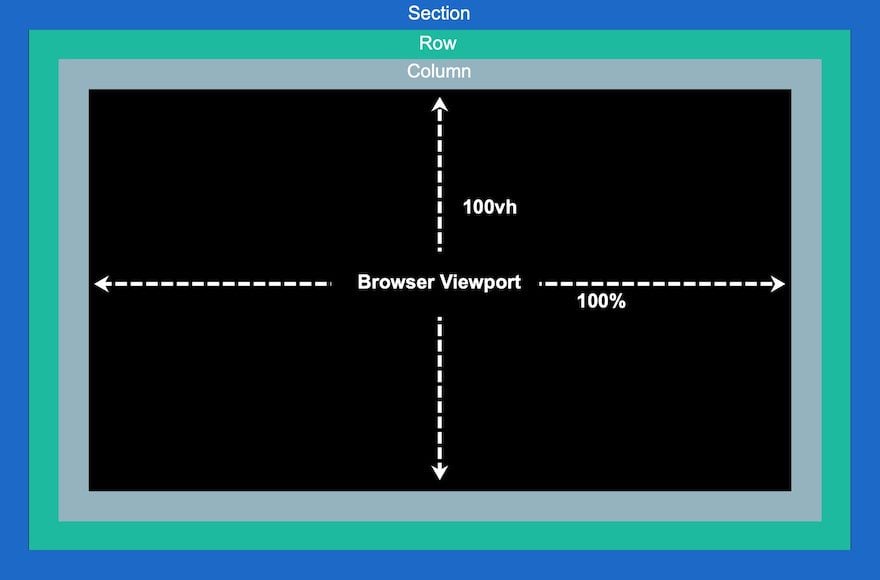
1: Creating a Fullscreen Canvas
First, we need to create a fullscreen canvas using by customizing a section, row, and column so that each of them spans the full width and height of the browser. This will give us a kind of unhindered creative space we need to fill with icons.

2: Adding and Positioning the Icons
Now, we can strategically place the icons within the fullscreen canvas (or column) to build our scroll-animated icon background design.
![]()
3: Adding Scroll Animaiton to the Icons
Once the icons are in place, we can add our scroll transform effects (or animation) to each of them.
![]()
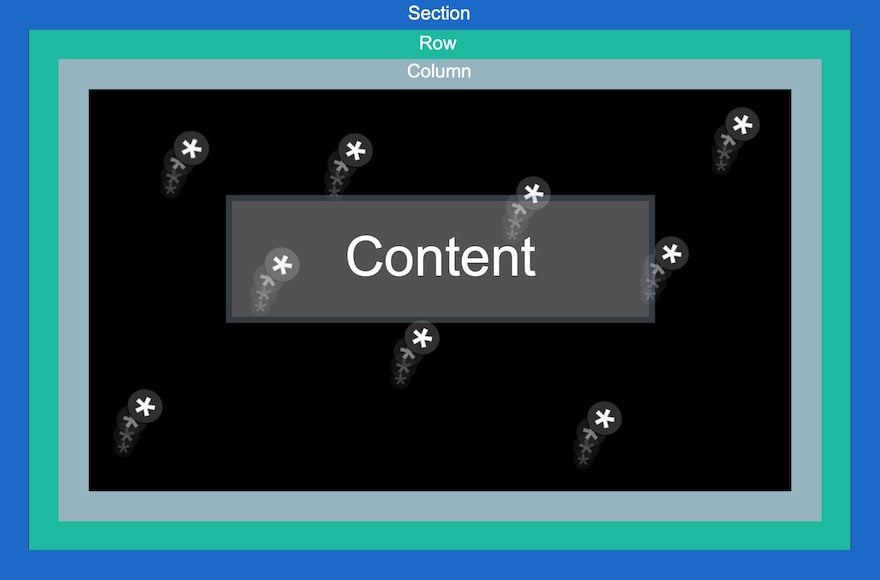
4: Adding Content to the Forefront of the Section
After the background design is complete with scroll-animated icons, we can add the content we need to the showcase at the forefront.
Now that we have an idea of what to do, let’s dive in!
Part 1: Creating the Fullscreen Canvas (Setting up the Section, Row, and Column)
Let’s begin by adding a one-column row to the regular section.
![]()

Section Settings
Open the section settings and add a background color as follows:
- Background Color: #000
![]()

Under the design tab, add a min-height of 100vh to make sure the section spans the full height of the viewport.
- Min Height: 100vh (desktop), 600px (tablet and phone)
![]()

Row Settings
Next, open the row settings and update the sizing so that it also spans the full width and height of the section/viewport.
- Use Custom Gutter Width: YES
- Gutter Width: 1
- Width: 100%
- Max Width: 100%
- Height: 100%
- Padding: 0px top, 0px bottom
![]()

Under the advanced tab, give the row an absolute position.
- Position: Absolute
![]()

Column Height
Now that our section and row are in place, it is important to give the column a min-height of 100% so that it will also span the full width and height of the section/viewport.
![]()

At this point, we have essentially created a fullscreen canvas that allows us to fill the column with icons.
Part 2: Creating and Positioning the Icons within the Column
Now we are ready to start creating and positioning the icons with the column. The idea is to strategically place the icon within this fullscreen column to build our scroll-animated icon background design.
![]()
Creating and Positioning Icon 1
We’ll start by creating our first icon and then positioning it using the Divi Builder.
Add an Icon Module to the column.
![]()

Open the Icon Settings and pick an icon from the icon picker.
![]()

Under the design tab, update the icon color and size as follows:
- Icon Color: #fff
- Icon Size: 3vw (desktop), 40px (tablet), 30px (phone)
![]()

Under the Advanced tab, update the position and offsets as follows:
- Position: Absolute
- Location: Bottom Left
- Vertical Offset: 10%
- Horizontal Offset: 10%
NOTE: Keep in mind that the percentage length unit here is relative to the bottom and left CSS Properties. In this case, a vertical offset of 10% is equivalent to “bottom: 10%” in CSS and a horizontal offset is equivalent to “left: 10%”. Because our column is fullscreen, icons will remain responsive when adjusting the browser height and width. In other words, they will keep their position on different screen sizes.
![]()

Creating and Positioning Icon 2
To create the second icon, duplicate the existing icon. Then open the settings of the duplicate icon and update the position settings as follows:
- Vertical Offset: 30%
- Horizontal Offset: 40%
![]()

Creating and Positioning Icon 3
To create the third icon, duplicate the previous icon. Then open the settings of the duplicate icon and update the position settings as follows:
- Vertical Offset: 20%
- Horizontal Offset: 30%
![]()

Creating and Positioning Icon 4
To create the fourth icon, duplicate the previous icon. Then open the settings of the duplicate icon and update the position settings as follows:
- Vertical Offset: 70%
- Horizontal Offset: 40%
![]()
Creating and Positioning Icon 5
To create the fifth icon, duplicate the previous icon. Then open the settings of the duplicate icon and update the position settings as follows:
- Vertical Offset: 60%
- Horizontal Offset: 50%
![]()
Creating and Positioning Icon 6
To create the sixth icon, duplicate the previous icon. Then open the settings of the duplicate icon and update the position settings as follows:
- Vertical Offset: 65%
- Horizontal Offset: 60%
![]()

Creating and Positioning Icon 7
To create the seventh icon, duplicate the previous icon. Then open the settings of the duplicate icon and update the position settings as follows:
- Vertical Offset: 28%
- Horizontal Offset: 70%
![]()
Creating and Positioning Icon 8
To create the eighth icon, duplicate the previous icon. Then open the settings of the duplicate icon and update the position settings as follows:
- Vertical Offset: 50%
- Horizontal Offset: 80%
![]()
Creating and Positioning Icon 9
To create the ninth and final icon, duplicate the previous icon. Then open the settings of the duplicate icon and update the position settings as follows:
- Vertical Offset: 15%
- Horizontal Offset: 90%
![]()
Part 3: Adding Scroll Animation to Icons
Once the icons have been strategically positioned, we are ready to add the scroll animations to each of the icons.
![]()
Multi-Select the Icons
For this example, we are going to add the same scroll animations to all nine of the icons. But, you can choose to give unique scroll animations to each of them individually if you choose. To add the scroll animations to all the icons at once, use multi-select (hold ctrl or cmd while selecting the icon modules) to select all the icons in the column. Then open the settings of one of the selected modules.
![]()

This will bring up the element settings modal. Under the advanced tab, open the Scroll Effects option group toggle. There you will see the Scroll Transform Effects. We will be adding all six effects available (Vertical Motion, Horizontal Motion, Fade In and Out, Scaling Up and Down, Rotating, and Blur).
Adding Scroll Transform Effects
Vertical Motion
Make sure the Vertical Motion tab is selected and update the following:
- Enable Vertical Motion: YES
- Starting Offset: 2 (at 0%)
- Ending Offset: -2 (at 100%)
For tablet display update the offsets as follows:
- Starting Offset: 1 (at 0%)
- Ending Offset: -1 (at 100%)
For phone display update the offsets as follows:
- Starting Offset: 0.5 (at 0%)
- Ending Offset: -0.5 (at 100%)
![]()

Horizontal Motion
Next, select the Horizontal Motion tab and update the following:
- Enable Horizontal Motion: YES
- Starting Offset: -1 (at 0%)
- Ending Offset: 1 (at 100%)
For tablet display, update the offsets as follows:
- Starting Offset: 0 (at 0%)
- Ending Offset: 0 (at 100%)
![]()

Fading In and Out
Next, select the Fading In and Out tab and update the following:
- Enable Fading In and Out: YES
- Mid Opacity: 50% (at 50%)
![]()

Scaling Up and Down
Next, select the Scaling Up and Down tab and update the following:
- Enable Scaling Up and Down: YES
- Starting Scale: 0% (at 0%)
- Mid Scale: 50% (at 50%)
![]()

Rotating
Next, select the Rotating tab and update the following:
- Enable Rotating: YES
- Starting Rotation: 0% (at 0%)
- Mid Rotation: 90% (at 50%)
- Ending Rotation: 180% (at 100%)
![]()

Blur
Next, select the Blur tab and enable the blur effect:
- Enable Blur: YES
![]()

Preview
Here is a quick look at the scroll-animated icons in action.
Part 4: Adding Content to the Forefront of the Section
Now that we have our scroll-animated icons for our background, we are ready to add the content we want to display in the forefront. The idea is to keep the row (with the column and icons) behind any additional row(s) of content we want to be displayed in front of that background.
In this example, we are going to add a one-column row with a simple heading.
First, add a new one-column row directly under the existing row.
![]()

The existing row has an absolute position so adding another one will place the row at the top of the section as expected.
Inside the new row, add a text module.
![]()

Open the text settings and add the following HTML inside the body content:
<h1>Divi</h1>
![]()

Under the design tab, update the heading text styles as follows:
- Heading Font: Poppins
- Heading Text Alignment: Center
- Heading Text Size: 8vw (desktop), 40px (tablet and phone)
![]()

Row Position
In order to make sure the row (and heading) are positioned in the center of the section, open the row settings and update the position as follows:
- Position: Absolute
- Location: Center
![]()

Finishing Touches: Section Background Image and Overflow
To finish off the design, open the section settings and add a background image. For this example, I’m using an image from our Artificial Intelligence Layout Pack.
![]()

Under the advanced tab, make sure the overflow is hidden by updating the visibility options:
- Horizontal Overflow: Hidden
- Vertical Overflow: Hidden
This will make sure the vertical scroll bar doesn’t show up when an icon is animated outside the section.
![]()

Final Result
Now let’s take a look at the final result on desktop and tablet.
Additional Design Example (Included in FREE download)
I couldn’t help but get a little more creative with this design. So, I added an additional design example that uses animated icons to highlight the heading. It is included in the free download at the beginning of the article.
Here is the preview.
Final Thoughts
Sometimes it is fun to get creative and showcase just how powerful (and fun) Divi can be as a visual page builder. I think this tutorial has helped highlight just how effective Divi can be at making website background sections come to life. The fact that you can add scroll transform effects to hundreds of different icons opens the door for all kinds of creative designs and animations. Hopefully, this gives you a boost of inspiration to use scroll-animated icons in even more creative ways.
I look forward to hearing from you in the comments.
Cheers!
.inline-code{padding: 0px 4px; color: crimson; font-family: Monaco,consolas,bitstream vera sans mono,courier new,Courier,monospace!important} video.with-border {border-radius: 8px;box-shadow: 0 8px 60px 0 rgba(103,151,255,.11), 0 12px 90px 0 rgba(103,151,255,.11);display:block;margin: 0 auto;}
The post How to Add Scroll-Animated Icons to Section Backgrounds in Divi appeared first on Elegant Themes Blog.