

Designing a WooCommerce Checkout Page usually involves advanced customization to the PHP template file in the backend and a good bit of custom CSS. But with Divi’s Woo Modules, this process has become easy and enjoyable! When you edit a WC Checkout Page using Divi, that WC shortcode will transform into a structured layout of dynamic Woo Checkout Modules that are ready to be designed visually using powerful built-in design options. This gives you full control over the design of the checkout page.
In this tutorial, we will be showing you how to create a completely custom WooCommerce Checkout Page from scratch with Divi. First, we’ll design the WooCommerce Checkout Page using the dynamic Woo Modules available for the checkout page. Once done, we’ll show you how to add the checkout page design to a checkout page template in the Theme Builder. So, whether you want to customize the actual Checkout Page or create a Checkout Page Template, Divi has you covered. You’ll be on your way to designing stunning checkout pages in no time.
Let’s get started!
Sneak Peek
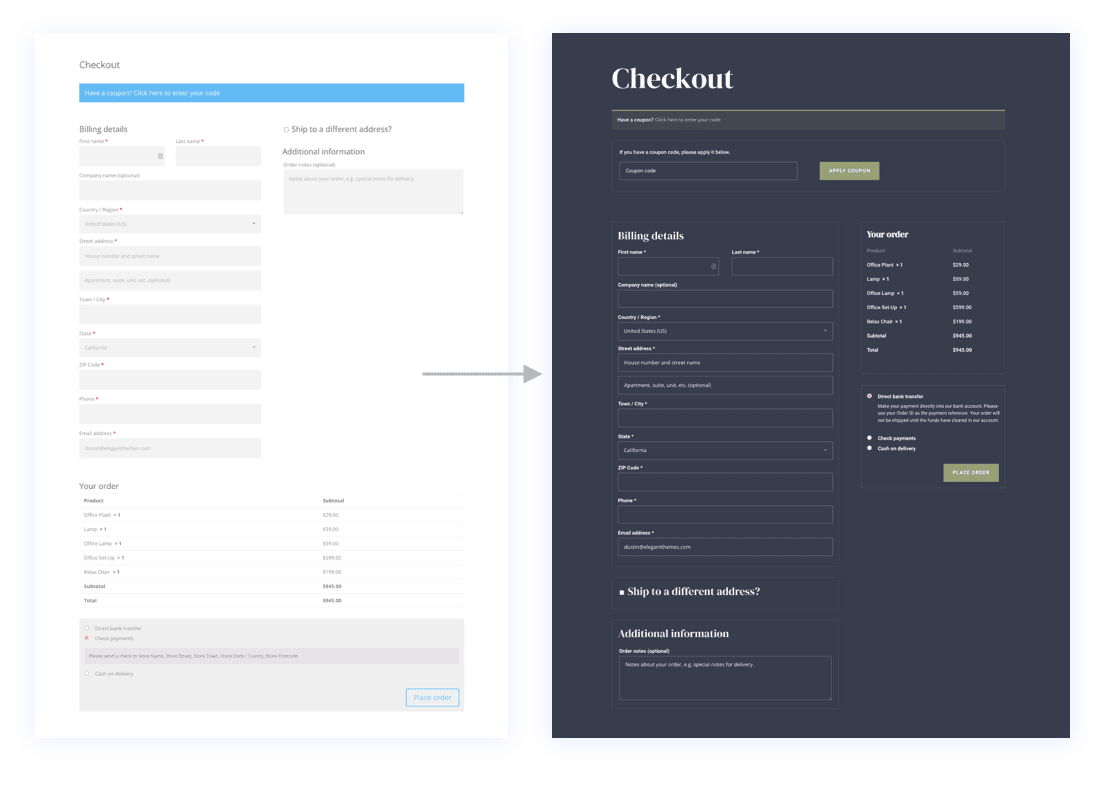
The Before and After
Here is a quick look at Divi’s default Checkout page compared to the new Checkout page we’ll design in this tutorial.

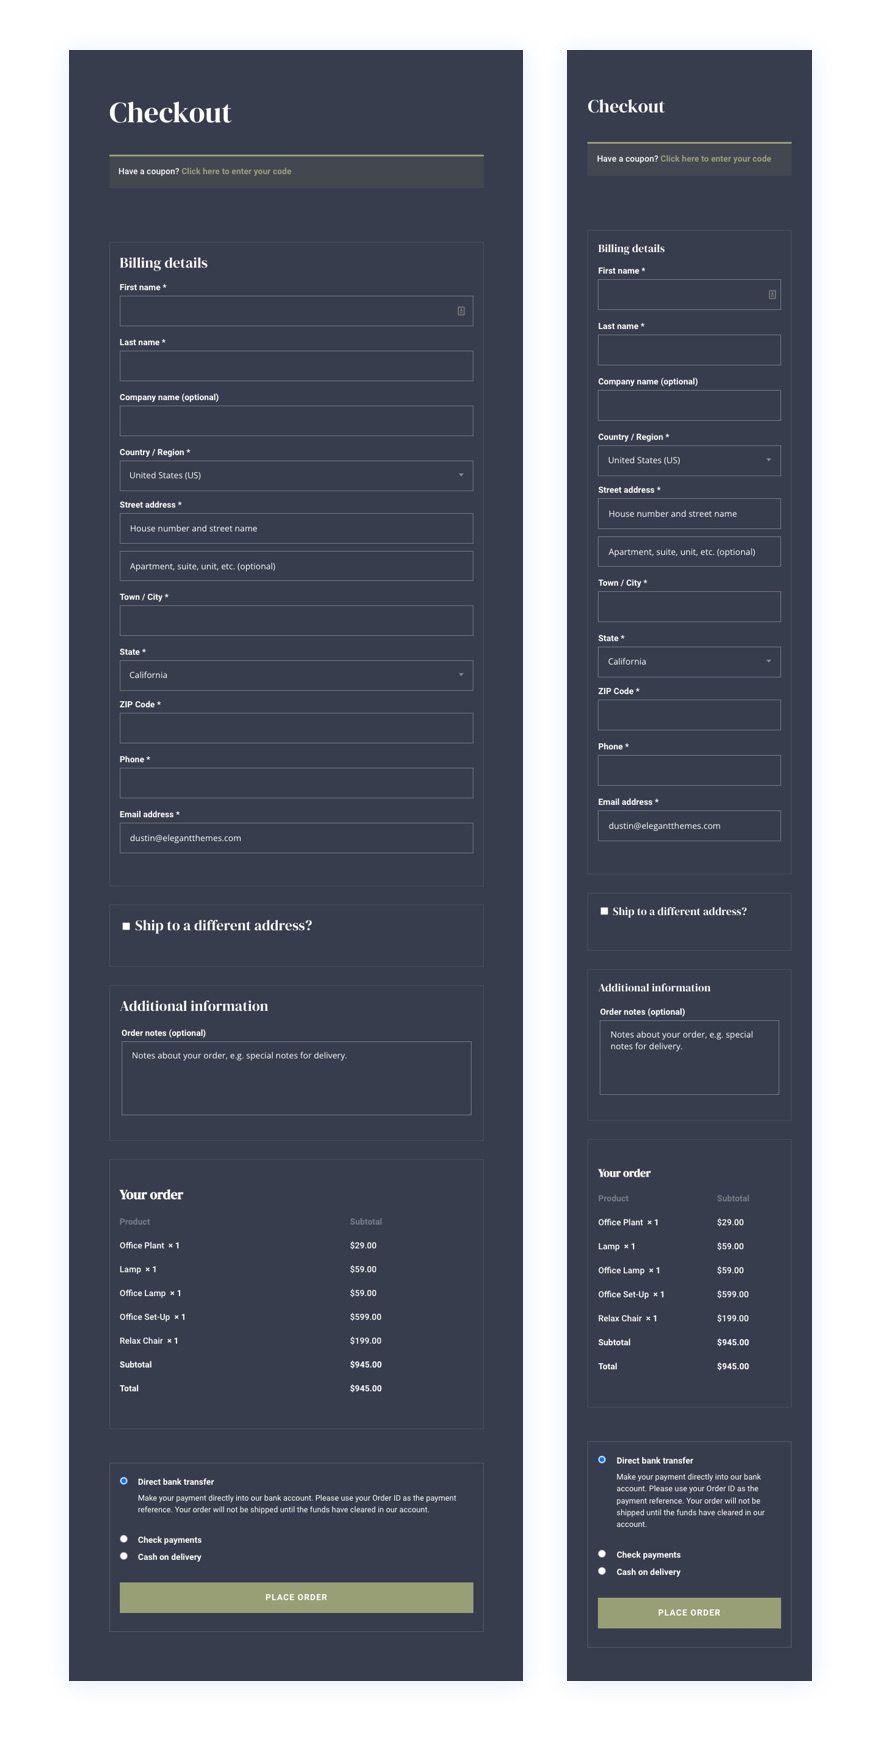
And here is a closer look at the Checkout page design on desktop and mobile.


You can also check out the live demo of this checkout page design.
Download the Checkout Page Layout for FREE
To lay your hands on the Checkout page template design from this tutorial, you will first need to download it using the button below. To gain access to the download you will need to subscribe to our Divi Daily email list by using the form below. As a new subscriber, you will receive even more Divi goodness and a free Divi Layout pack every Monday! If you’re already on the list, simply enter your email address below and click download. You will not be “resubscribed” or receive extra emails.
@media only screen and ( max-width: 767px ) {.et_bloom .et_bloom_optin_1 .carrot_edge.et_bloom_form_right .et_bloom_form_content:before { border-top-color: #ffffff !important; border-left-color: transparent !important; }.et_bloom .et_bloom_optin_1 .carrot_edge.et_bloom_form_left .et_bloom_form_content:after { border-bottom-color: #ffffff !important; border-left-color: transparent !important; }
}.et_bloom .et_bloom_optin_1 .et_bloom_form_content button { background-color: #f92c8b !important; } .et_bloom .et_bloom_optin_1 .et_bloom_form_content .et_bloom_fields i { color: #f92c8b !important; } .et_bloom .et_bloom_optin_1 .et_bloom_form_content .et_bloom_custom_field_radio i:before { background: #f92c8b !important; } .et_bloom .et_bloom_optin_1 .et_bloom_border_solid { border-color: #f7f9fb !important } .et_bloom .et_bloom_optin_1 .et_bloom_form_content button { background-color: #f92c8b !important; } .et_bloom .et_bloom_optin_1 .et_bloom_form_container h2, .et_bloom .et_bloom_optin_1 .et_bloom_form_container h2 span, .et_bloom .et_bloom_optin_1 .et_bloom_form_container h2 strong { font-family: “Open Sans”, Helvetica, Arial, Lucida, sans-serif; }.et_bloom .et_bloom_optin_1 .et_bloom_form_container p, .et_bloom .et_bloom_optin_1 .et_bloom_form_container p span, .et_bloom .et_bloom_optin_1 .et_bloom_form_container p strong, .et_bloom .et_bloom_optin_1 .et_bloom_form_container form input, .et_bloom .et_bloom_optin_1 .et_bloom_form_container form button span { font-family: “Open Sans”, Helvetica, Arial, Lucida, sans-serif; } p.et_bloom_popup_input { padding-bottom: 0 !important;}


Download For Free
Join the Divi Newsletter and we will email you a copy of the ultimate Divi Landing Page Layout Pack, plus tons of other amazing and free Divi resources, tips and tricks. Follow along and you will be a Divi master in no time. If you are already subscribed simply type in your email address below and click download to access the layout pack.
You have successfully subscribed. Please check your email address to confirm your subscription and get access to free weekly Divi layout packs!
To import the section layout to your Divi Library, navigate to the Divi Library.
Click the Import button.
In the portability popup, select the import tab and choose the download file from your computer.
Then click the import button.


Once done, the section layout will be available in the Divi Builder.
Download the Cart & Checkout Page Template Sets for Divi
This Checkout Page design is also available for download as a part of our FREE cart & checkout page template sets for Divi.
Let’s get to the tutorial, shall we?
About the WooCommerce Checkout Page and Divi
Whenever you install WooCommerce on your Divi site, WooCommerce (WC) will generate key WC pages including a shop page, a cart page, a checkout page, and an account page. The content of the page is deployed through the use of a shortcode on the backend WordPress block editor.


If you activate the Divi Builder on this Checkout page, each of the content elements of the WooCommerce Checkout page will be loaded as Divi Woo Modules that can be used to style the page.

Woo Modules for Designing a Checkout Page in Divi
Divi comes with a variety of modules that are key to adding dynamic content to a page template. Some of these include Woo Modules specific to the Checkout page.
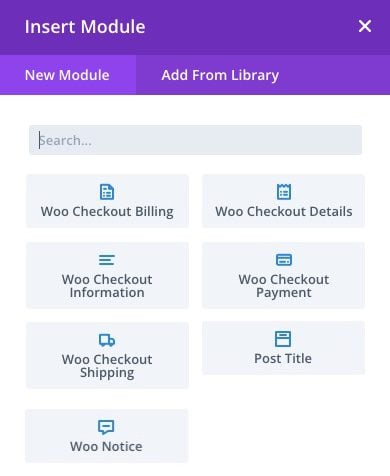

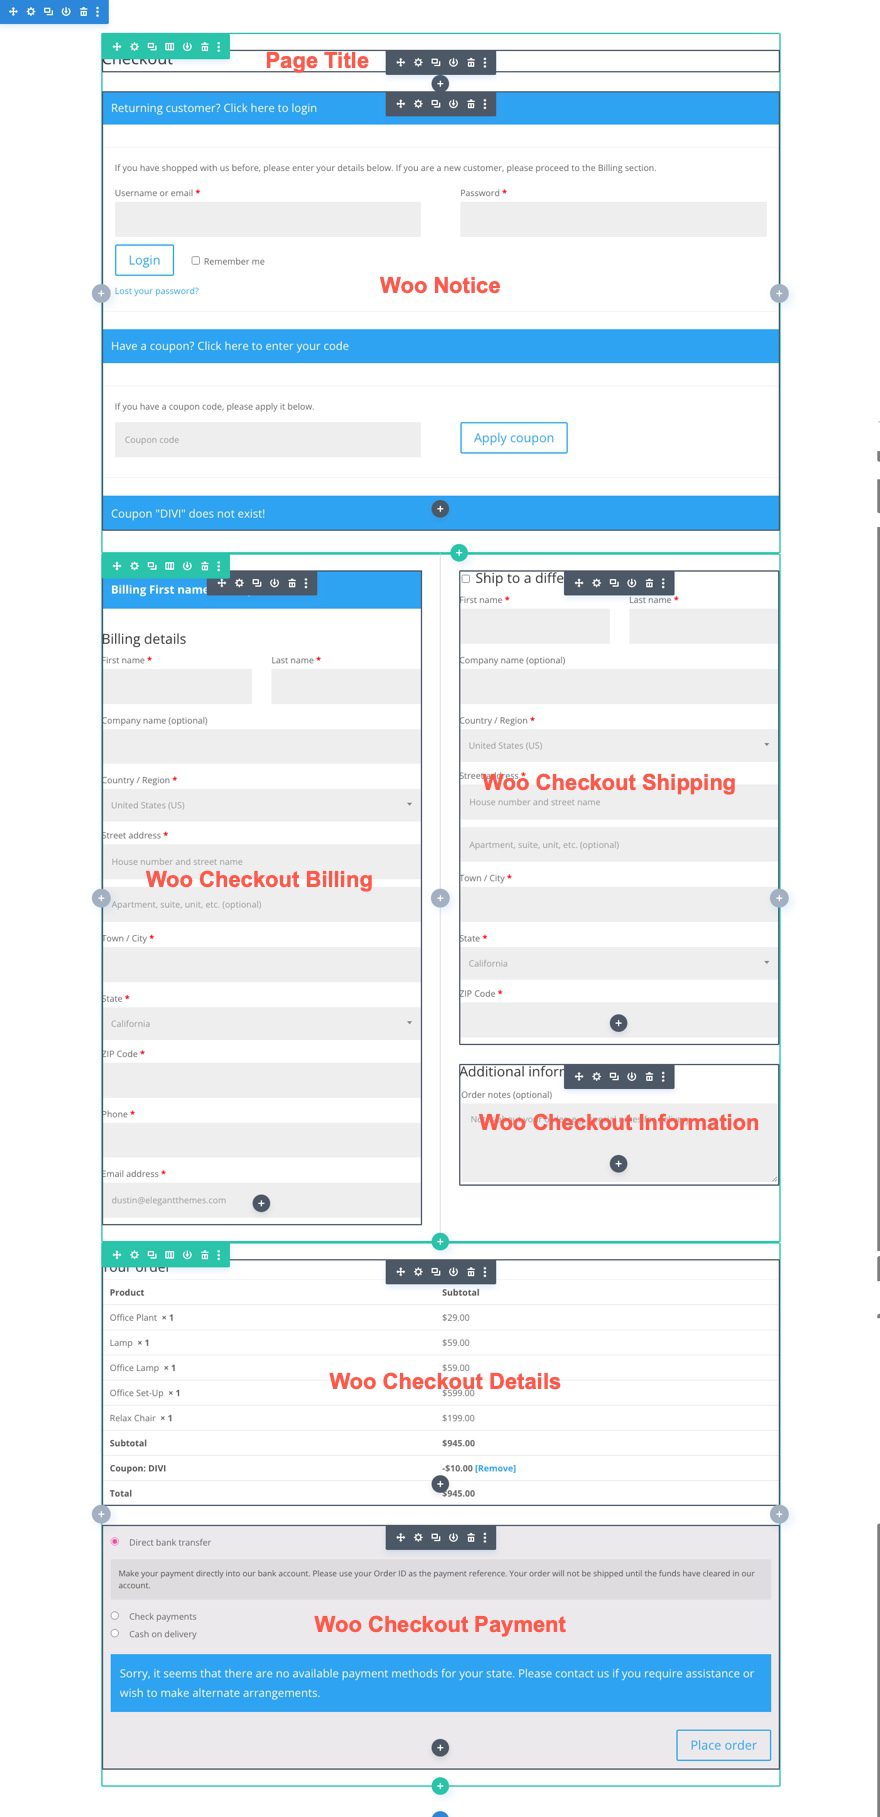
The Modules that are key to building the Checkout page or template include:
- Post Title – This will display the title of the Checkout page dynamically when building a Checkout page template.
- Woo Notice – This module can be set to different page types (cart page, product page, checkout page). It will display important notifications to the user dynamically as needed.
- Woo Checkout Billing – This module displays the billing details form used during checkout.
- Woo Checkout Shipping – This module displays the shipping details form used during checkout.
- Woo Checkout Information – This module displays the additional information form used during checkout.
- Woo Checkout Details – This module displays order details, including the products being purchased and their prices, during checkout.
- Woo Checkout Payment – This module displays the payment type selection and payment form details during checkout.
Another optional woo module:
- Woo Breadcrumbs – This will display the WooCommerce Breadcrumb navigation bar.
Design a Checkout Page or Template
As mentioned, we can easily use the Divi Woo Modules to design a custom WooCommerce Checkout page. However, you can also choose to build a custom Checkout template as well using the same design process. For this tutorial, we are going to build a custom Checkout page layout for the checkout page. Then we’ll show you how to use the custom checkout page layout to create a Checkout Page Template using the Divi Theme Builder.
Designing a WooCommerce Checkout Page Layout with Divi
For this WooCommerce Checkout Page tutorial, the goal is to create a custom page layout for the WooCommerce Checkout Page that is designated as the WooCommerce Checkout Page in WooCommerce. At the end of the tutorial, we’ll show you how to easily save and import this checkout page layout to create a new Checkout Page Template using the Theme Builder.
Gettings Started: Editing the WooCommerce Checkout Page
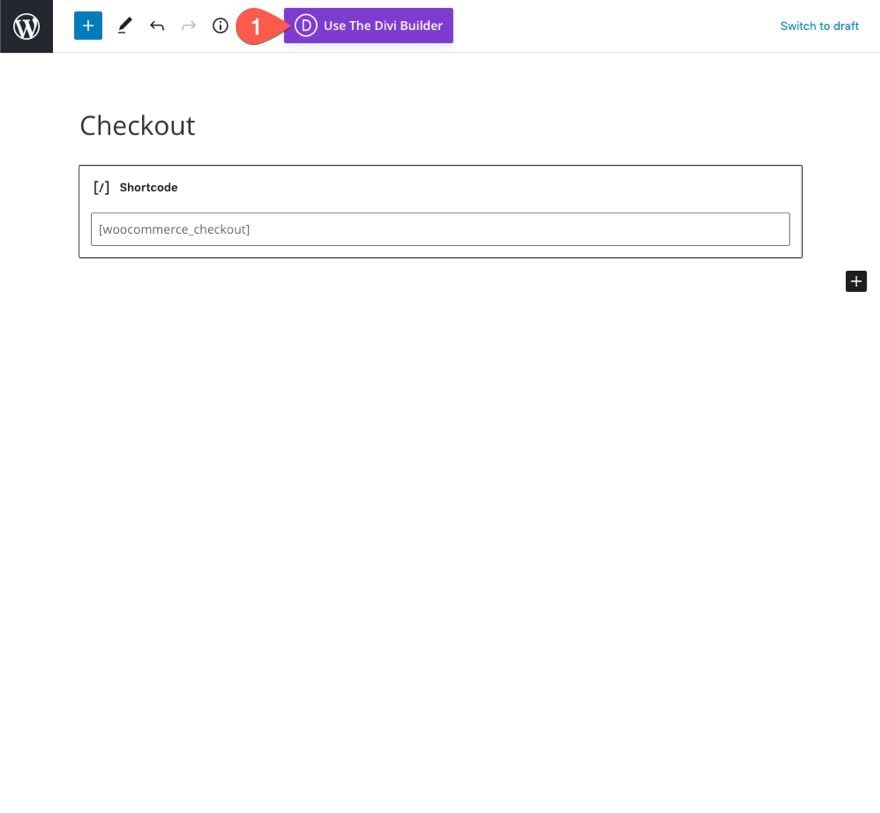
From the WordPress Dashboard, click to edit the WooCommerce Checkout Page. By default, the page will only contain the shortcode used to generate the checkout page content.
Click the Use The Divi Builder button at the top of the page editor.

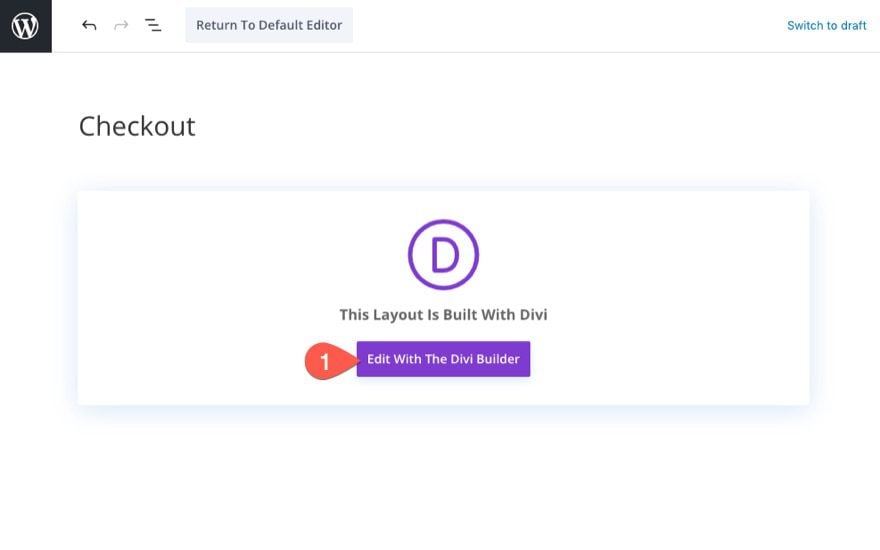
Then click the Edit With The Divi Builder button to launch the Divi Builder.

Clearing the Layout to Start From Scratch
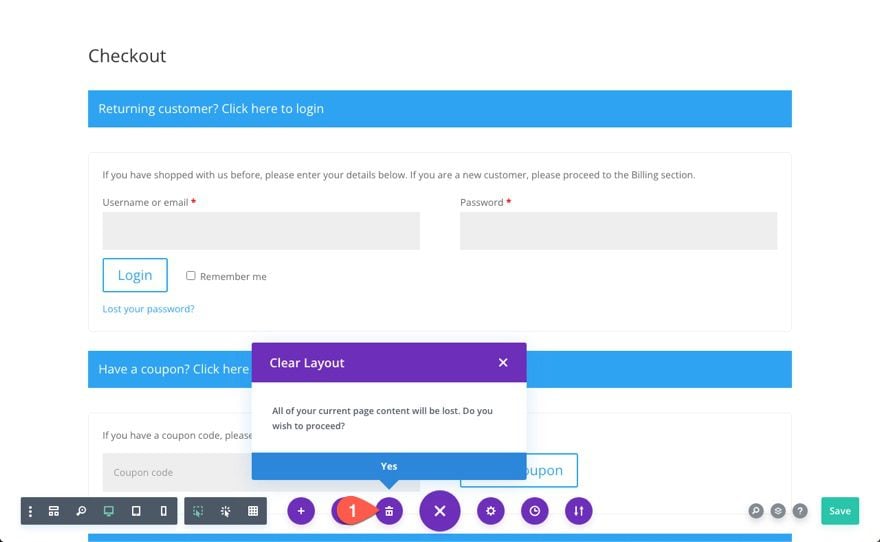
As previously mentioned, the page will load with all the customizable Divi Modules (including the key Woo Modules) that make up the content of the Checkout Page. You can use the existing layout and start customizing the modules that are already there if you want. But for this tutorial, we are going to start from scratch.
To clear the layout, open the settings menu at the bottom of the page and click that Clear Layout button (the garbage can icon) and select YES.

Creating a Section, Row, and Column
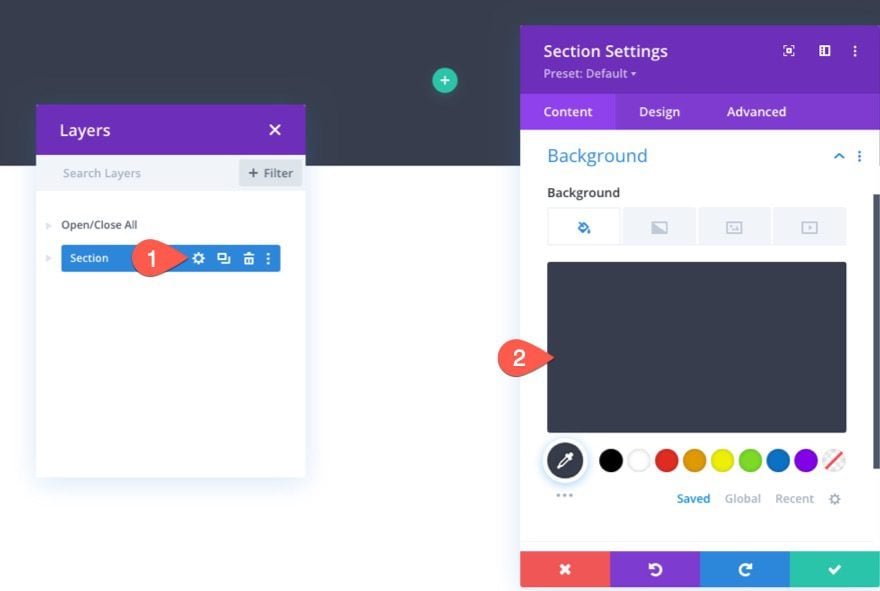
Section Background
To get started, add a background color to a new regular section as follows:
- Background Color: #f7f3f0

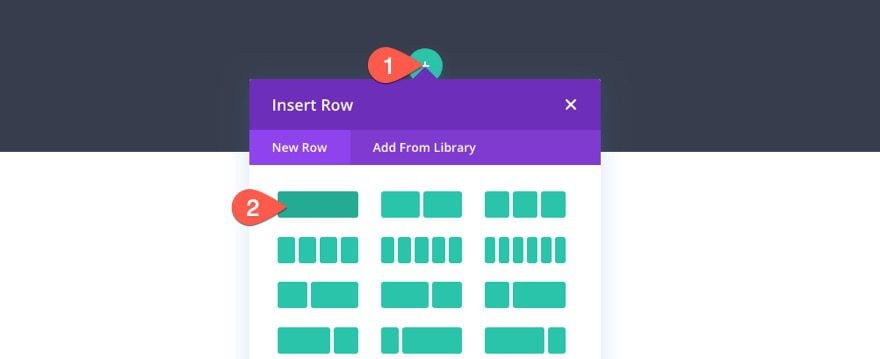
Row and Column
Next, add a one-column row to the section

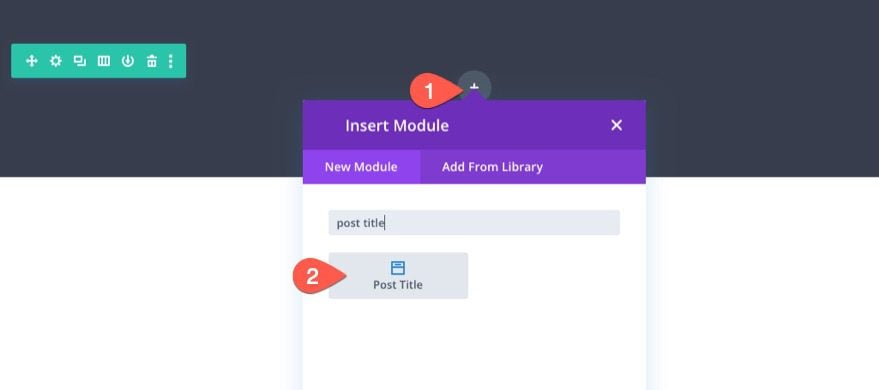
Creating the Dynamic Checkout Page Title
To create the dynamic page title needed for the checkout page, add a post title module to the column.

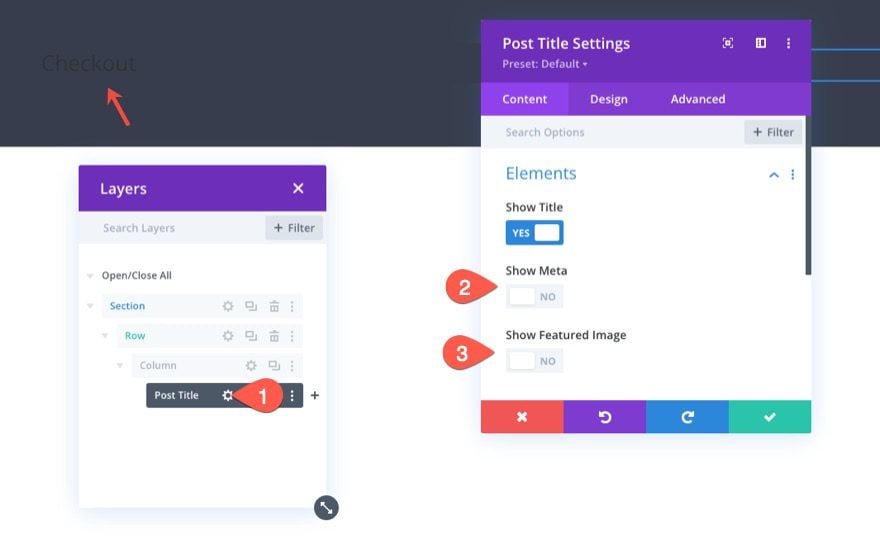
Post Title Content
In the post title settings, update the elements to show only the title as follows:
- Show Title: YES
- Show Meta: NO
- Show Featured Image: NO

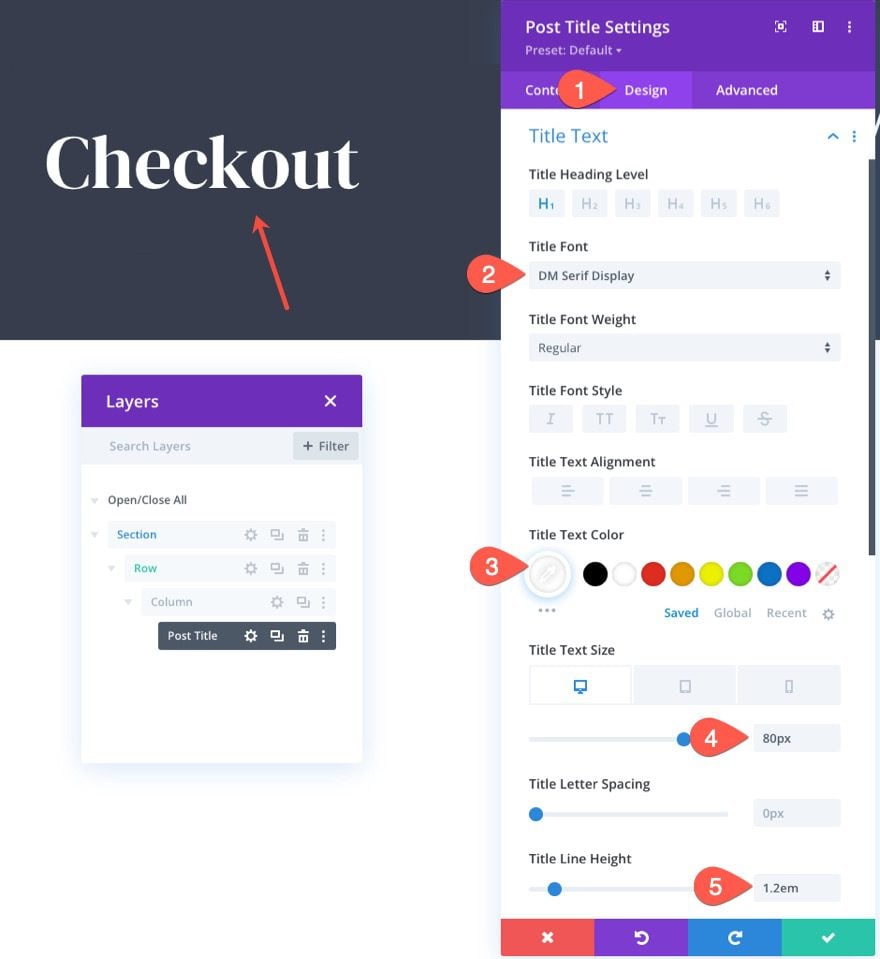
Post Title Text
To style the post title text, update the following under the design tab:
- Title Font: DM Serif Display
- Title Text Color: #fff
- Title Text Size: 80px (desktop), 60px (tablet), 42px (phone)
- Title Line Height: 1.2em

Designing the Dynamic Woo Notice Module for the Checkout Page
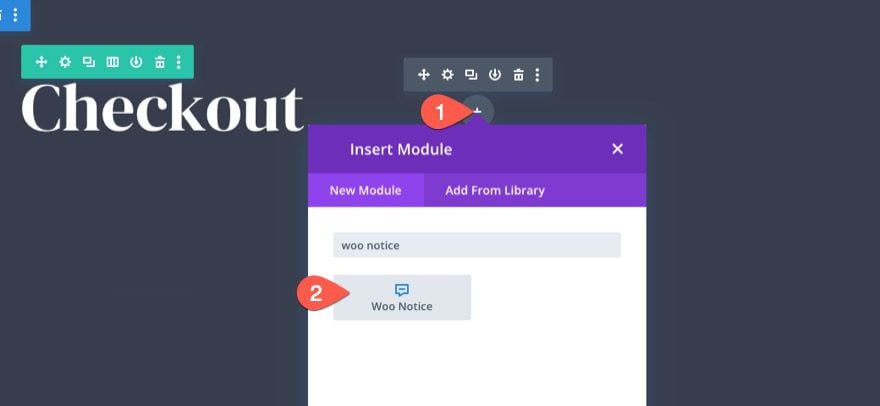
It is always a good idea to add the Woo Notice module at the top of the page so that the notices will be most visible to users when interacting with the checkout page. Keep in mind that we are designing notices that will be displayed only when needed.
To add the Woo Notice Module, click to add a new Woo Notice module under the post title module.

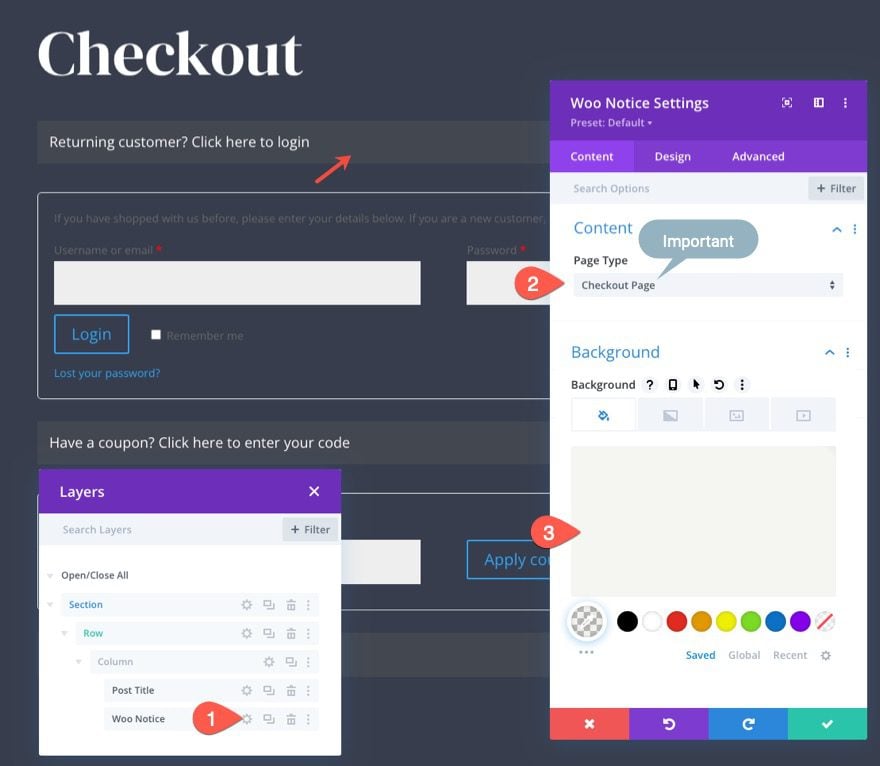
Woo Notice Page Type and Background
Next, update the Page Type and Background color of the Woo Notice as follows:
- Page Type: Checkout Page
- Background Color: rgba(153,158,117,0.1)
IMPORTANT: Make sure to select the Checkout Page as the Page Type so that the woo notices will work properly.

Woo Notice Title Text
Under the design tab, update the title text style as follows:
- Title Font: Roboto
- Title Font Weight: Medium
- Title Text Color: #fff
- Title Text Size: 14px
- Title Line Height: 1.8em
Then select the link tab and update the title link text color:
- Link Text Color: #999e75


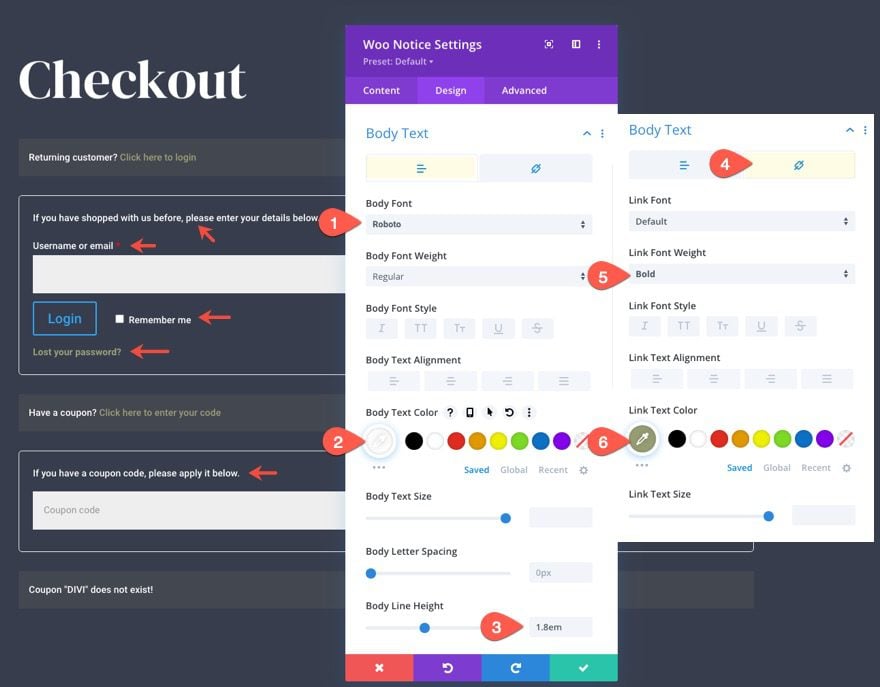
Woo Notice Body Text
After the title text, update the body text as follows:
- Body Font: Roboto
- Body Text Color: #fff
- Body Line Height: 1.8em
Then select the link tab and update the link text:
- Link Font Weight: Bold
- Link Text Color: #999e75

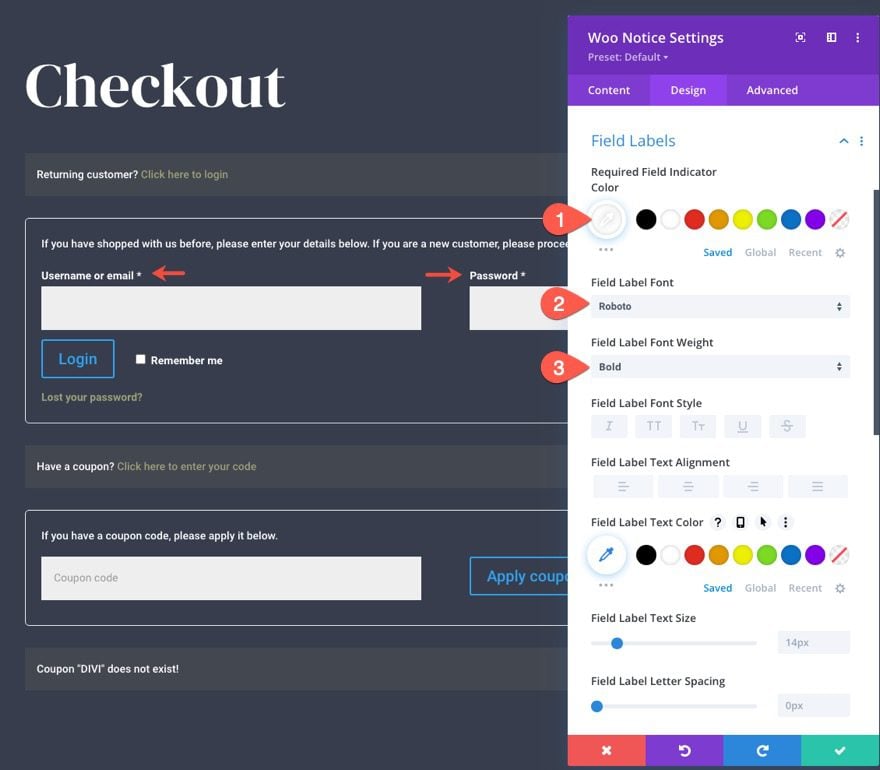
Woo Notice Field Labels
The Checkout Page Notices include fields and field labels for things like a login form and a coupon code. To edit the style of the field labels for these fields, update the following:
- Required Field Indicator Color: #fff
- Field Label Font: Roboto
- Field Label Font Weight: Bold

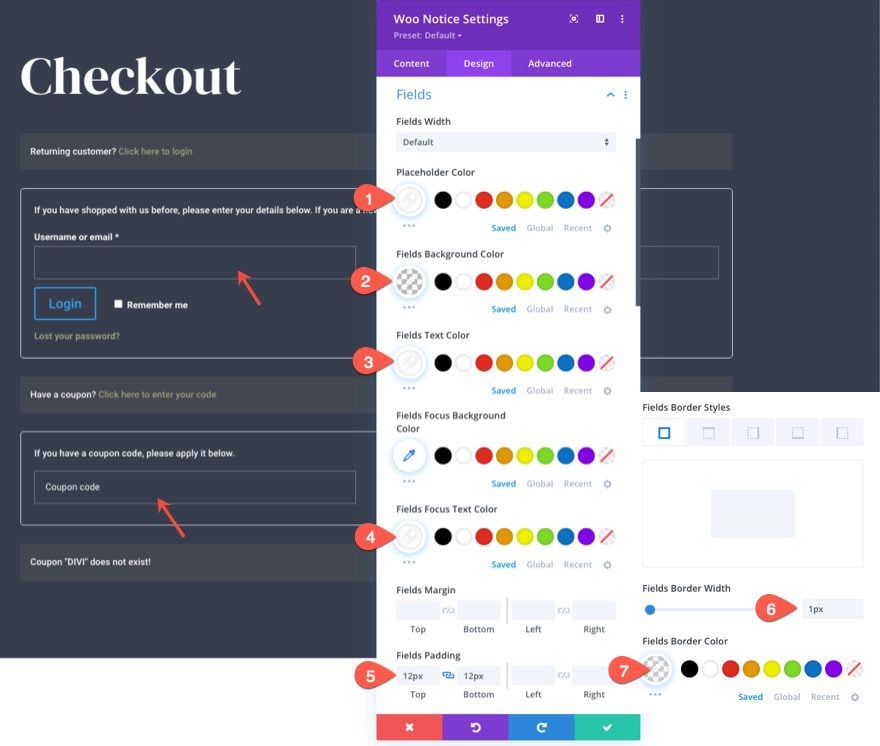
Woo Notice Fields
Next, update the fields style options as follows:
- Placeholder Color: #fff
- Fields Background Color: transparent
- Fields Text Color: #fff
- Fields Focus Text Color: #fff
- Fields Padding: 12px top, 12px bottom
- Fields Border Width: 1px
- Fields Border Color: rgba(255,255,255,0.32)

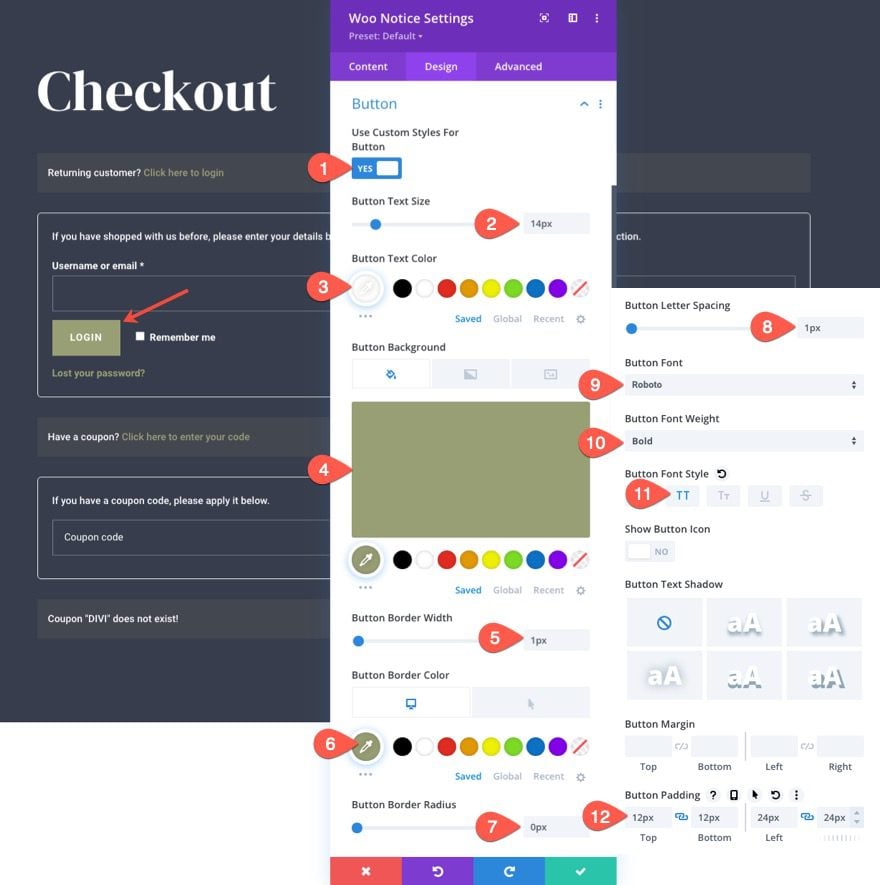
Woo Notice Button
- Use Custom Styles for Button: YES
- Button Text Size: 14px
- Button Text Color: #fff
- Button Background Color: #999e75
- Button Border Width: 1px
- Button Border Color: #999e75
- Button Border Radius: 0px
- Button Letter Spacing: 1px
- Button Font: Roboto
- Button Font Weight: Bold
- Button Font Style: TT
- Button Padding: 12px top, 12px bottom, 24px left, 24px right

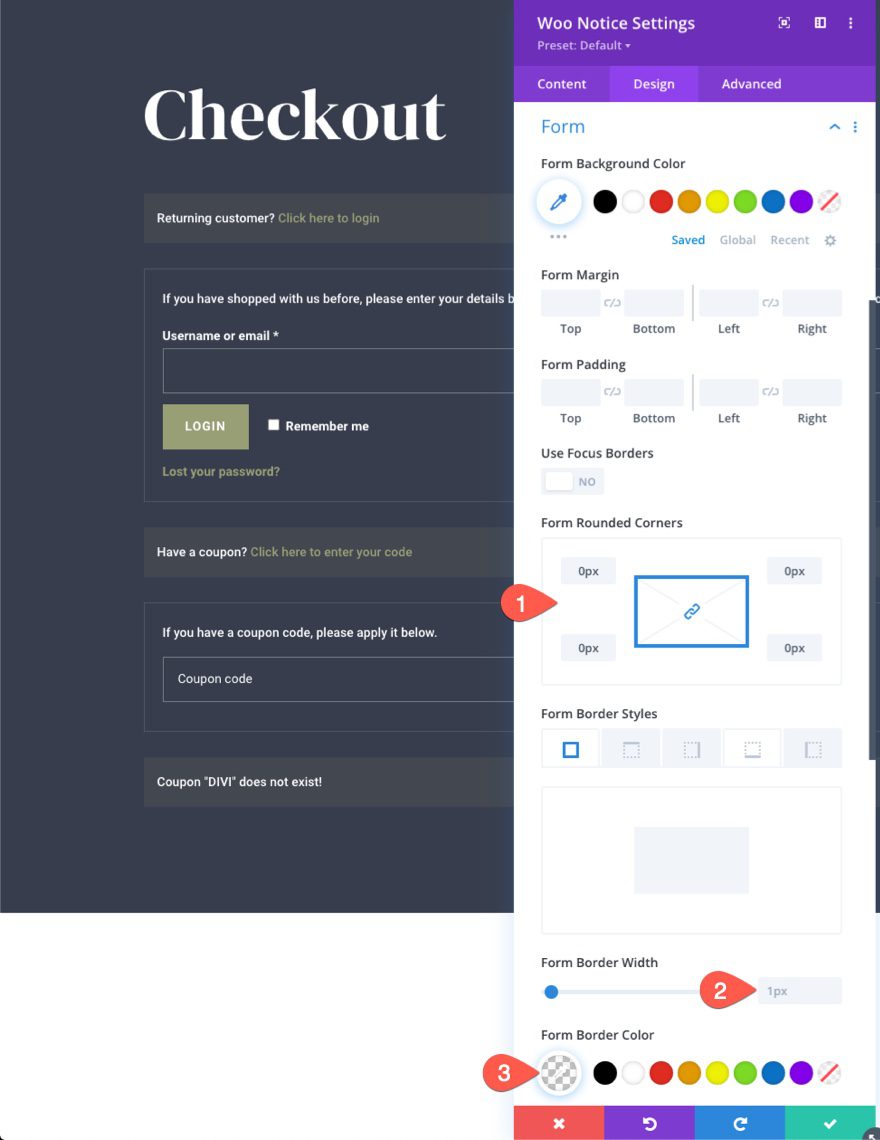
Woo Notice Form
Each of the notice forms can be styled under the Form option group. To give the forms a light border, update the following:
- Form Rounded Corners: 0px
- Form Border Width: 1px
- Form Border Color: rgba(255,255,255,0.32)

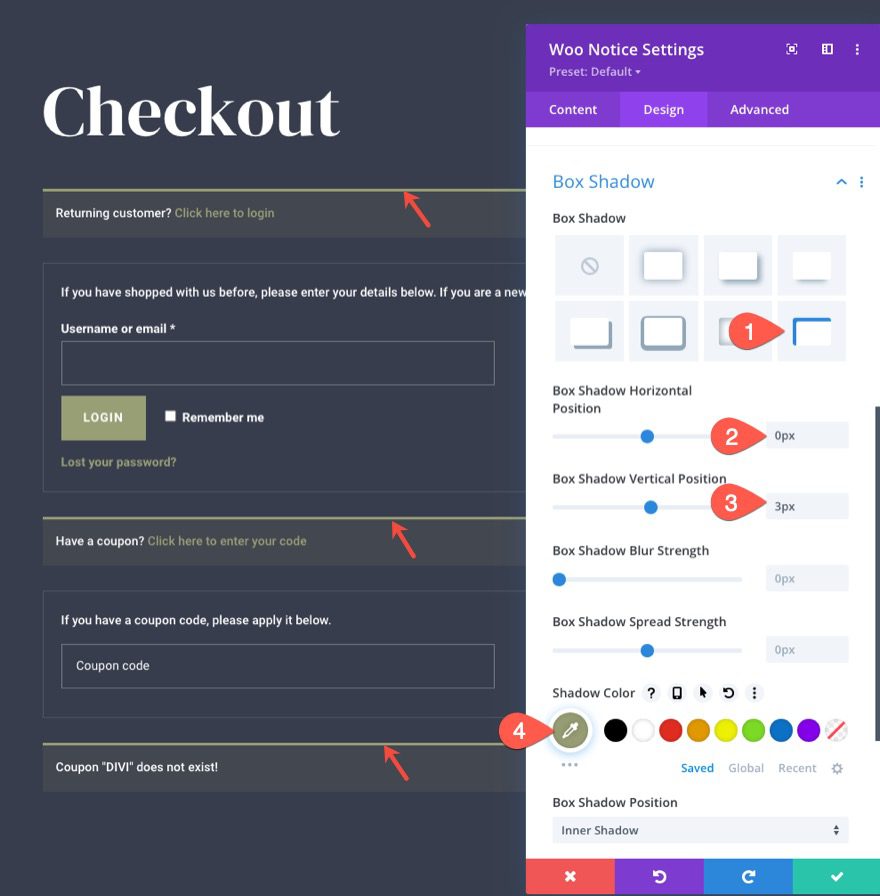
Woo Notice Box Shadow
To give the woo notice bar a top border-like design, update the box-shadow options as follows:
- Box Shadow: see screenshot
- Box Shadow Horizontal Position: 0px
- Box Shadow Vertical Position: 3px
- Shadow Color: #999e75

Designing the Woo Checkout Billing Module
Now that our page title and notices are in place, we are ready to add the Woo Checkout Billing content, another key element to the checkout page.
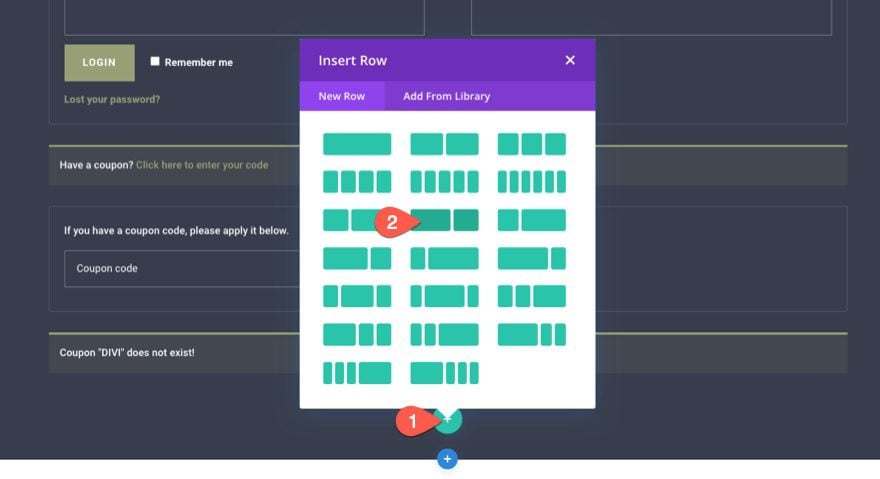
Before we add the billing content, create a new row with a three-fifths two-fifths column structure.

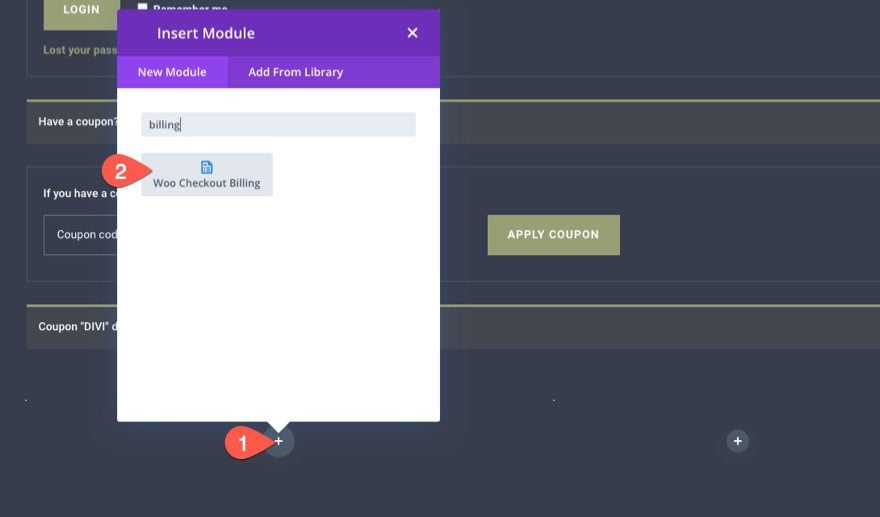
In column 1, add a Woo Checkout Billing module.

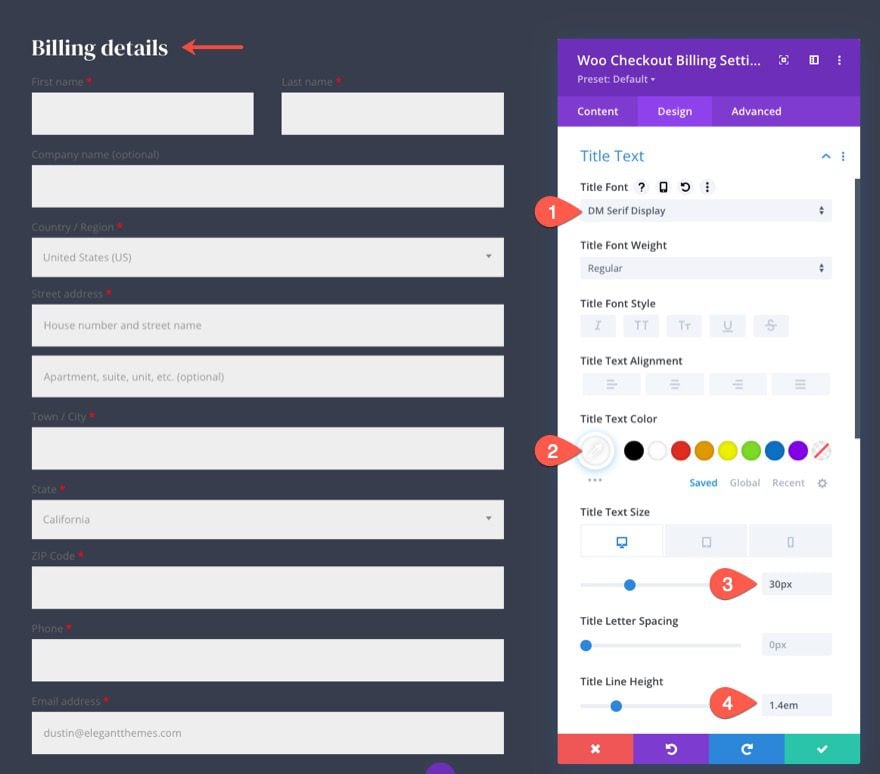
Woo Checkout Billing Title Text
We can target the title text by customizing the title text options.
Open the Woo Checkout Billing settings modal and, under the design tab, update the following:
- Title Font: DM Serif Display
- Title Text Color: #fff
- Title Text Size: 30px (desktop), 24px (tablet), 18px (phone)
- Title Line Height: 1.4em

Woo Checkout Billing Field and Field Labels
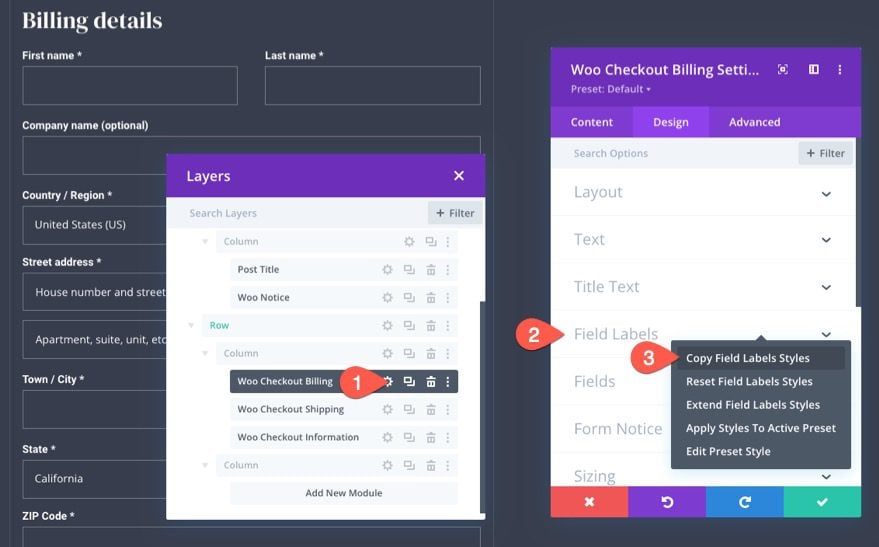
Just like the Notice Module, this module also has options to style the field and field labels. Since we want all of our field and field labels to match throughout the page, we can copy the field and field label styles from the Notice module already created and paste those styles to the Woo Checkout Billing module.
Here’s how to do it:
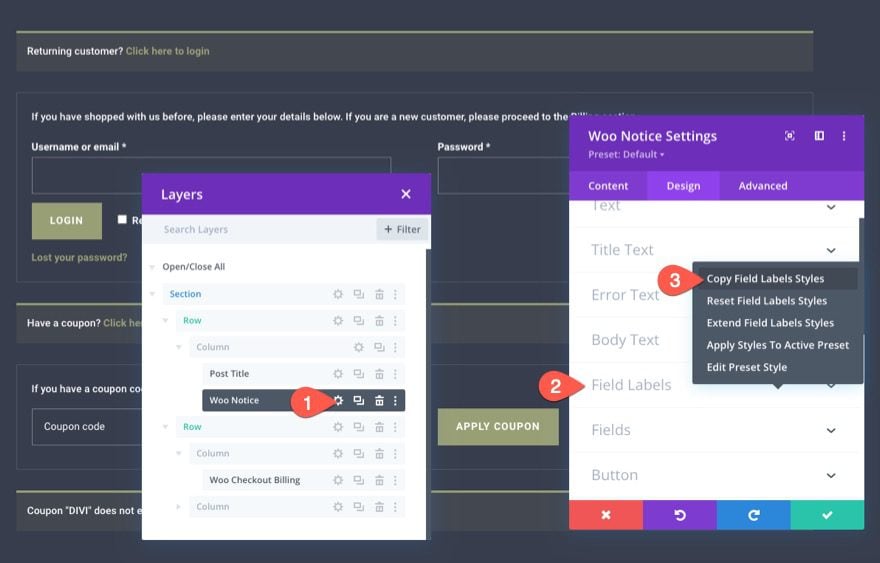
- Open the settings of the Notice Module at the top of the page.
- Right-click on the Field Labels option group under the design tab.
- Select “Copy Field Labels Styles” from the right-click menu.

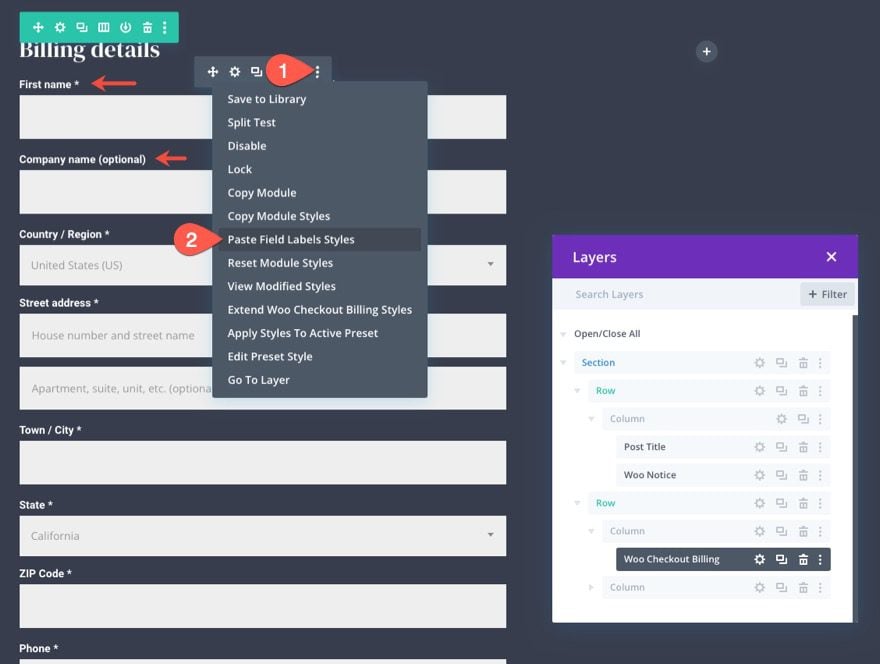
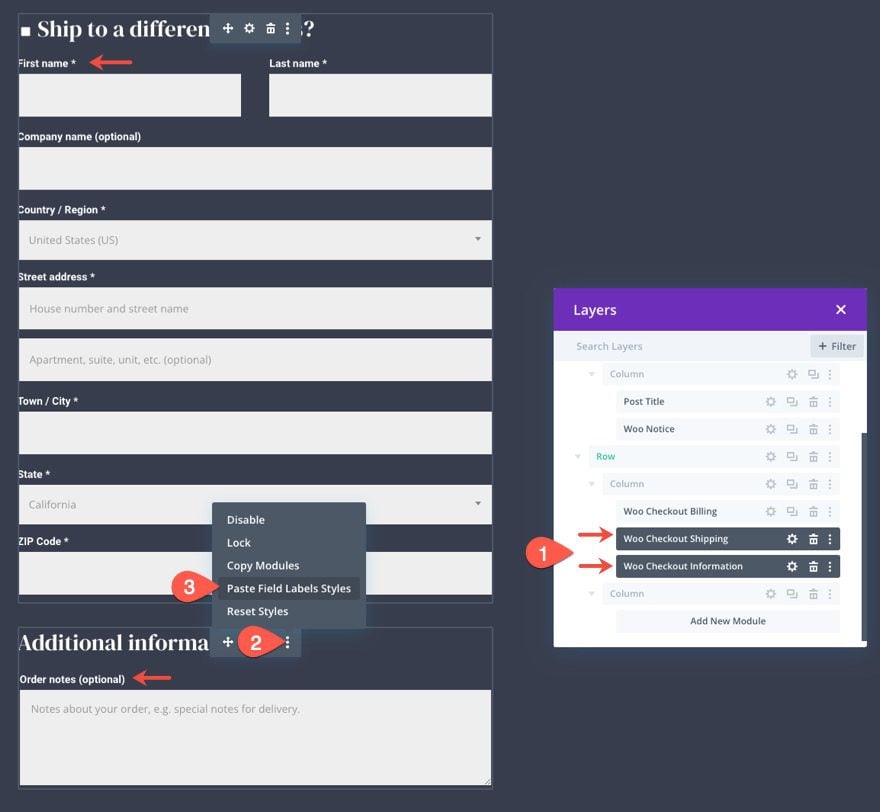
With the style now copied, open the more settings menu in the top menu bar of the Woo Checkout Billing module. Then select “Paste Field Labels Styles” from the menu.

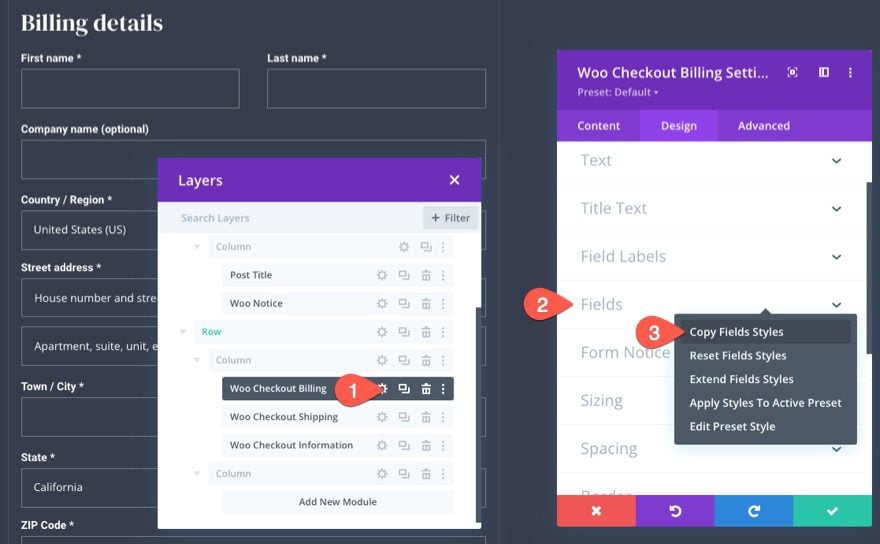
We can repeat the same process to copy over the field styles as well.
Here’s how to do it:
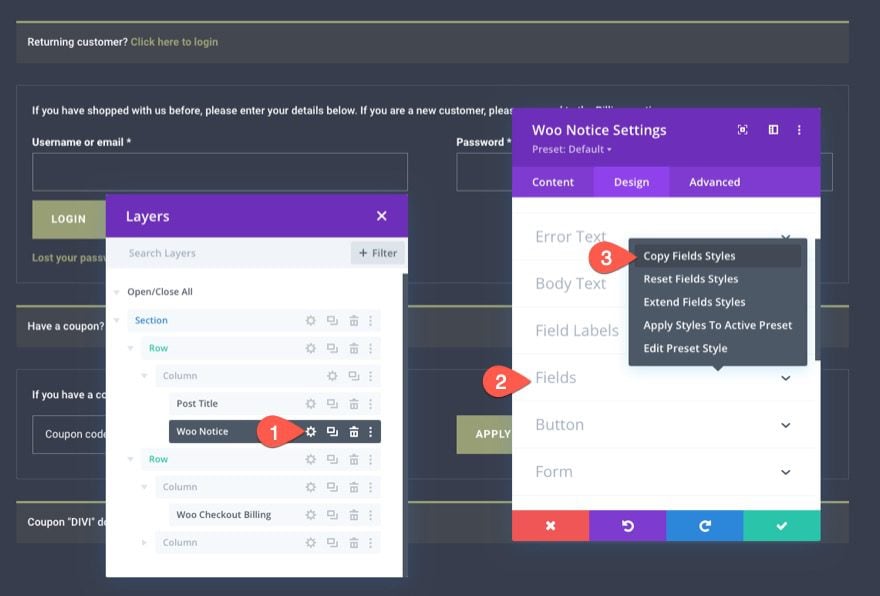
- Open the settings of the Notice Module at the top of the page.
- Right-click on the Field option group under the design tab.
- Select “Copy Field Styles” from the right-click menu.

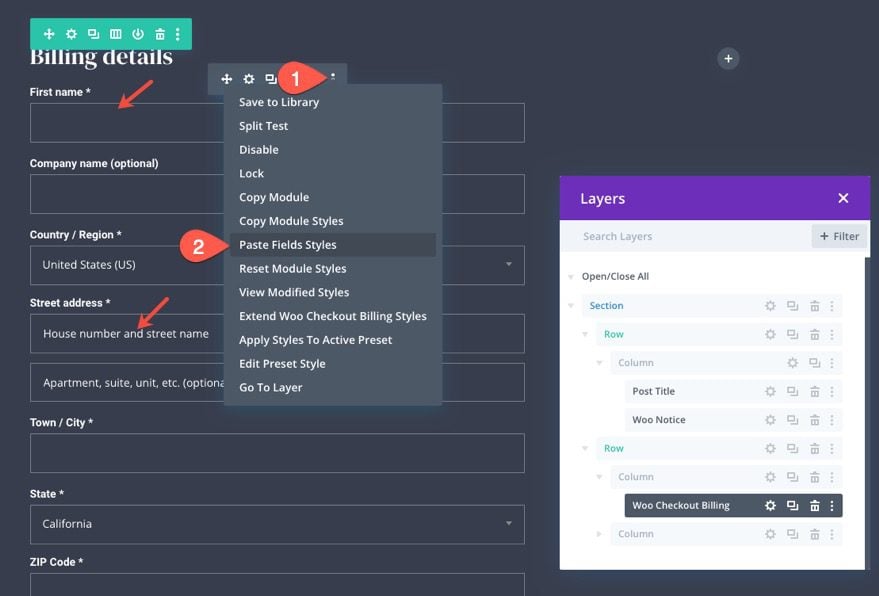
With the style now copied, open the more settings menu in the top menu bar of the Woo Checkout Billing module. Then select “Paste Field Styles” from the menu.

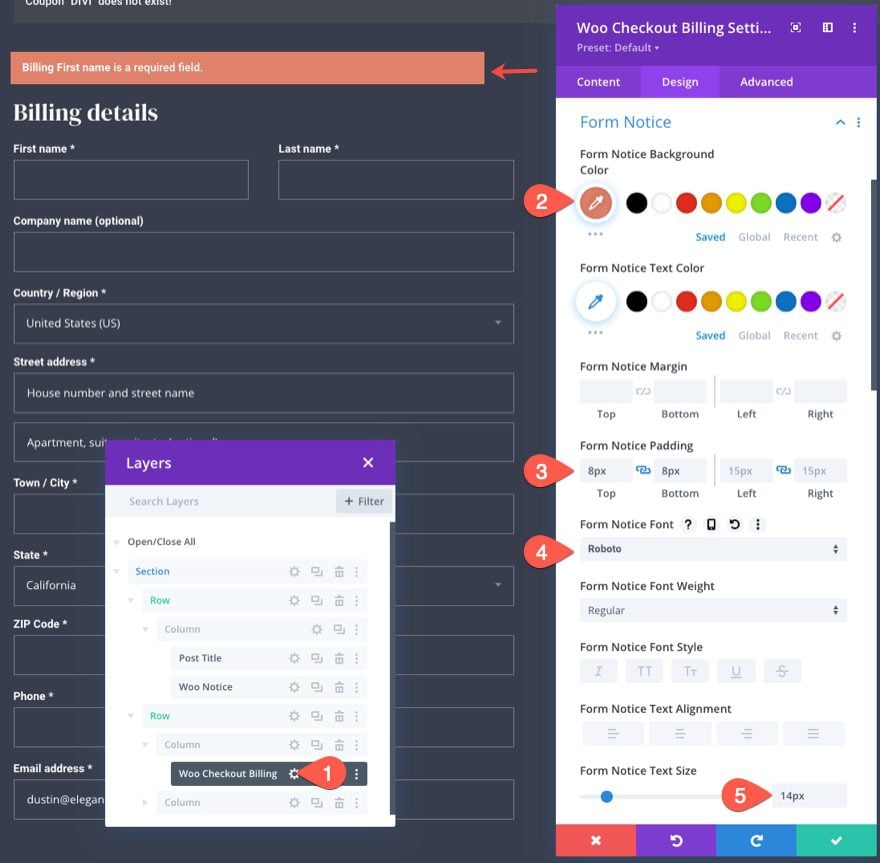
Woo Checkout Billing Form Notice
The form notice is what dynamically displays any notifications or errors that may arise when filling out the form. To style the form notice, open the Woo Checkout Billing settings and update the following:
- Form Notice Background Color: #e0816b
- Form Notice Padding: 8px top, 8px bottom
- Form Notice Font: Roboto
- Form Notice Text Size: 14px

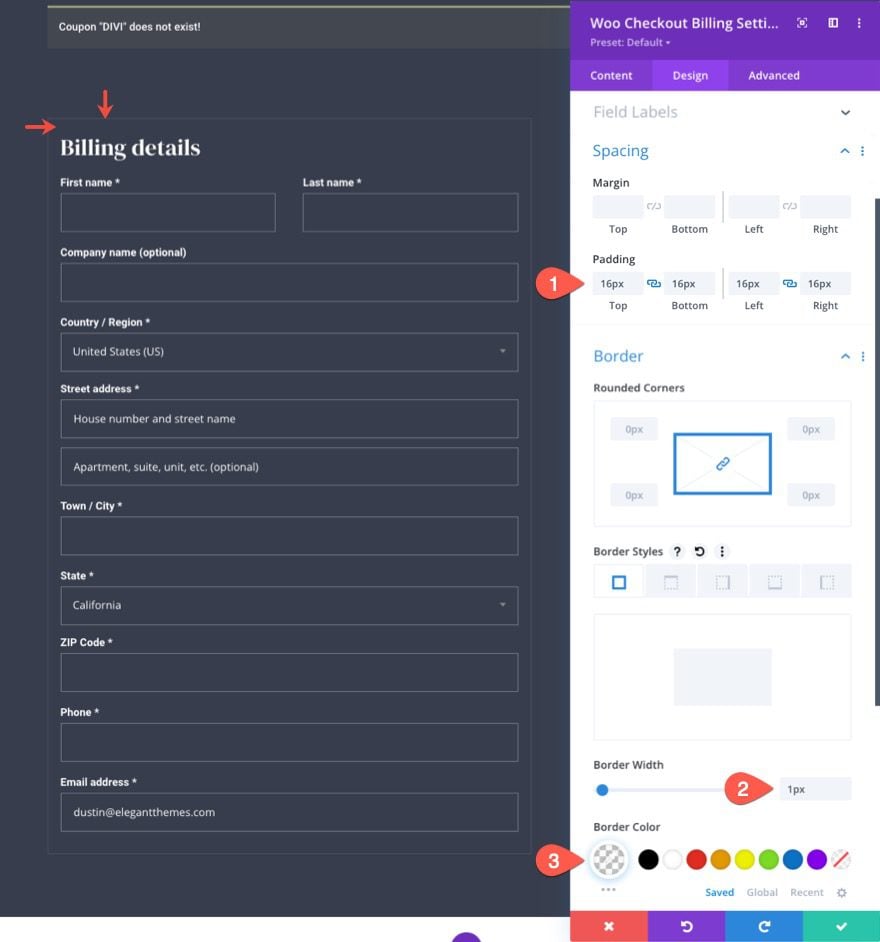
Woo Checkout Billing Spacing and Border
To finish off the design, let’s give a little padding and a light border the module as follows:
- Padding: 16px top, 16px bottom, 16px left, 16px right
- Border Width: 1px
- Border Color: rgba(255,255,255,0.1)

Designing the Woo Checkout Shipping and Woo Checkout Information
The next key elements we need to create the checkout page template are the Woo Checkout Shipping module and the Woo Checkout Information module. The Woo Checkout Shipping module displays the form needed for entering shipping information before completing checkout. And the Woo Checkout Information module displays an entry form that allows users to enter any additional information before checkout.
Add Woo Checkout Shipping Module
For this layout, go ahead and add a new Woo Checkout Shipping module directly under the Woo Checkout Billing module.


Add Woo Checkout Shipping Module
Under the Woo Checkout Shipping module, go ahead and add a Woo Checkout Information module.


Styling the Woo Checkout Shipping and Woo Checkout Information Modules
Because both of these woo modules (Checkout Shipping and Checkout Information) need to match the design of the Woo Checkout Billing module, we can copy the styles we need over to each one.
Copying and Pasting the Title Text Styles
Let’s start with the Title Text styles. Open the settings for the Woo Checkout Billing module and copy the Title Text Styles using the right-click menu.
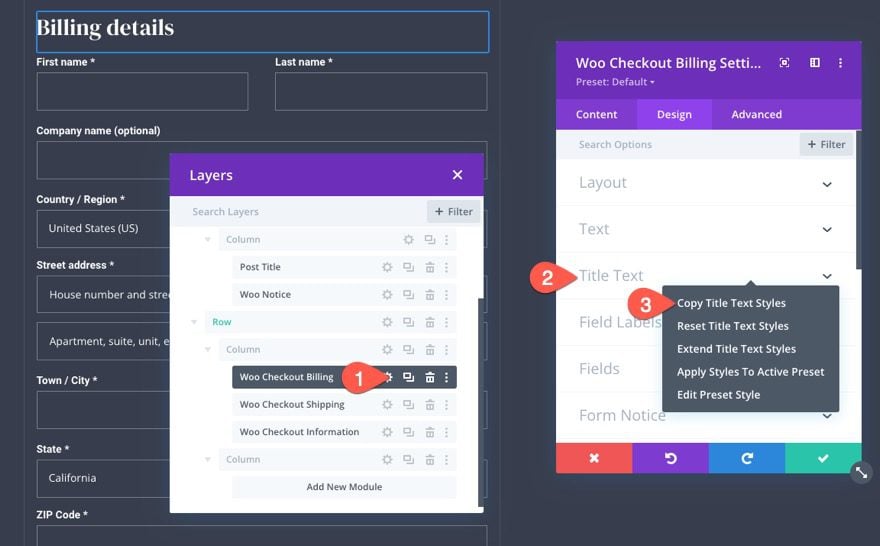

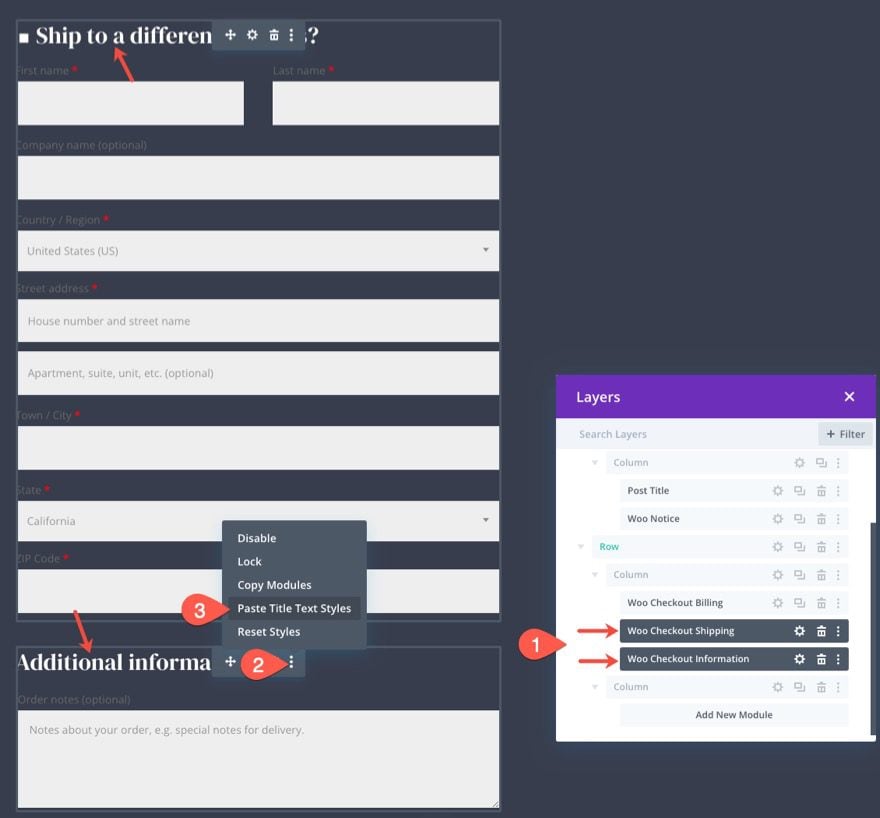
Then use the multi-select feature to select both the Woo Checkout Shipping and Woo Checkout Information Modules. Then paste the title text styles to one of the selected modules.

Copying and Pasting the Field Labels Styles
Repeat the same process to copy and paste the field labels styles as well.
Open the settings for the Woo Checkout Billing module and copy the Field Labels Styles using the right-click menu.

Then use the multi-select feature to select both the Woo Checkout Shipping and Woo Checkout Information Modules. Then paste the field labels styles to one of the selected modules.

Copying and Pasting the Fields Styles
Repeat the same process to copy and paste the fields’ styles as well.
Open the settings for the Woo Checkout Billing module and copy the Fields’ Styles using the right-click menu.

Then use the multi-select feature to select both the Woo Checkout Shipping and Woo Checkout Information Modules. Then paste the fields styles to one of the selected modules.


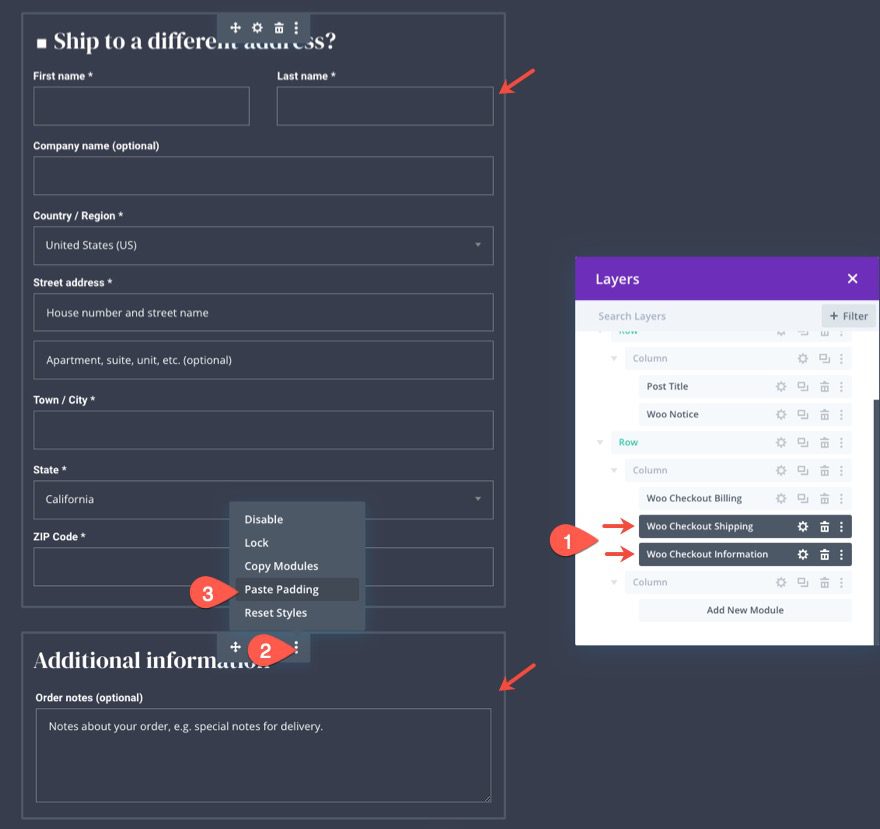
Copying and Pasting the Padding
Repeat the same process to copy and paste the padding as well.
Open the settings for the Woo Checkout Billing module and copy the padding using the right-click menu.
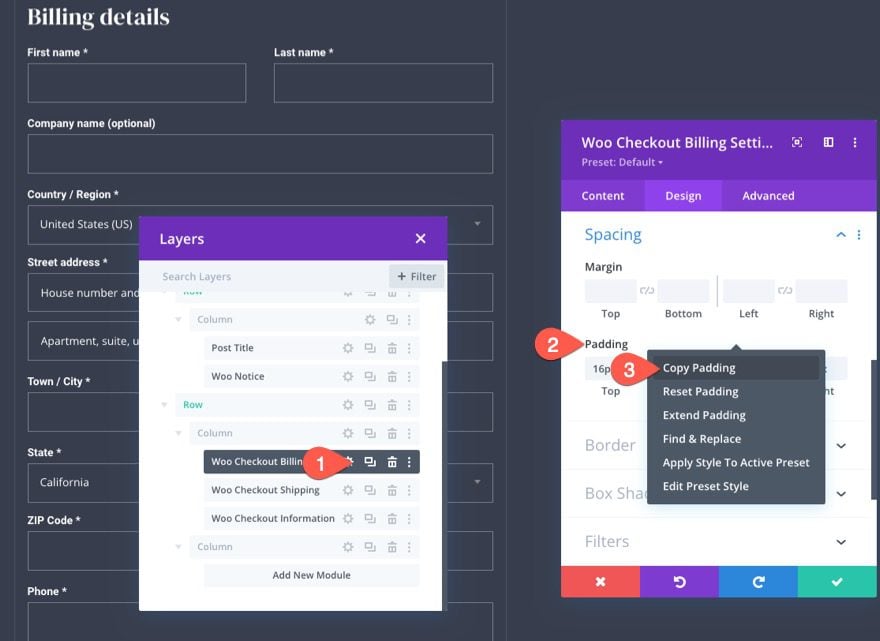

Then use the multi-select feature to select both the Woo Checkout Shipping and Woo Checkout Information Modules and paste the padding to one of the selected modules.

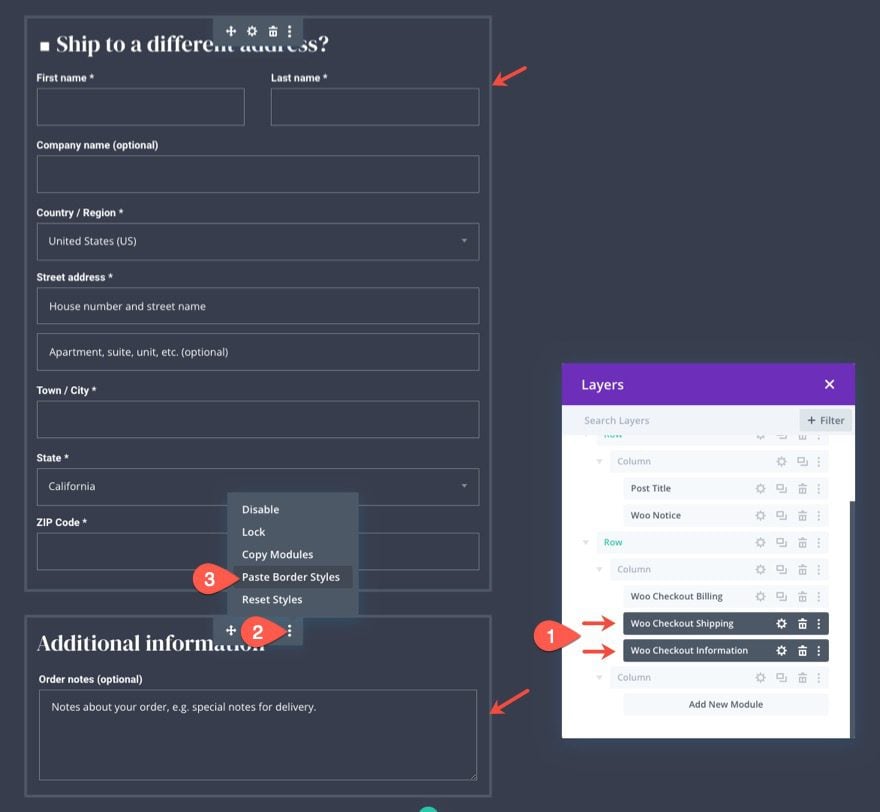
Copying and Pasting the Border
Repeat the same process to copy and paste the border as well.
Open the settings for the Woo Checkout Billing module and copy the border using the right-click menu.
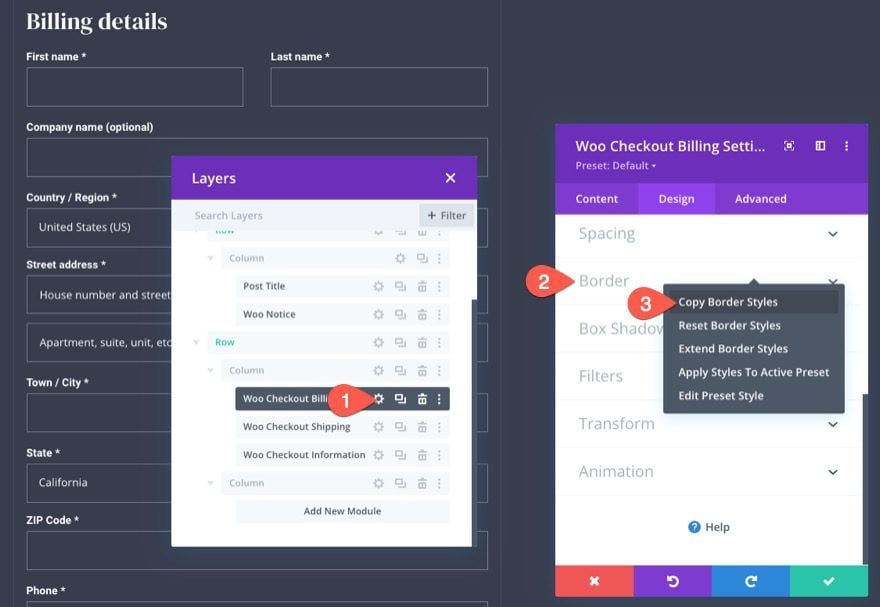

Then use the multi-select feature to select both the Woo Checkout Shipping and Woo Checkout Information Modules and paste the border styles to one of the selected modules.
Designing the Woo Checkout Details Module
Now that our shipping and additional information content is designed, we are ready to add the Woo Checkout Details content. This is another key element to the checkout page that displays the details of the purchase order. It includes the list of products, subtotals, and the total amount of the purchase. It also displays any coupon discounts that are applied that can be removed with a link.
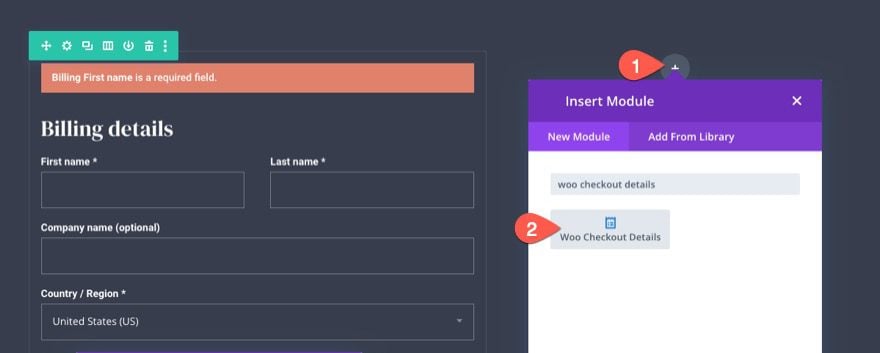
To the checkout details, add a new Woo Checkout Details module to column 2 in the same row.

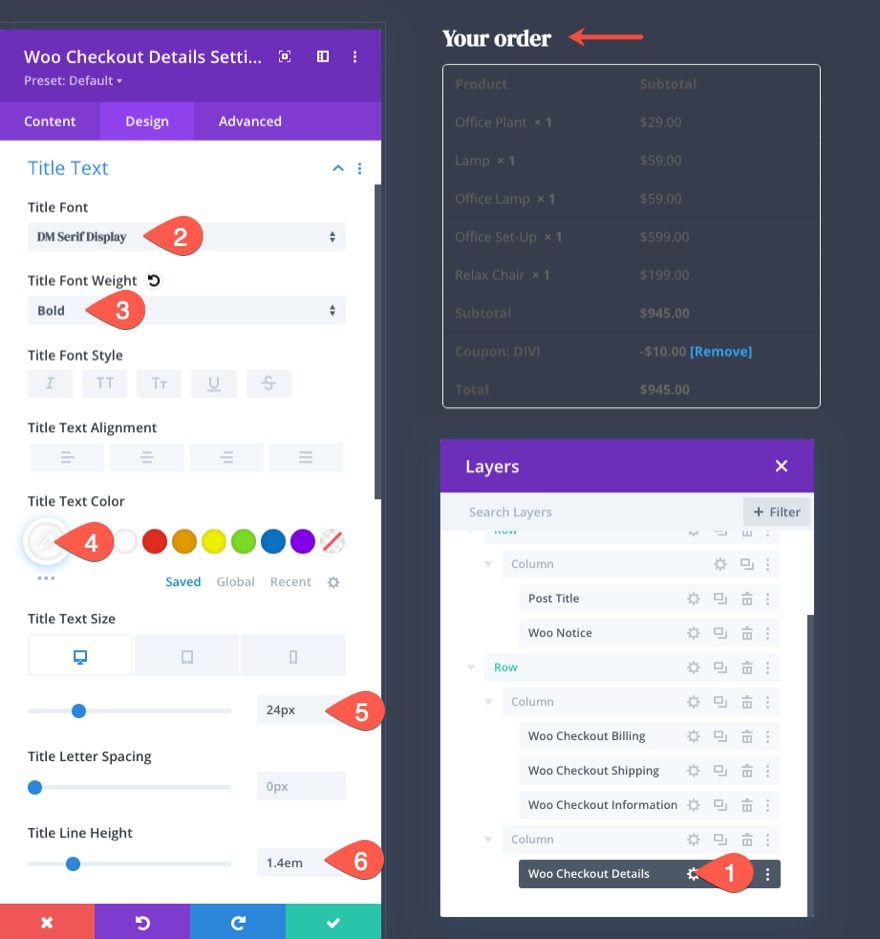
Woo Checkout Details Title Text
In the Woo Checkout Details settings modal, go to the design tab and update the Title text as follows:
- Title Font: DM Serif Display
- Title Font Weight: Bold
- Title Text Color: #fff
- Title Text Size: 24px (desktop), 22px (tablet), 18px (phone)
- Title Line Height: 1.4em

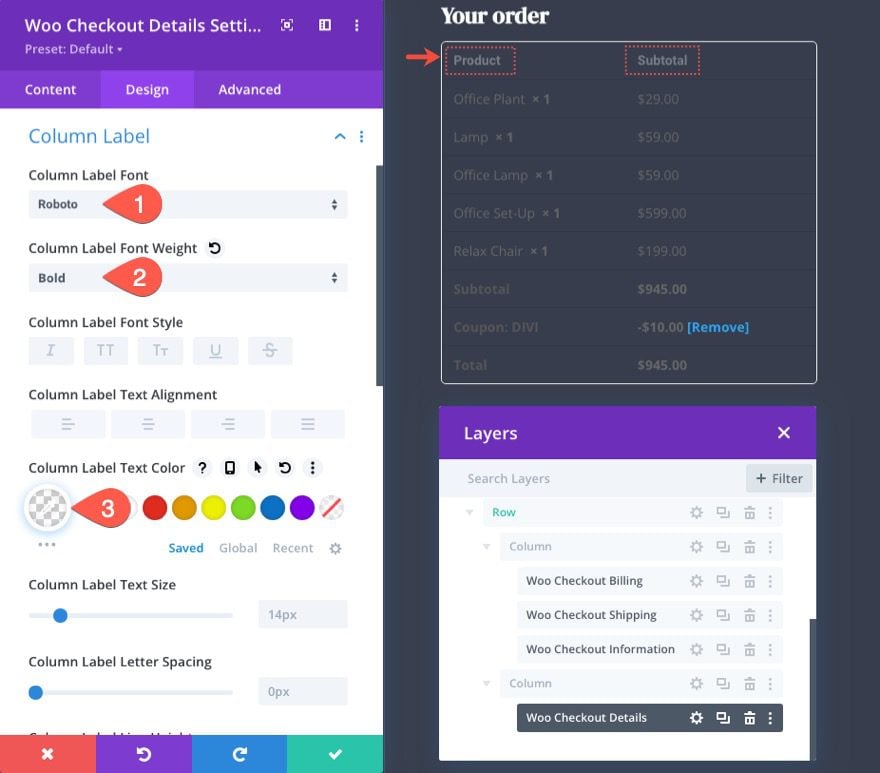
Woo Checkout Details Column Label
To style the column labels, update the following:
- Column Label Font: Roboto
- Column Label Font Weight: Bold
- Column Label Text Color: rgba(255,255,255,0.32)

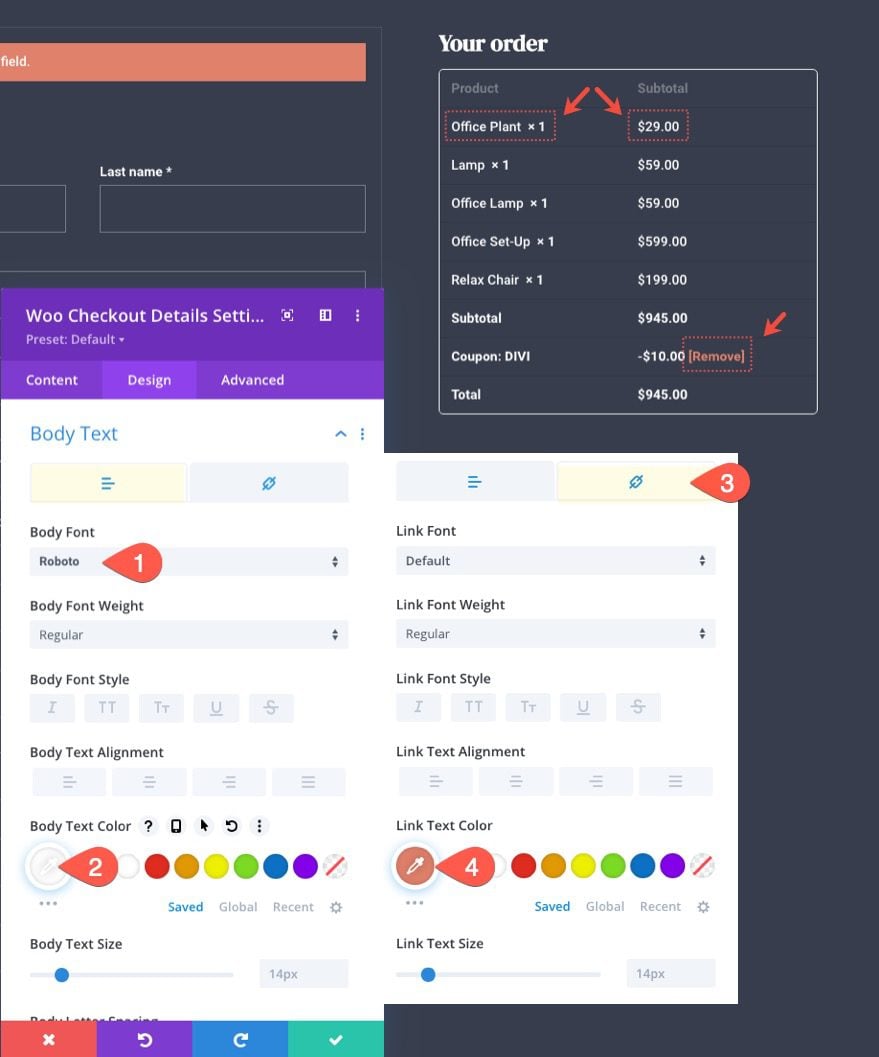
Woo Checkout Details Body Text
To style the body text that targets the items under each column in the list, update the following:
- Body Font: Roboto
- Body Text Color: #fff
Under the link tab, update the link text color:
- Link Text Color: #e0816b

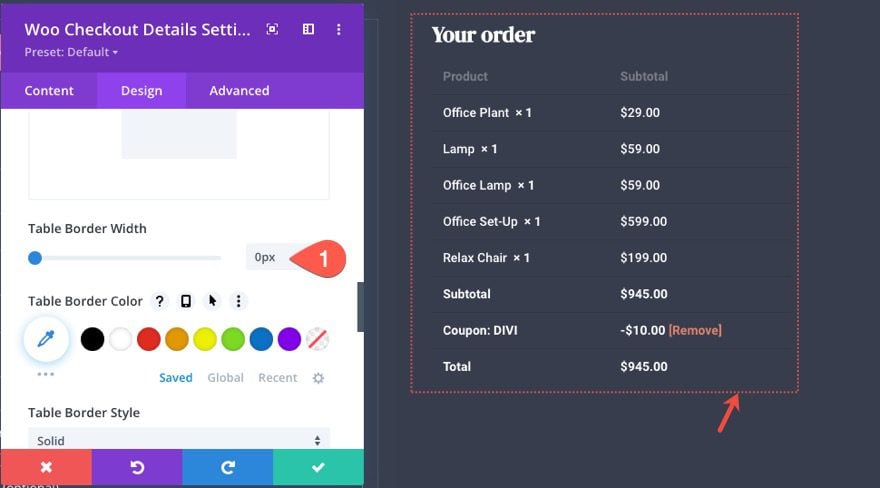
Woo Checkout Details Table Border
For this design, we are going to take out the table border altogether. To do this, update the following:
- Table Border Width: 0px

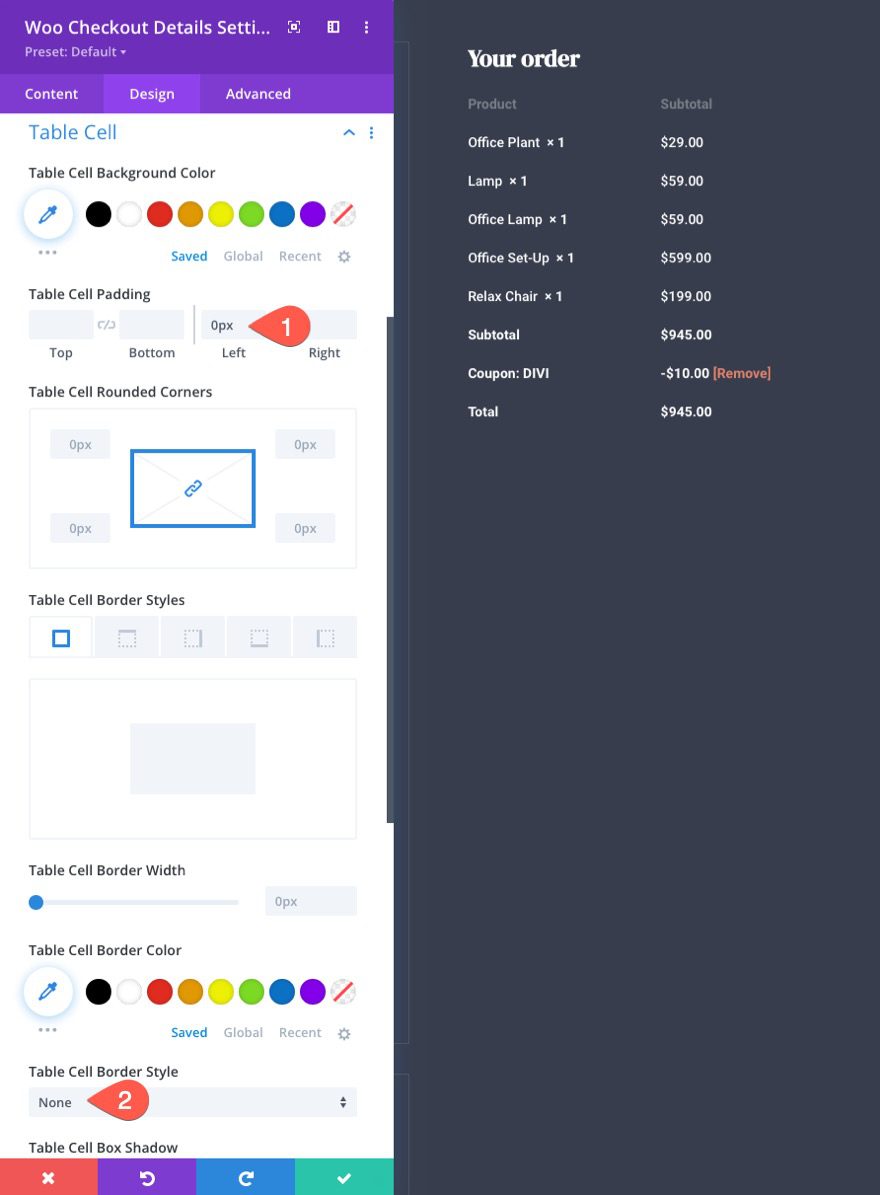
Woo Checkout Details Table Cell
To style the table cells within the table, update the following:
- Table Cell Padding: 0px left
- Table Cell Border Style: none
This aligns the content within the table cells to the left and removes the table cell border completely.

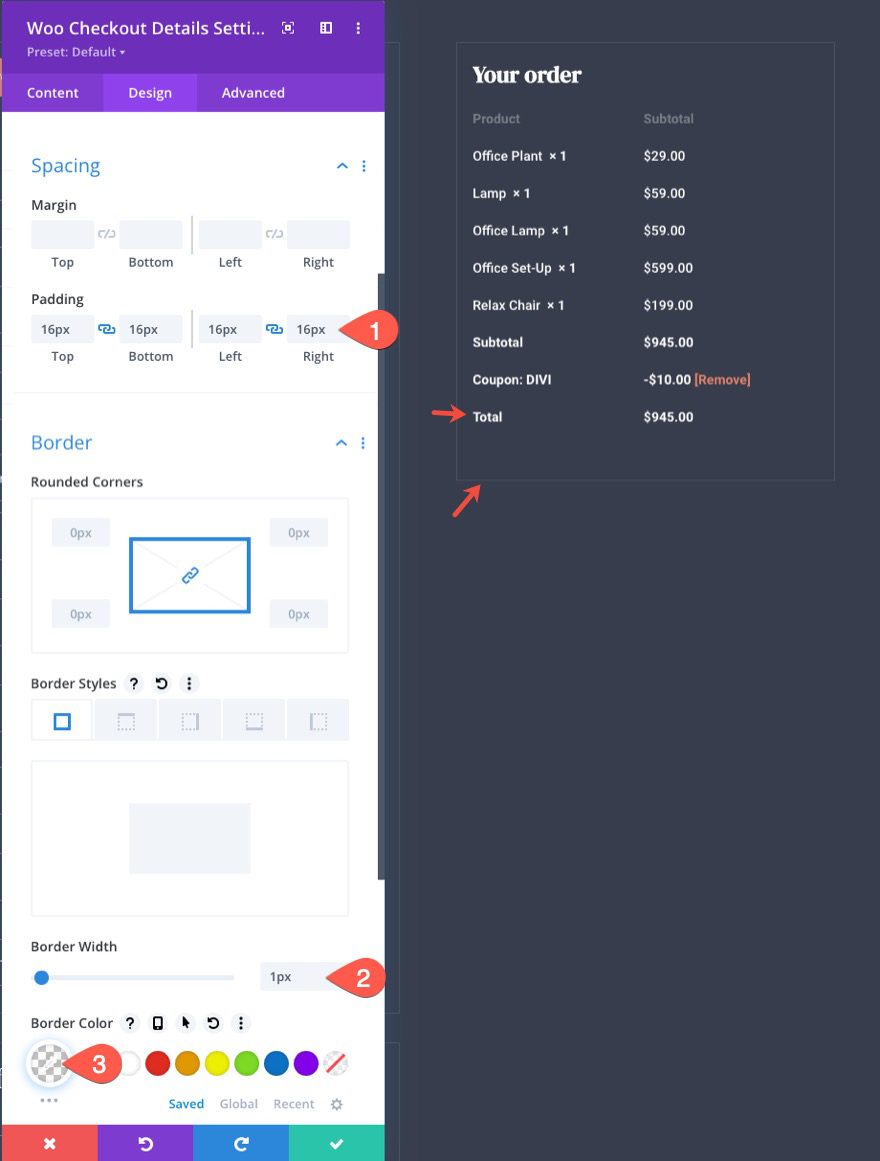
Woo Checkout Details Padding and Border
To keep the module’s design consistent with the other modules, update the padding and border as follows:
- Padding: 16px top, 16px bottom, 16px left, 16px right
- Border Width: 1px
- Border Color: rgba(255,255,255,0.1)

Designing the Woo Checkout Payment Module
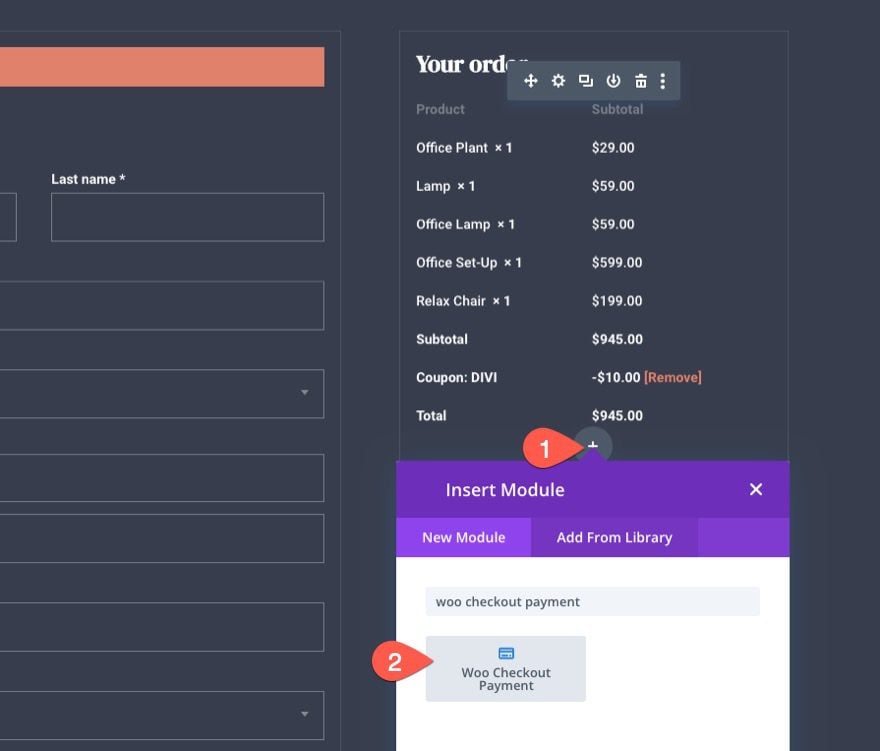
Now that our checkout details content is complete, we are ready to add the Woo Checkout Payment content. This is the final key element to the checkout page. It includes clickable radio button toggles for different payment options as well as the main checkout button. It also includes built-in form notices.
To add the checkout payment content, add a new Woo Checkout Payment module under the checkout details in column 2.

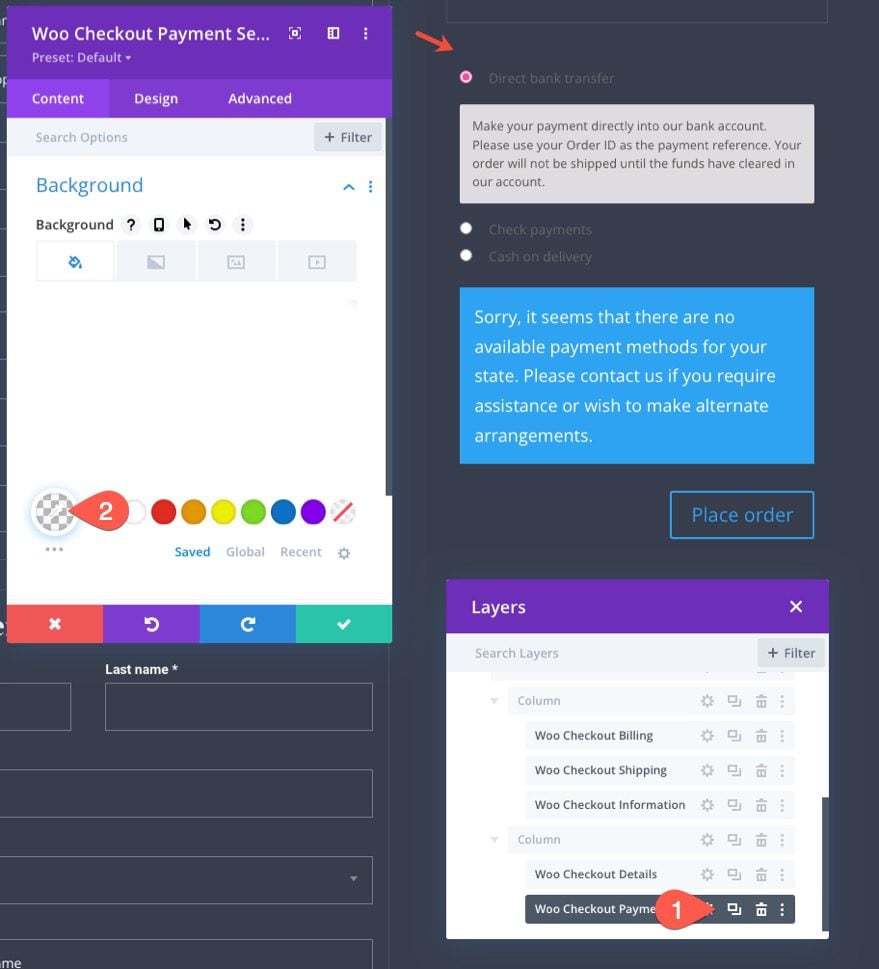
Woo Checkout Payment Background
Open the Woo Checkout Payment settings and give the module a transparent background:
- Background Color: transparent

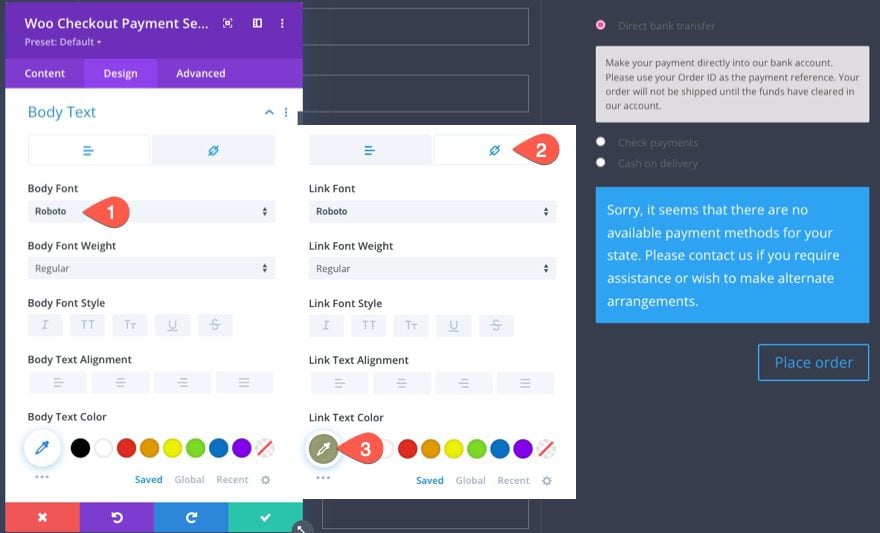
Woo Checkout Payment Body Text
Next, update the body text style as follows:
- Body Font: Roboto
Under the link tab update the link text color:
- Link Text Color: #999e75

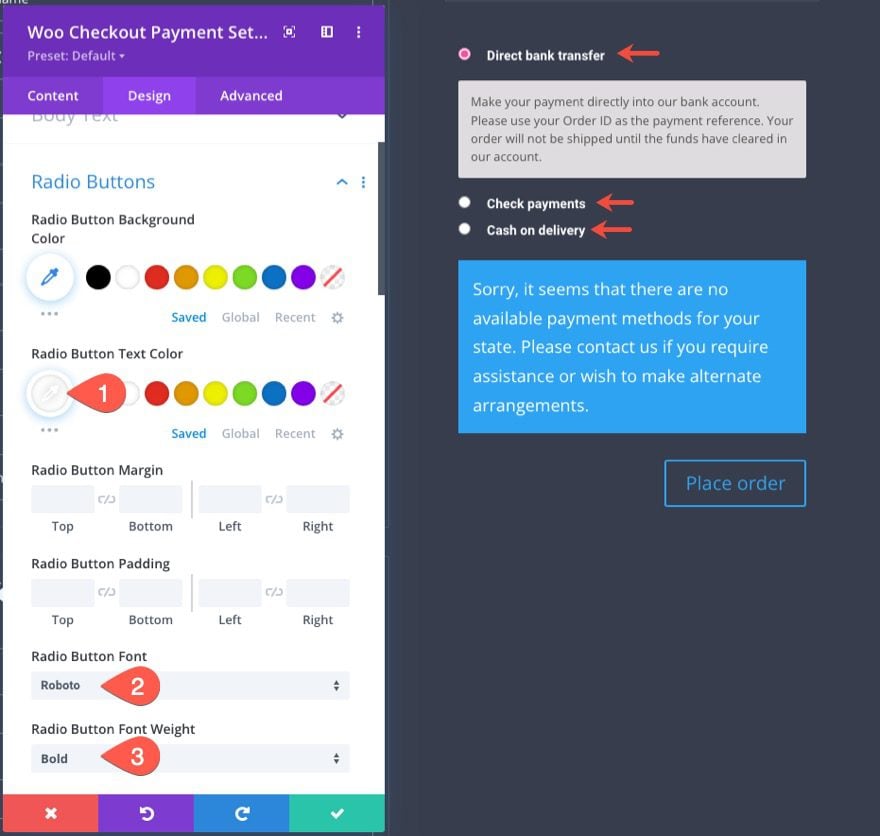
Woo Checkout Payment Radio Buttons
Next, update the style of the radio buttons as follows:
- Radio Button Text Color: #fff
- Radio Button Font: Roboto
- Radio Button Font Weight: Bold

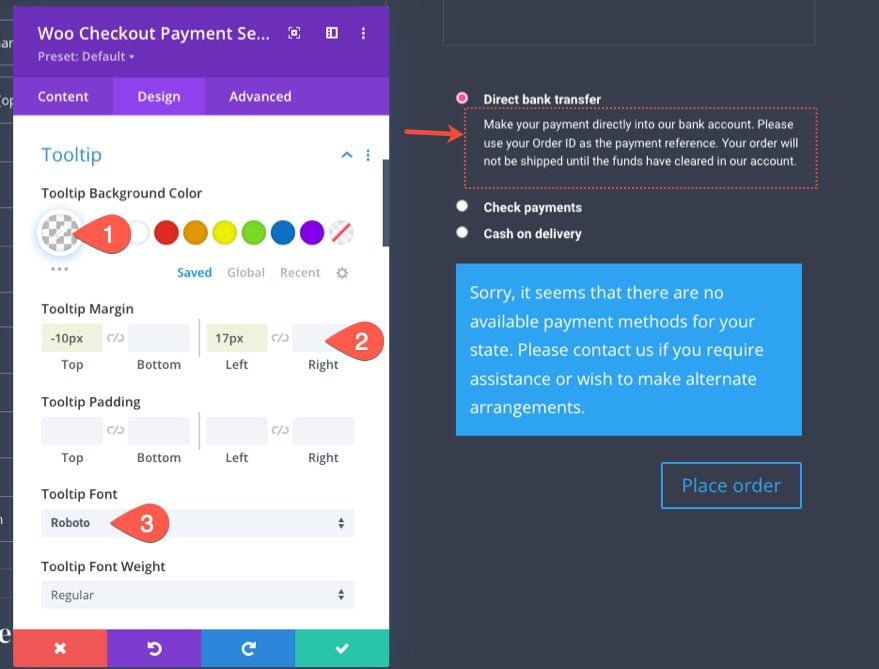
Woo Checkout Payment Tooltips
The tooltip is the text box that displays when a radio button toggle is open.
Let’s update the tooltip styles as follows:
- Tooltip Background Color: transparent
- Tooltip Margin: -10px top, 17px left
- Tooltip Font: Roboto

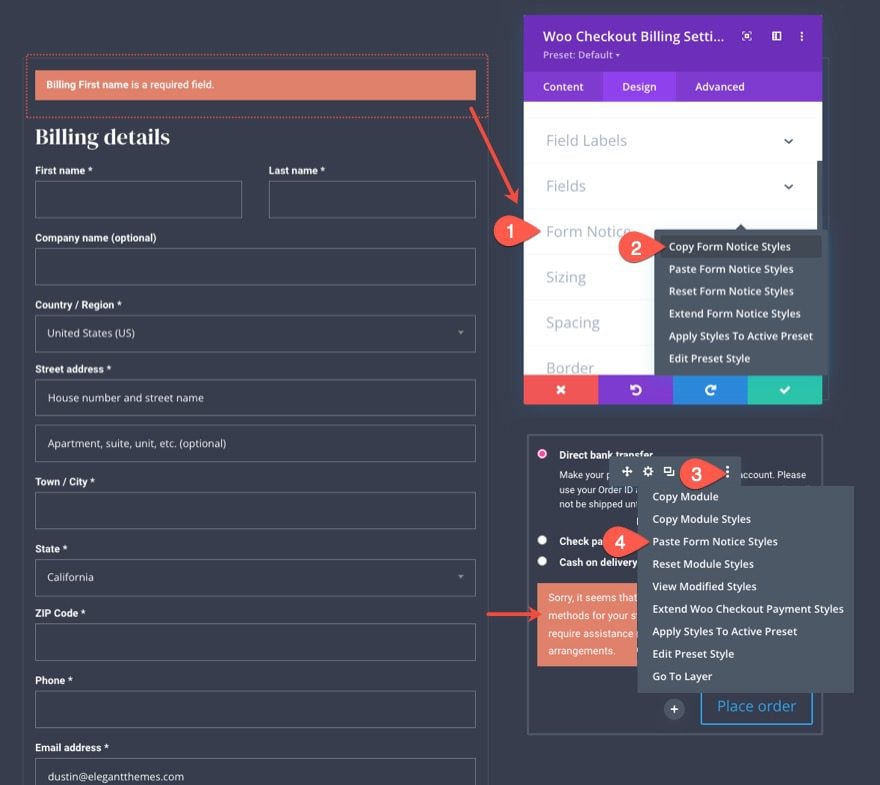
Woo Checkout Payment Form Notice
Because the Woo Checkout Payment module shares the same Form Notice option, we can copy the existing form notice styles from the Woo Checkout Billing module and paste them to the Woo Checkout Payment module.

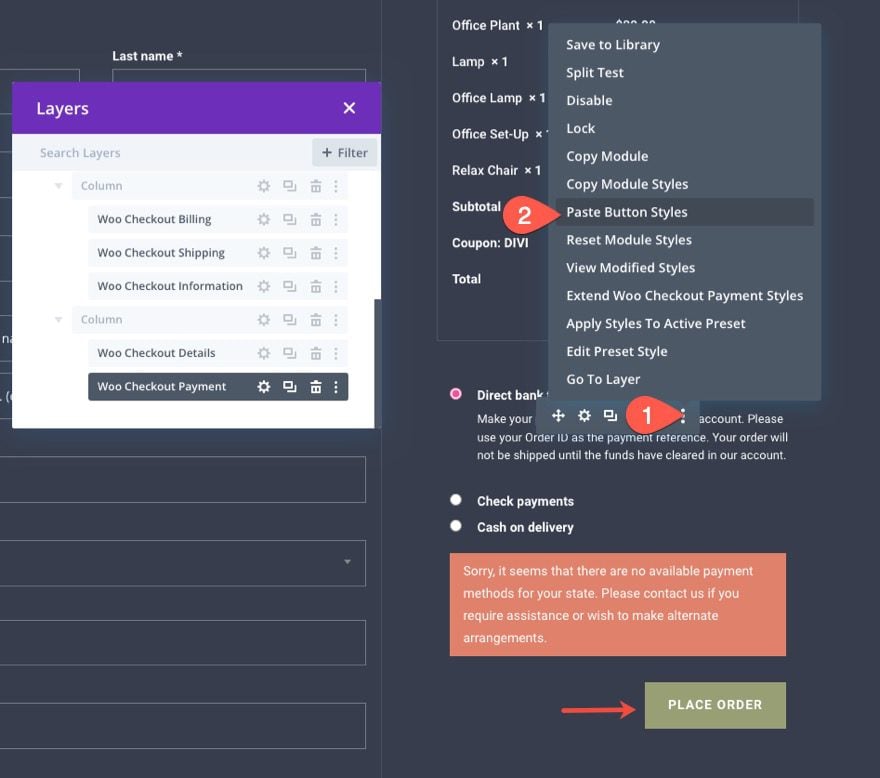
Woo Checkout Payment Button
To style the checkout button for the Woo Checkout Payment module, copy the button styles from the Woo Notice module.
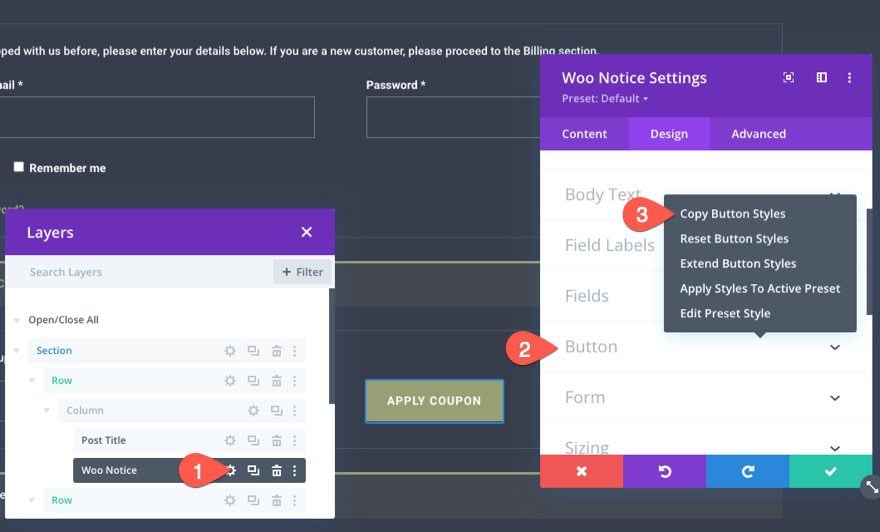

Then paste the button styles to the Woo Checkout Payment module.

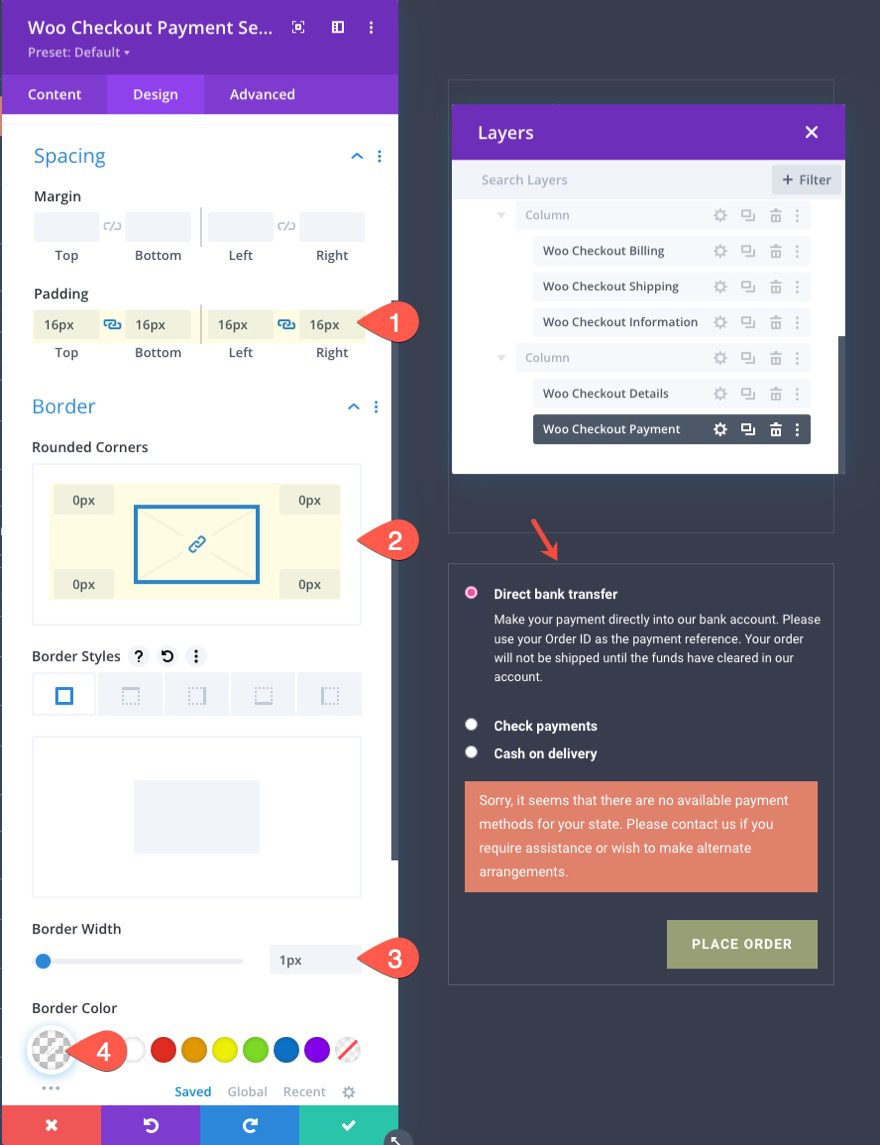
Woo Checkout Payment Padding and Border
To finish the design, add padding and border as follows:
- Padding: 16px top, 16px bottom, 16px left, 16px right
- Rounded Corners: 0px
- Border Width: 1px
- Border Color: rgba(255,255,255,0.1)

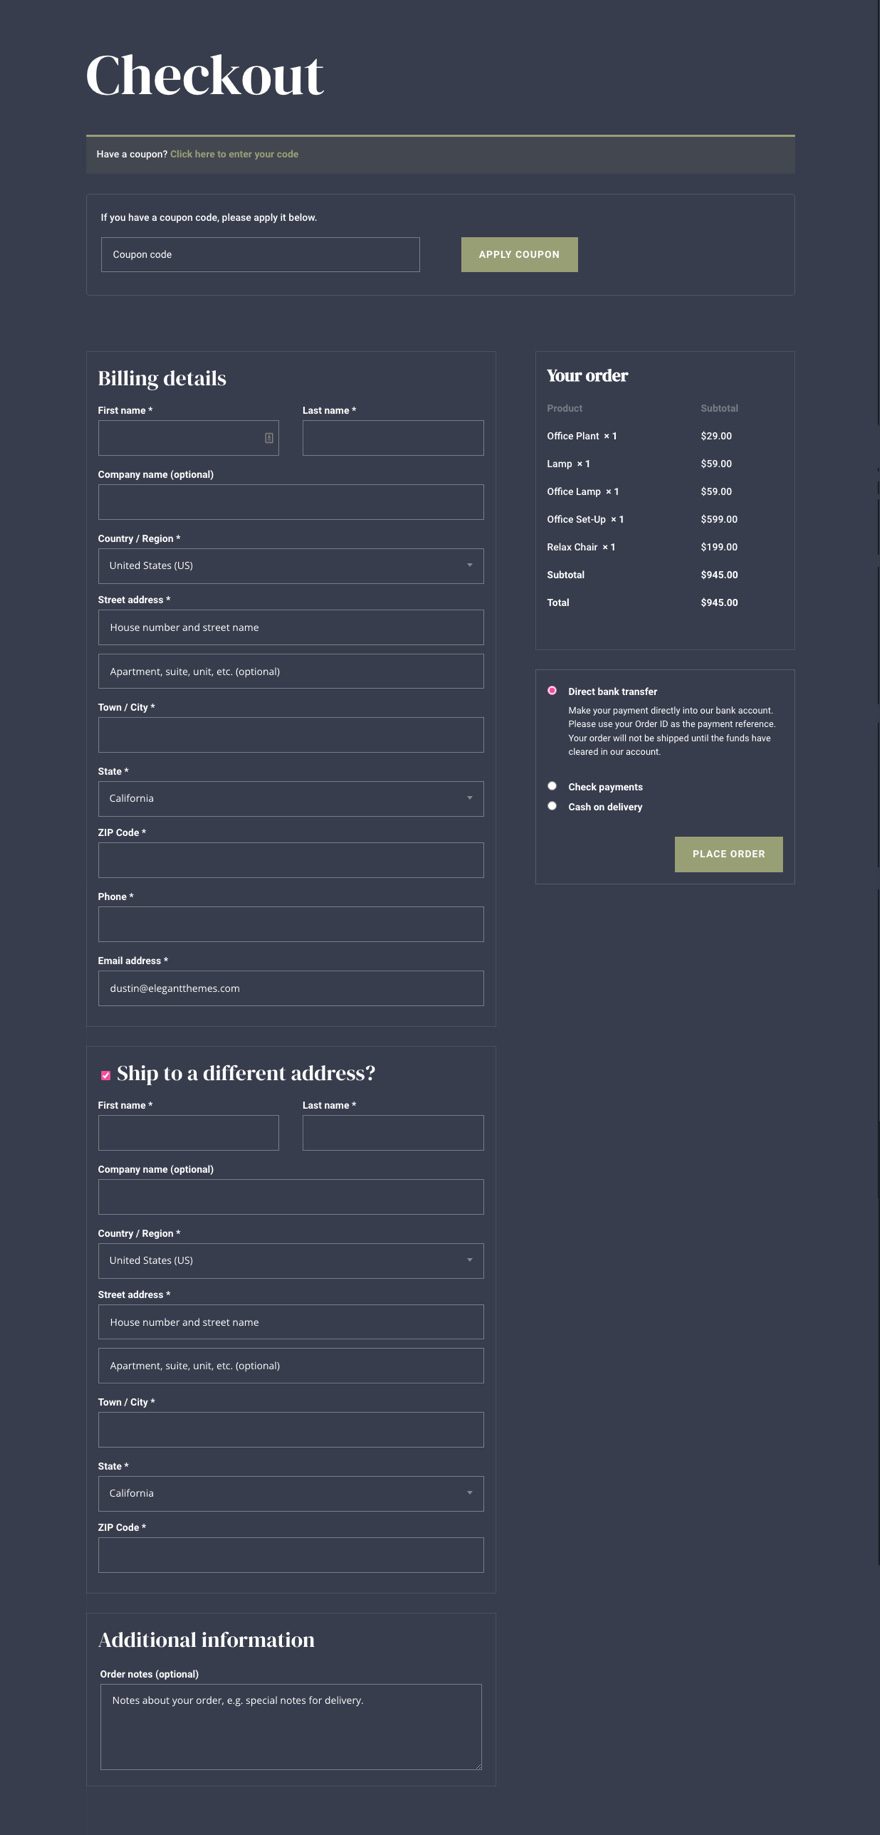
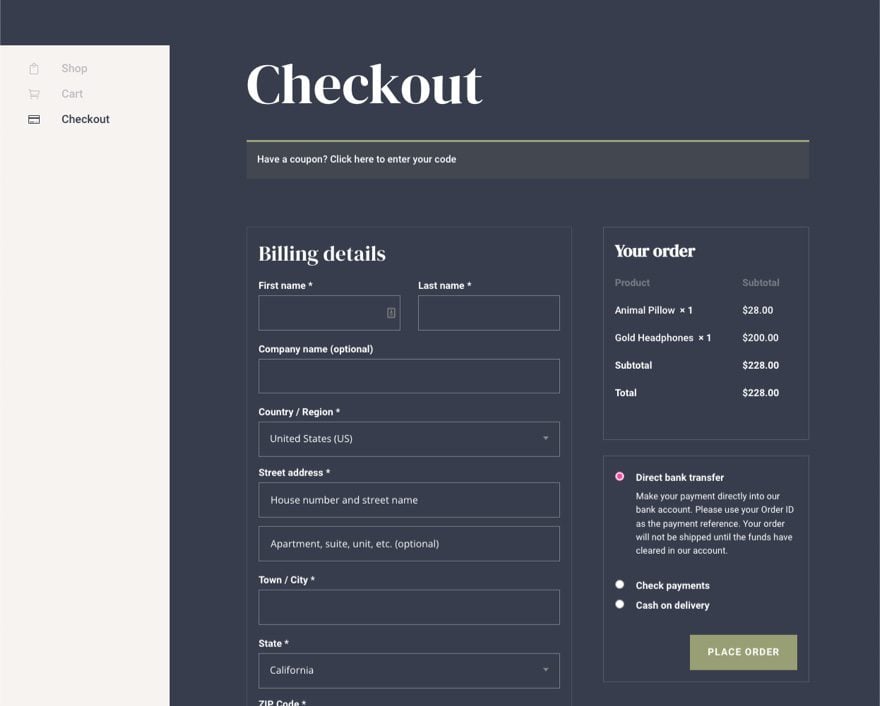
The Result
Here is what our checkout page looks like now!
Add More Content as Needed
At this point, we have all the key elements for our checkout page template. But you don’t have to stop here. You can add any content you want to the page as needed.
For our featured demo of this checkout page template (available for download here), we included a fixed sidebar with some custom navigation links.

Creating a Custom Template for the Checkout Page
If you want to create a Checkout Page Template, you can use the Theme Builder to create a checkout page template layout just like we did with the Checkout page template. However, since we already have a page layout designed from this tutorial, we can simply add this layout to a checkout page template.
Save WooCommerce Page Layout to Divi Library
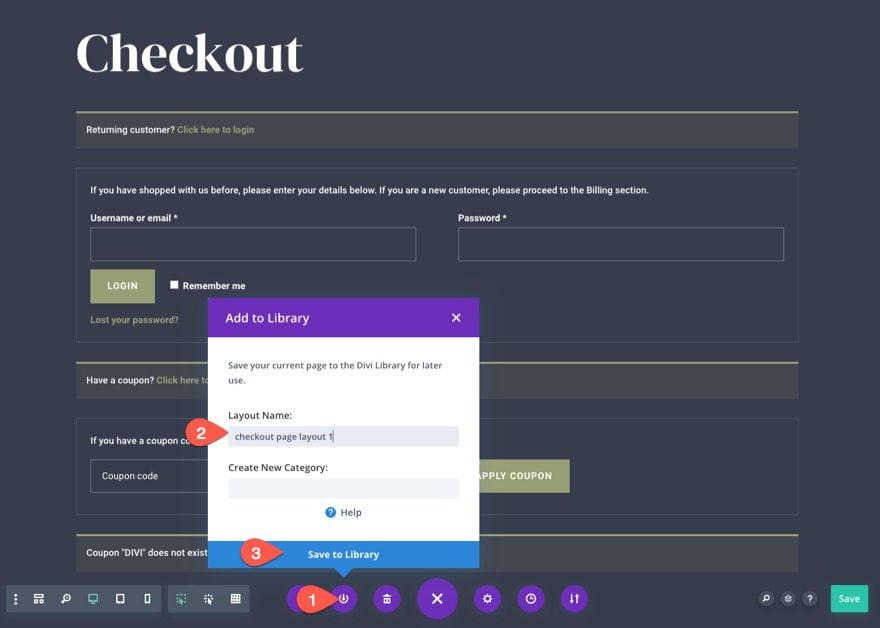
Before we can add the checkout page layout to a checkout page template, we must first save the page layout to the Divi Library.
To do this, open the Divi Builder settings menu at the bottom of the checkout page. Click the Add to Library icon, give the Layout a name, then click Save to Library.

Create New Checkout Page Template
Once the checkout page layout is saved to the library, we are ready to create a new checkout page template.
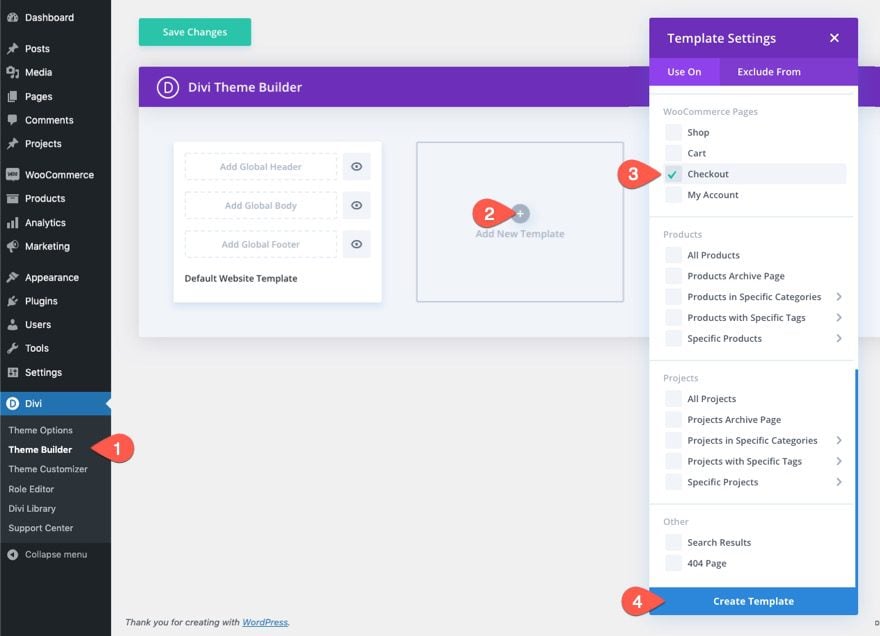
Here’s how to do it:
- Go to your WordPress Dashboard and navigate to Divi > Theme Builder.
- Then click the Add New Template plus icon inside the empty gray box area to add a new template.
- In the Template Settings modal, under the “Use On” tab, select Checkout under the WooCommerce Pages list.
- Finally, click Create Template.

Add Checkout Page Layout to the Checkout Template
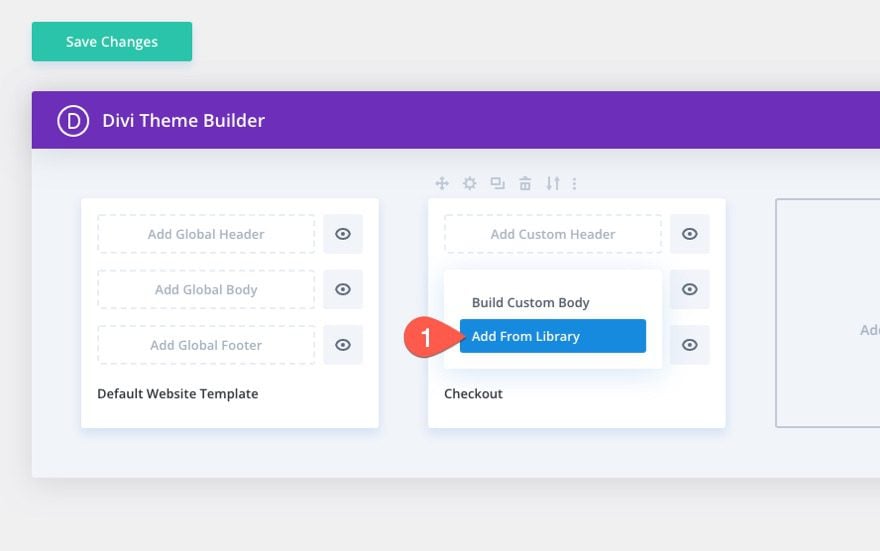
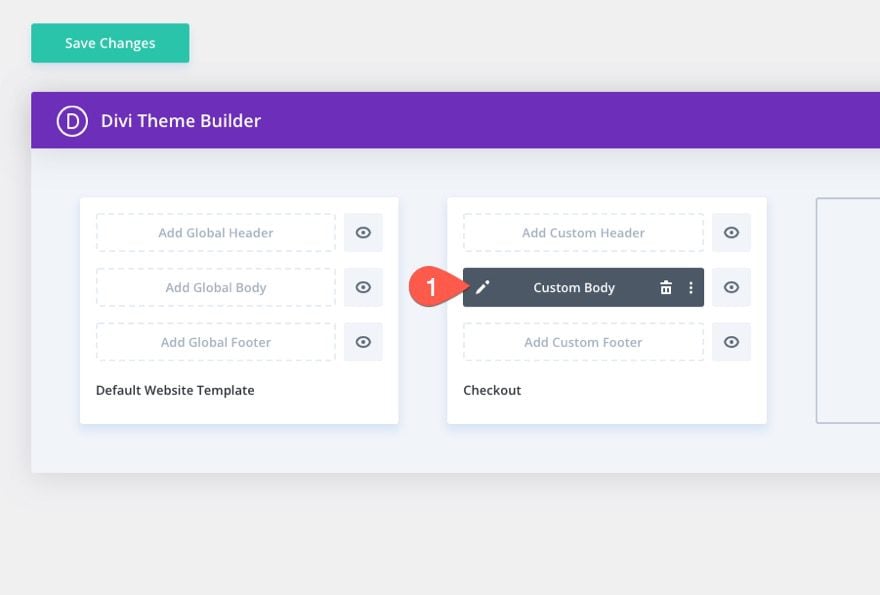
Once the new Checkout template has been created, click the “Add Custom Body” area of the template. Inside the popup list, select Add From Library.

From the Load From Library popup, under the Your Saved Layouts tab, select the checkout page layout you have saved to the library.
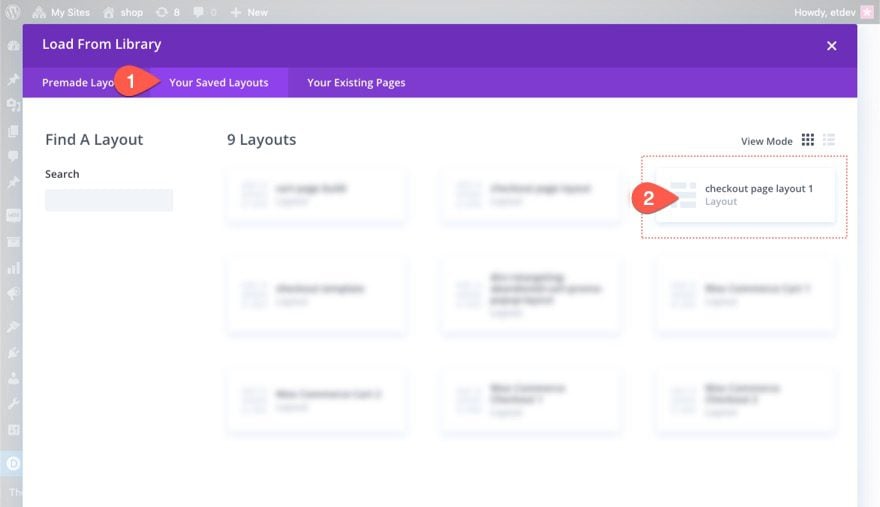

Once done, the Checkout template will be available in the Theme Builder. To edit the template, click the edit icon on the body area of the template.

Final Result
Let’s check out the final result of our checkout page template.

And here is how it looks on tablet and phone devices.
Final Thoughts
The process of designing a custom WooCommerce Checkout Page template is drastically simplified and amplified with Divi’s powerful visual page builder and intuitive Woo Modules. In this tutorial, we concentrated on incorporating the key elements that make up a checkout page. But, keep in mind, all of the other powerful Divi modules and features are at your disposal to take your checkout pages to a whole new level. Hopefully, this will help boost your Divi design skills and, more importantly, lead to more conversions.
For more, check out how to design a WooCommerce Cart Page Template in Divi or download our awesome FREE Cart & Checkout Page Template Sets for Divi.
I look forward to hearing from you in the comments.
Cheers!
.inline-code{padding: 0px 4px; color: crimson; font-family: Monaco,consolas,bitstream vera sans mono,courier new,Courier,monospace!important} video.with-border {border-radius: 8px;box-shadow: 0 8px 60px 0 rgba(103,151,255,.11), 0 12px 90px 0 rgba(103,151,255,.11);display:block;margin: 0 auto;}
The post How to Create a WooCommerce Checkout Page Template with Divi appeared first on Elegant Themes Blog.