

Searching for a WordPress PayPal plugin that lets you accept one-time or recurring payments with your own custom payment form?
It’s pretty easy to find a plugin that lets you add a simple PayPal button to your site. But what if you want to actually create a payment form that integrates with PayPal, and maybe even include some variables like recurring payments, coupons, and more?
In this post, we’ll show you a flexible way to set up a WordPress PayPal form using the free and paid version of Paid Membership Subscriptions (depending on what type of form you need to create).
By the end of our step-by-step guide, you’ll be able to create your own payment forms like below that include:
- One-time or recurring payments.
- Unlimited payment options in one form, including letting people choose between one-time or recurring payments.
- Support for PayPal Standard and PayPal Express.
- Customization options like coupons, “pay what you want”, and one-time signup fees or free trials (for recurring payments).
- A built-in user registration feature so that people can manage their payments from a front-end dashboard. You even have the option to restrict access to some/all of your site’s content for paying members.

Once people submit the form, they’ll be taken to PayPal to continue with the payment:

Keep reading to learn how it works!
A Powerful WordPress PayPal Plugin With Form
Paid Member Subscriptions is a flexible PayPal plugin that lets you accept both one-time or recurring payments. For recurring payments, you can also set up custom rules like charging a one-time signup fee that’s added to the first payment or offering a free trial.
The plugin works with both PayPal Standard and PayPal Express, so you can use whichever method you prefer:
- PayPal Standard – people will go to the PayPal website to check out using a credit card or their existing PayPal account.
- PayPal Express – people will go to the PayPal website to approve a purchase but then they’ll be taken back to your website to complete the checkout.
Basically, both methods let you use PayPal to accept payments, but they have slightly different checkout flows.
Paid Member Subscriptions is a full WordPress membership plugin, so you can use it to accept PayPal payments in a lot of different ways.
If you just want a simple solution to accept payments, you can just use the plugin to create a PayPal payment form. Again, you can charge one-time or recurring fees and, because you have a full form, your shoppers will be able to view their order histories and manage recurring payments from their own WordPress account (which you can automatically create after a user makes a payment).
If you want to go further, Paid Member Subscriptions can also help you restrict access to some/all of the content on your site to create a WordPress membership site. This part is totally optional though and you don’t need to have a membership site to accept payments via PayPal.
The free version of Paid Member Subscriptions lets you accept one-time payments via PayPal Standard. Then, if you upgrade to Paid Member Subscriptions Pro, you’ll be able to accept recurring payments and you’ll also get access to PayPal Express.

Paid Member Subscriptions Pro
The best WordPress PayPal plugin with form for one-time or recurring payments using PayPal Standard or PayPal Express.
How to Set Up a WordPress PayPal Plugin With Form
Now, let’s get into the tutorial and we’ll show you how to set up your own WordPress PayPal integration using the Paid Member Subscriptions plugin.
We’ll start by showing you how you can use the free version of Paid Member Subscriptions to accept one-time payments via PayPal Standard. Then, we’ll show you how recurring payments work in Paid Member Subscriptions Pro.
Let’s dig in…
How to Accept One-Time Payments With PayPal Standard
For this first tutorial, we’re using the free version of Paid Member Subscriptions from WordPress.org. Make sure to install and activate the plugin before getting started.
1. Set Up Basic Settings in Paid Member Subscriptions
Once you activate the Paid Member Subscriptions plugin, it will automatically launch a setup wizard to help you configure some important defaults. Make sure to click the button to create pages. These are the pages that your visitors will use to make payments and view their order histories:
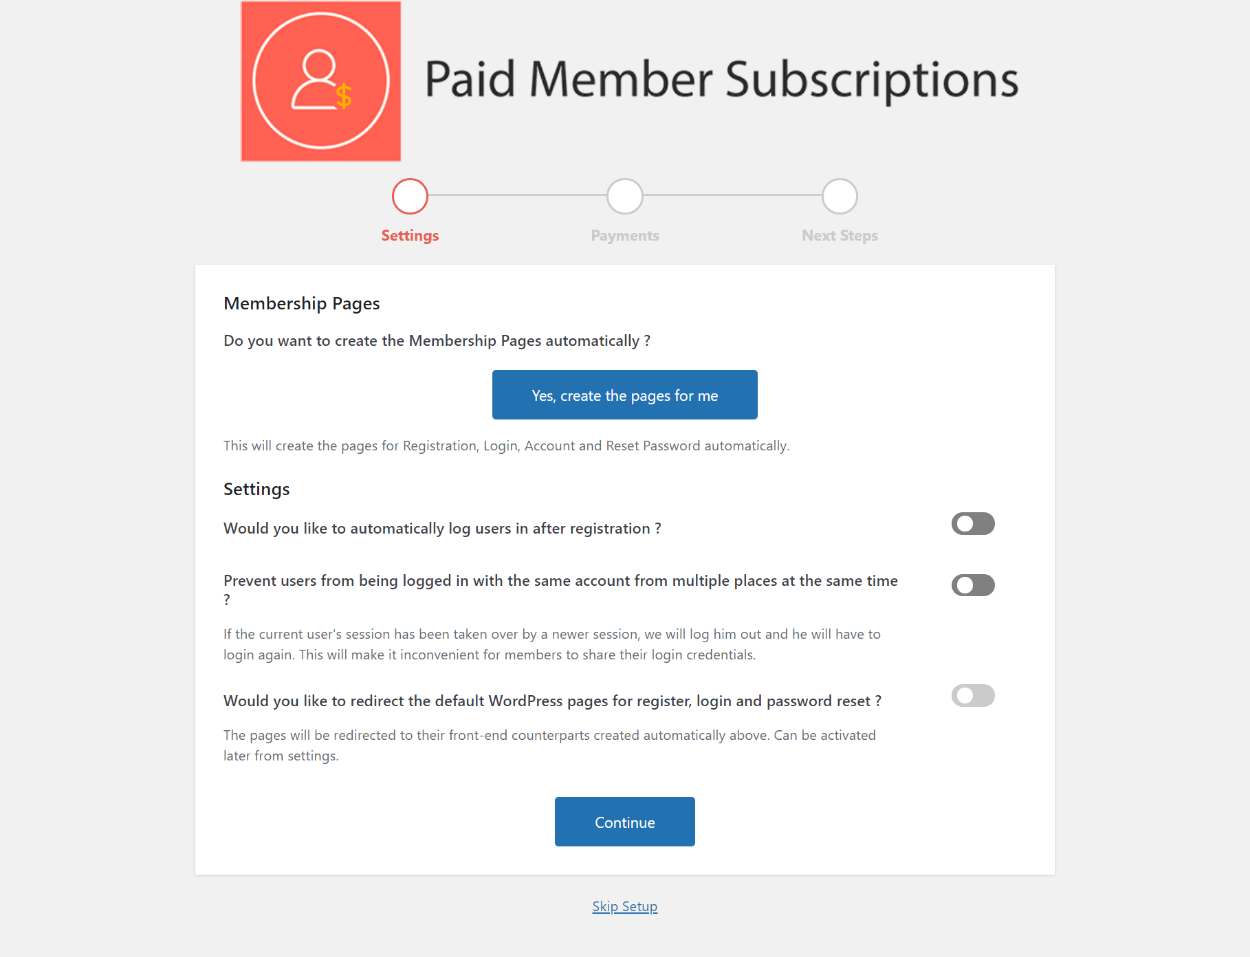

On the next page of the setup wizard, you can connect to PayPal. Again, the free version of Paid Member Subscriptions works with PayPal Standard, while Paid Member Subscriptions Pro lets you choose between PayPal Standard and PayPal Express according to your preferences:


And that’s it for the setup wizard!
If you’re using PayPal, you’ll also need to set up something called an IPN URL (Instant Payment Notification). This is what lets your site communicate with PayPal to verify payment success when using PayPal Standard.
For instructions on how to set up your PayPal IPN URL, you can follow this guide.
2. Create Subscription Plan(s)
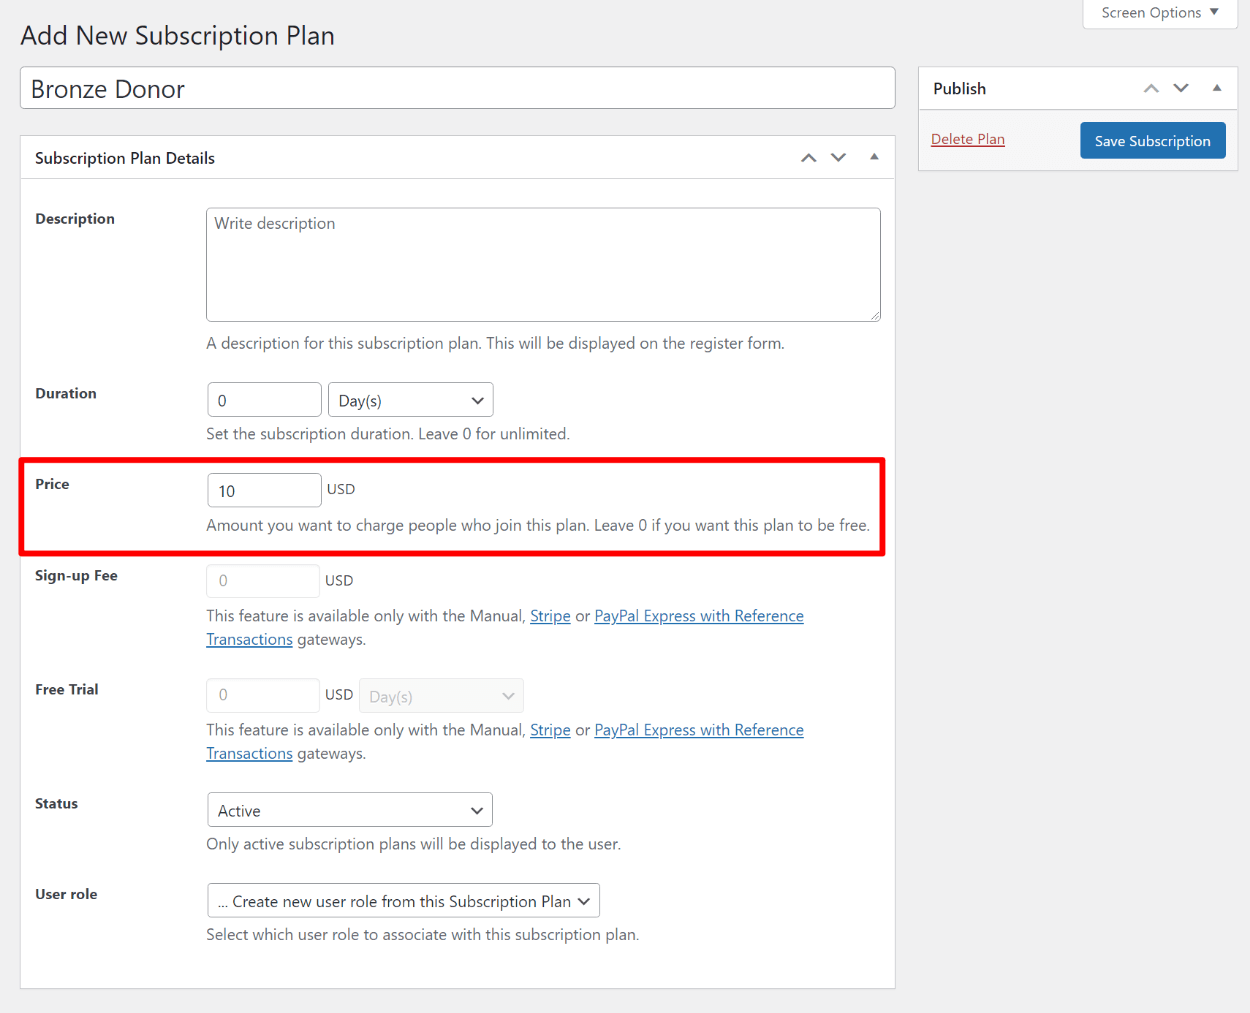
Once you’ve configured the basic PayPal settings above, you can go to Paid Member Subscriptions → Subscription Plans → Add New to create your first subscription plan.
A subscription plan is basically the payment option that you want to configure in PayPal. For example, if you want to charge people $10 via PayPal, you could create a subscription plan that requires a one-time $10 payment.
Because Paid Member Subscriptions is a membership plugin, people who make this payment will also be assigned to the subscription level, which helps you organize people who have made payments and also lets people manage their billing history from the front-end of your site.
If you want to restrict content on your site or WooCommerce store, you can also restrict content by a user’s subscription plan.
For this example, let’s say you’re accepting donations and you want to offer a $10 donation option called the “Bronze” level. You would set it up like this:

If you want to create additional payment options, you could repeat the process to create as many subscription plans as needed.
3. Start Accepting Payments
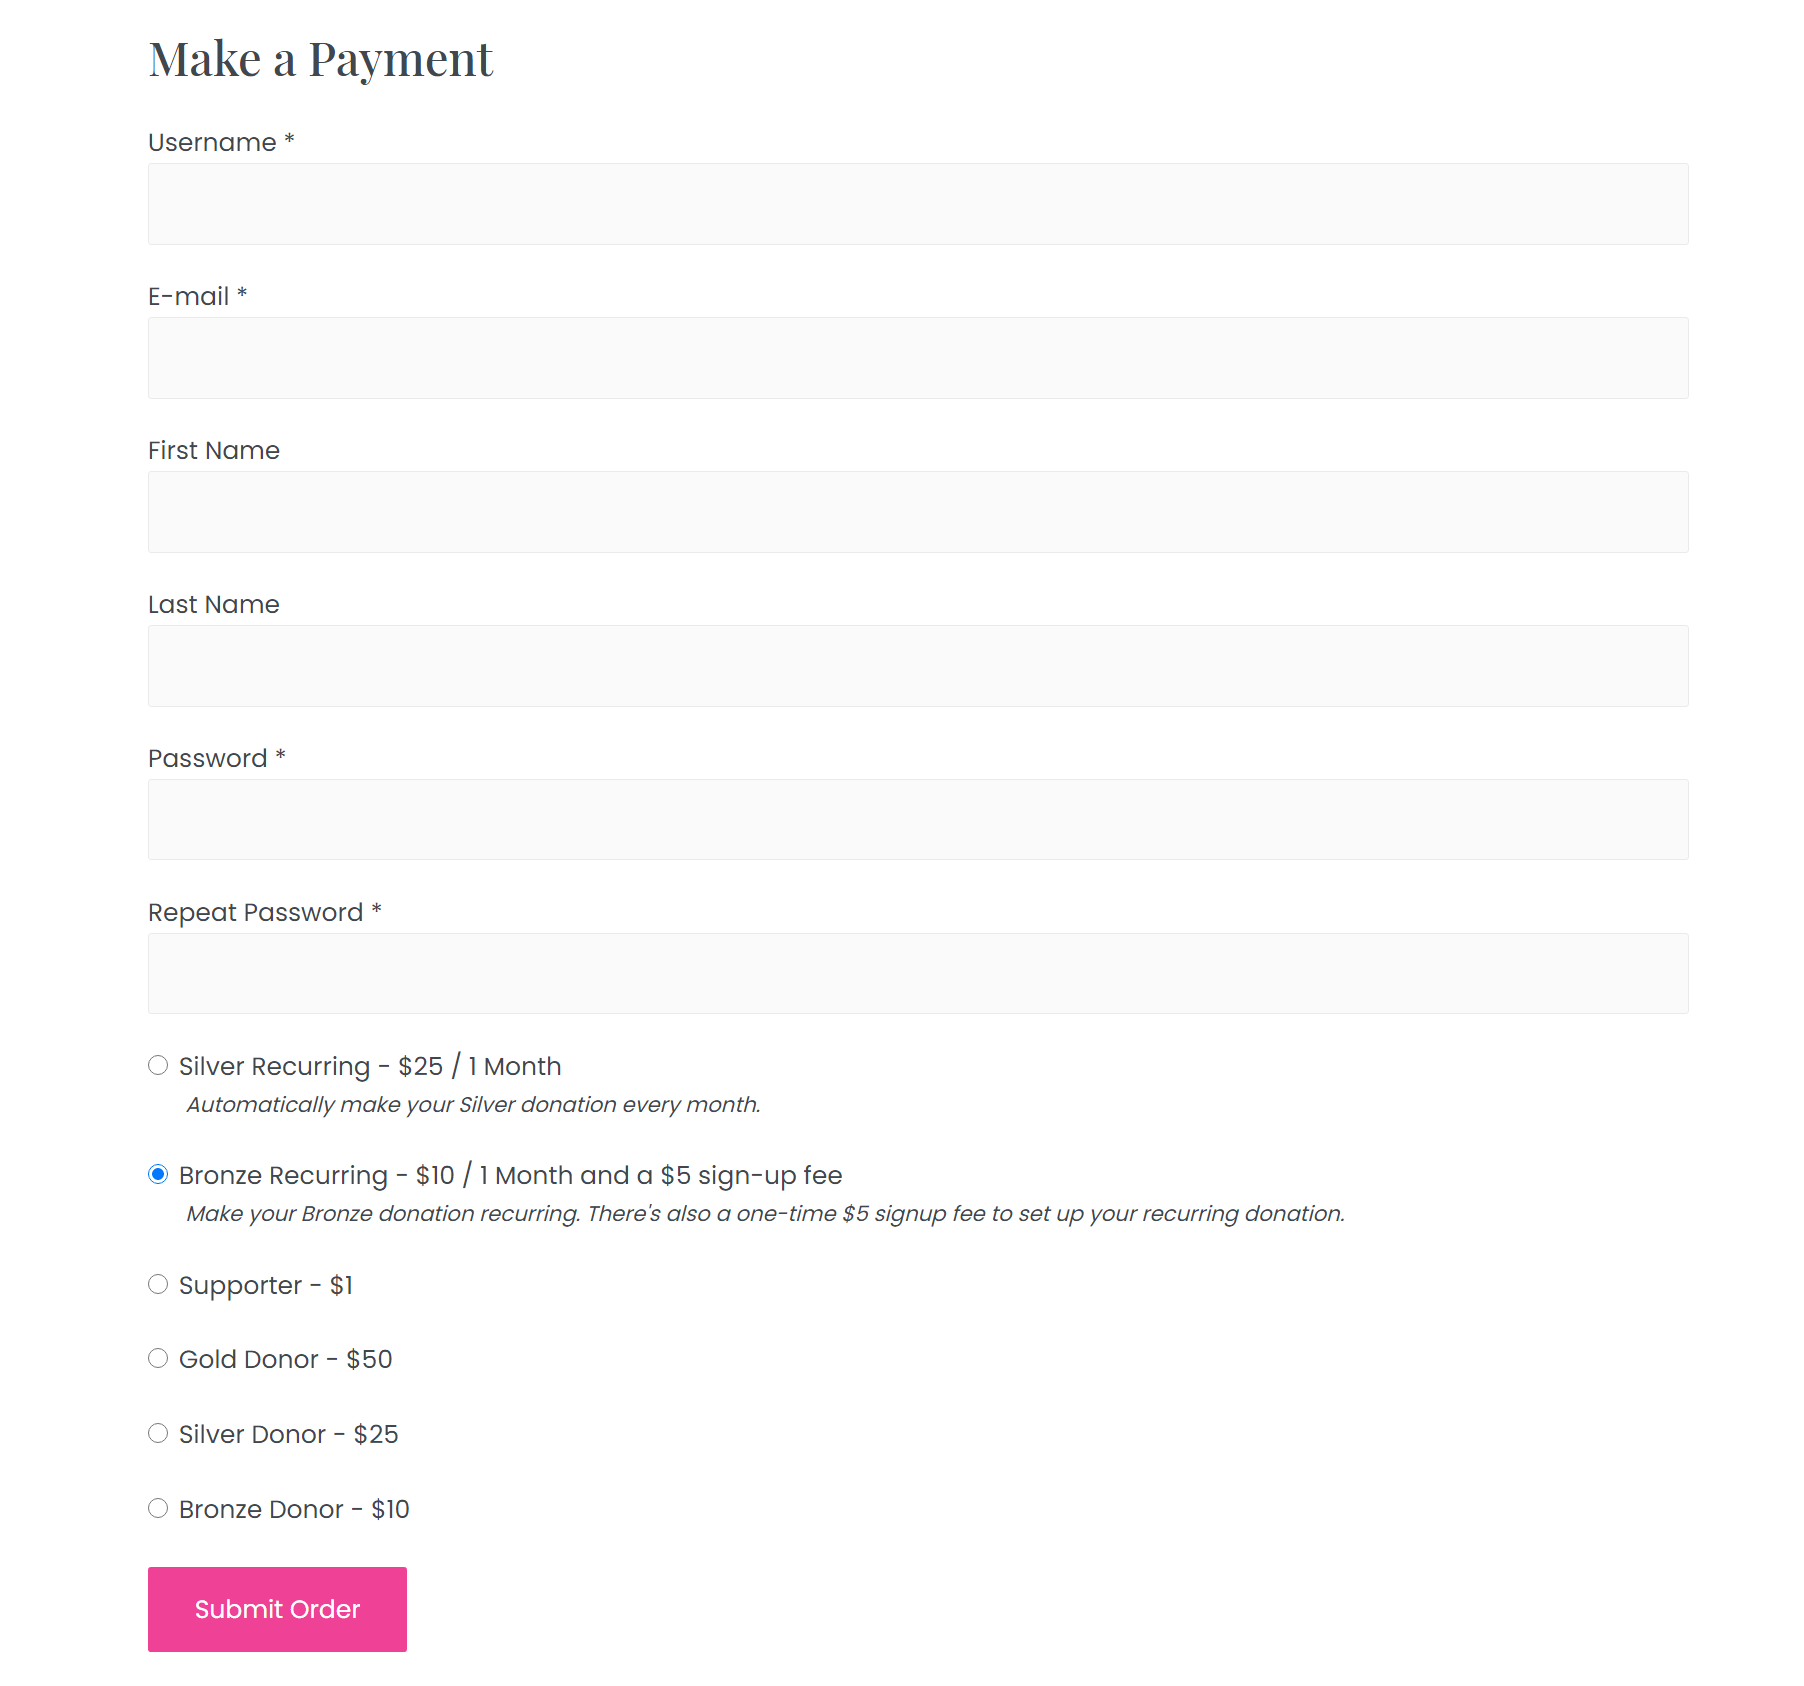
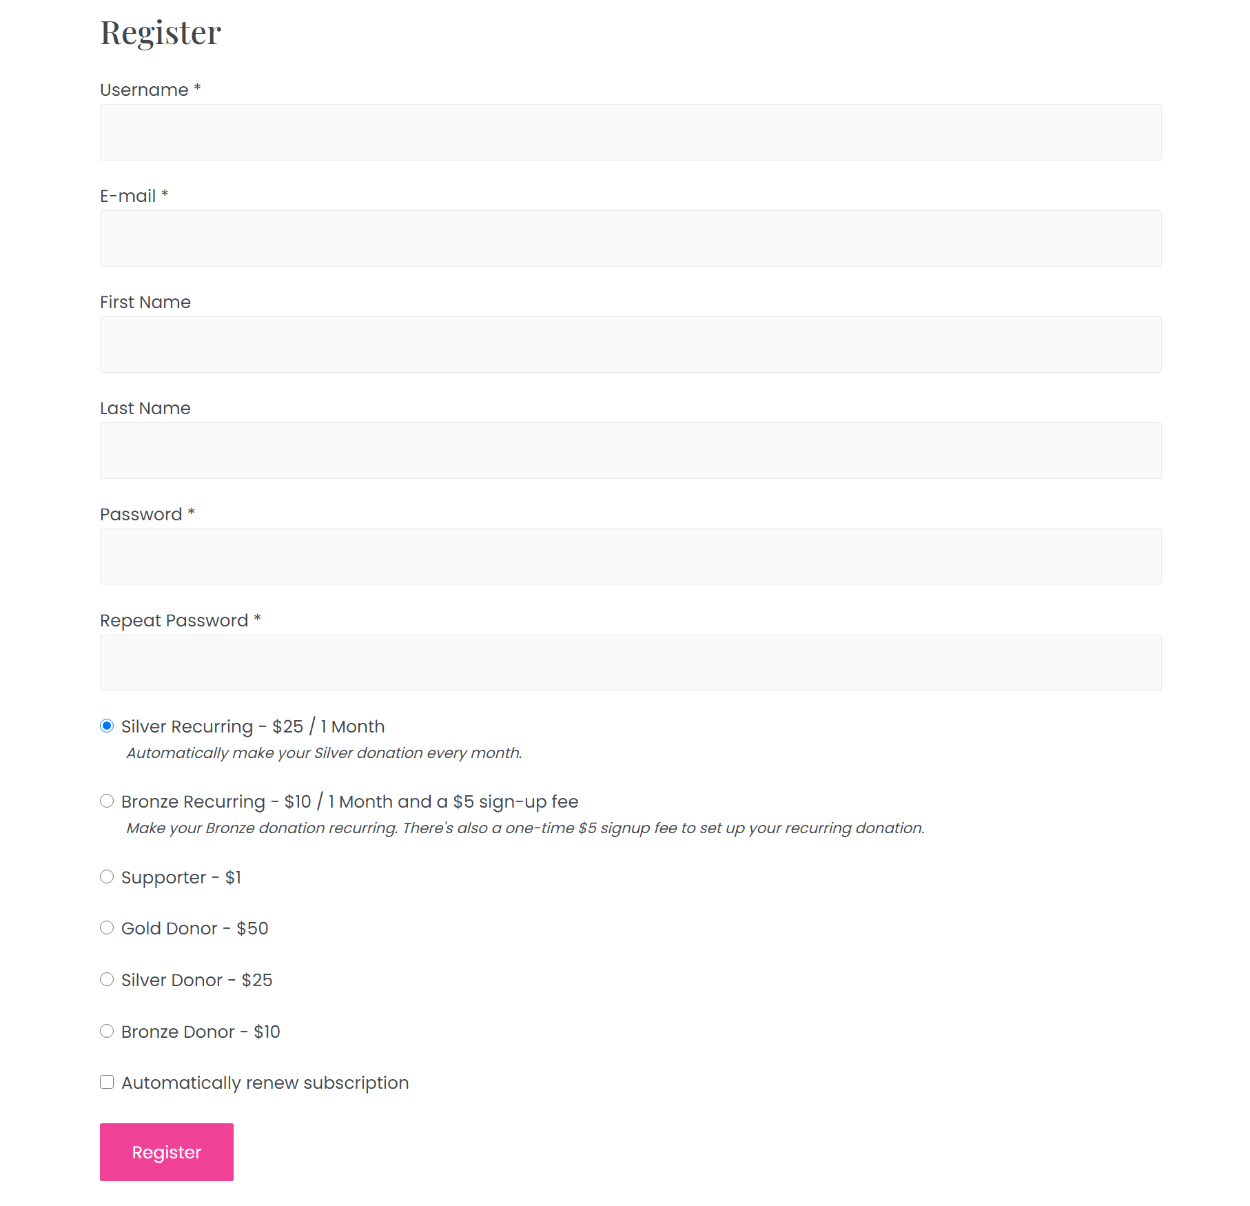
That’s it! Now, when people go to your register page (which Paid Member Subscriptions creates by default), they’ll see a form that collects basic user information and also lets them choose from one of the different payment options:
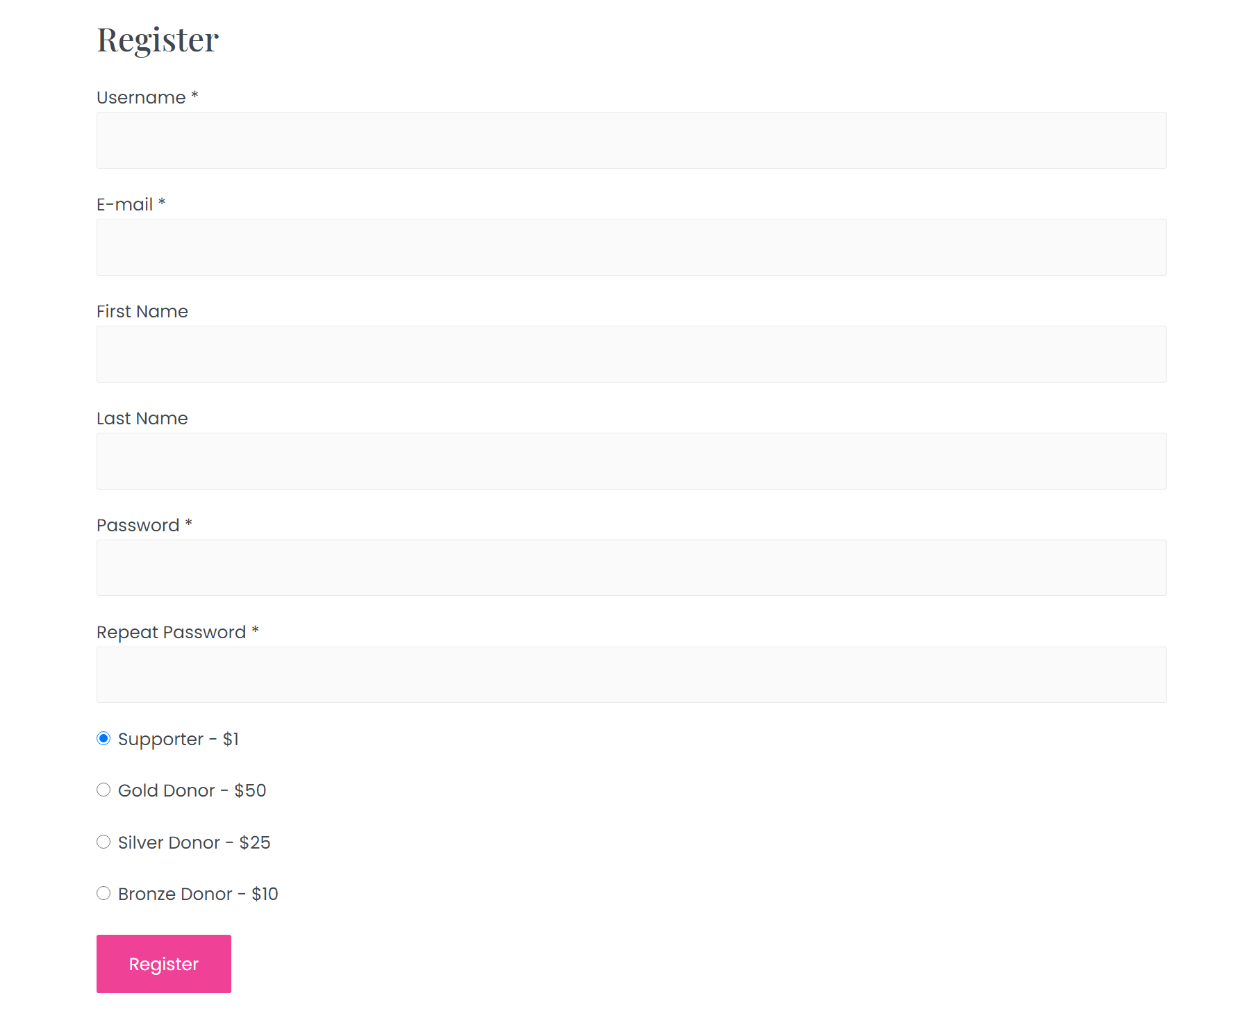

After they enter their details, choose a payment option, and click the Register button, they’ll be taken to the PayPal website to make the payment according to the payment option that they chose.
If you don’t like the “Register” text, you can change it to something like “Submit Order” using the Labels Edit add-on. The same goes for any other form label.
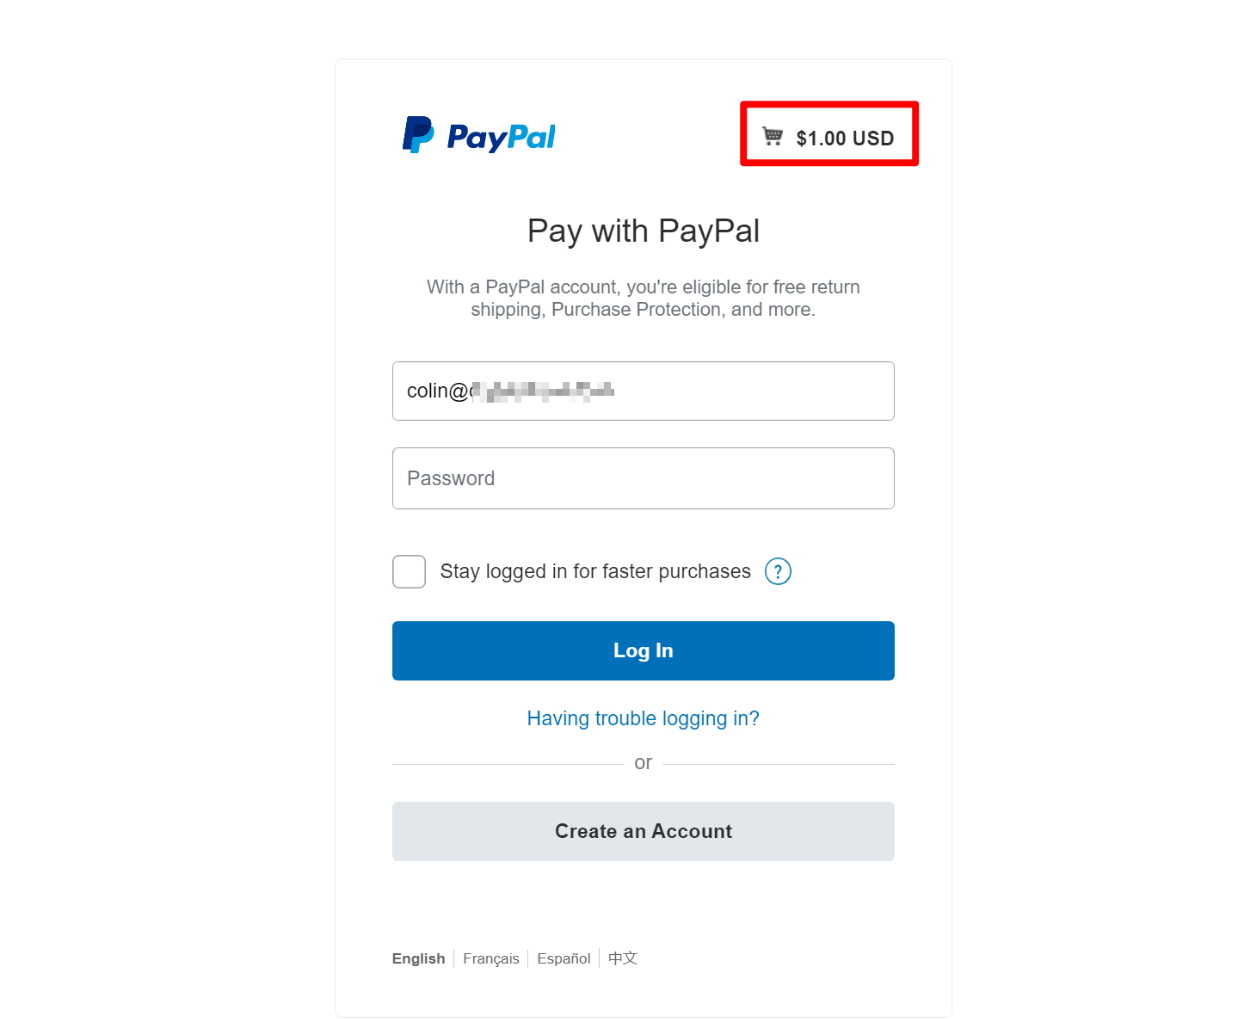
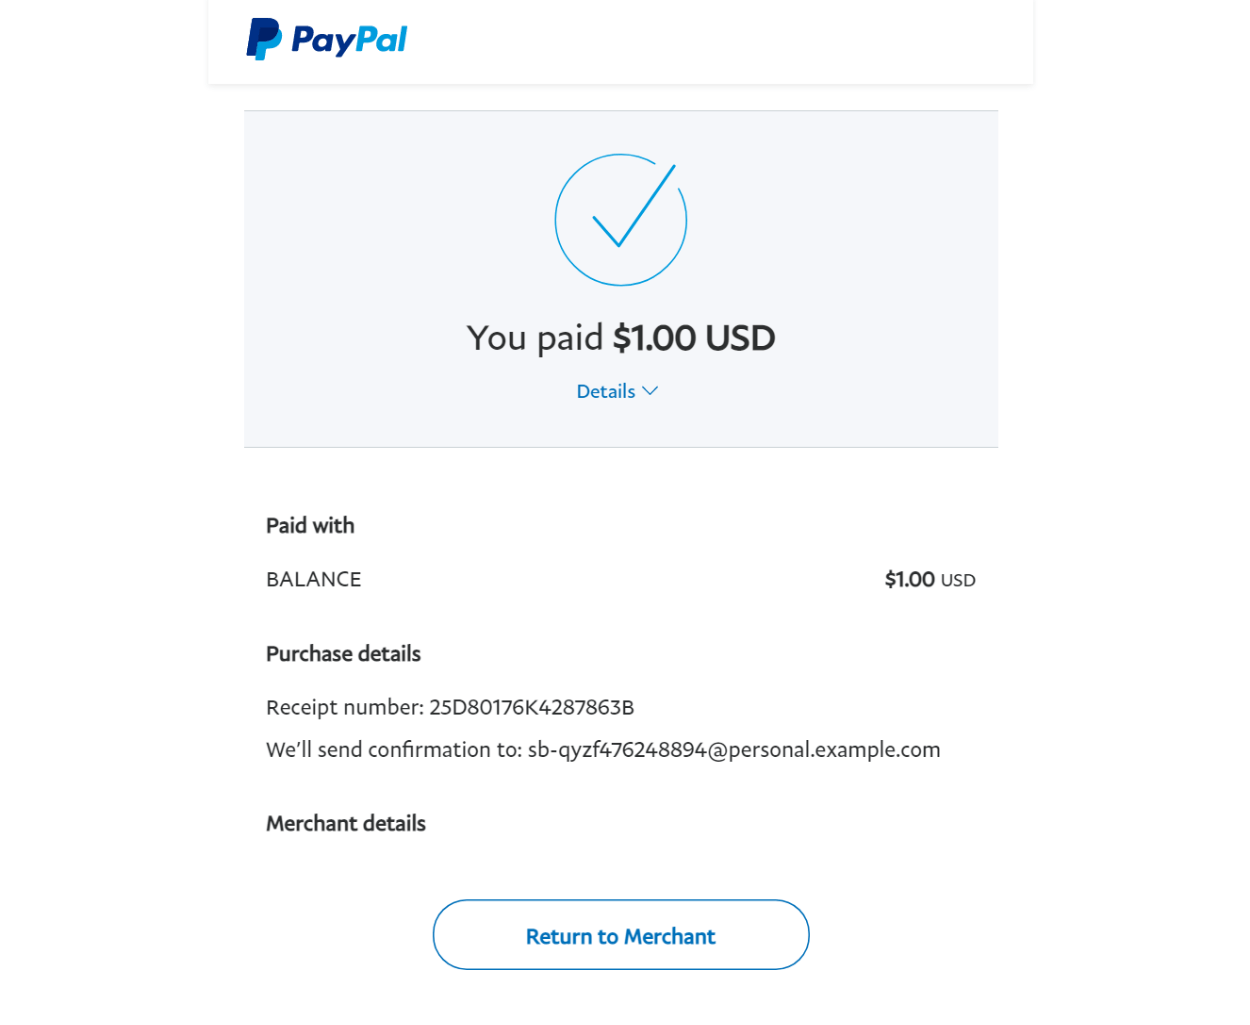
For example, if a person selected the $1 “Supporter” level, you can see that PayPal will automatically charge them $1:
With PayPal Standard, they’ll then be able to choose how they want to pay in the PayPal interface (PayPal Express works slightly differently):


They’ll then see a confirmation screen in PayPal (with Standard) along with a prompt to go back to the merchant (your WordPress site):

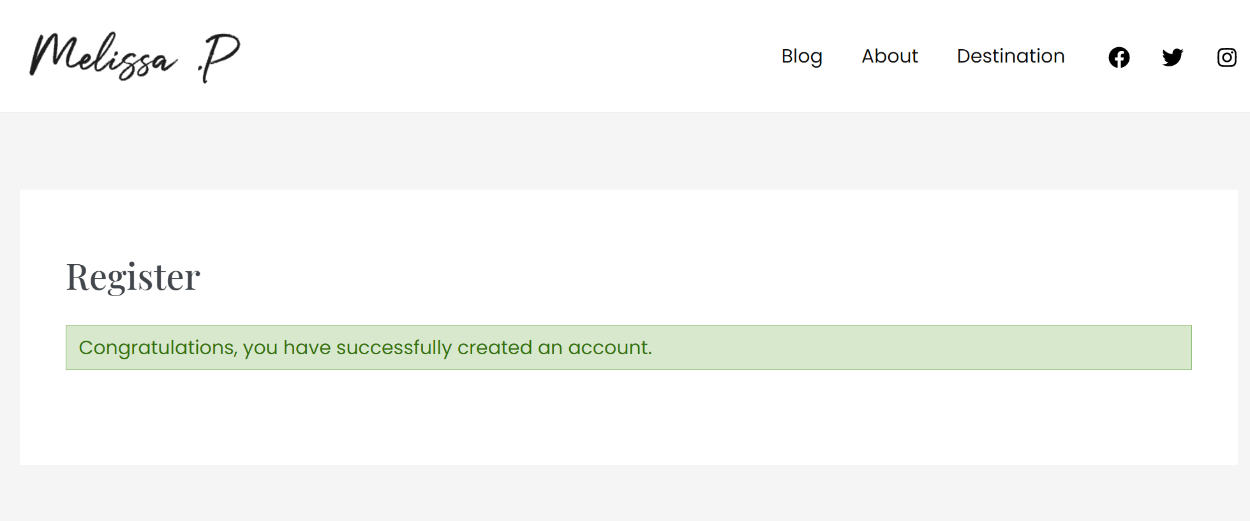
And then they’ll see a success message on your own website:

Users will also be able to see their payment history from the front-end of your site and you’ll be able to see a list of all payments by going to Paid Member Subscriptions → Payments.
4. Optional: Customize the Registration Form
By default, Paid Member Subscriptions creates a payment form that asks for a user’s:
- Username
- First name
- Last name
- Password
If you want to customize the PayPal payments form, Paid Member Subscriptions integrates with the Profile Builder plugin so that you can customize all the fields that appear on the payment form, including adding your own custom fields if needed.
How to Accept Recurring Payments With PayPal Standard or Express
In the first section, we showed you how to accept one-time payments via PayPal Standard using the free version of Paid Member Subscriptions.
Now, let’s get into how you can use the premium version, Paid Member Subscriptions Pro, to accept flexible recurring payments and/or use the PayPal Express gateway.
To get started, make sure to purchase and install the Paid Member Subscriptions Pro plugin and its associated add-ons for recurring payments and other features.
We’ll also assume that you’ve already gone through the basic setup wizard for Paid Member Subscriptions – if not, you can find that in Step #1 of our tutorial above on one-time payments.
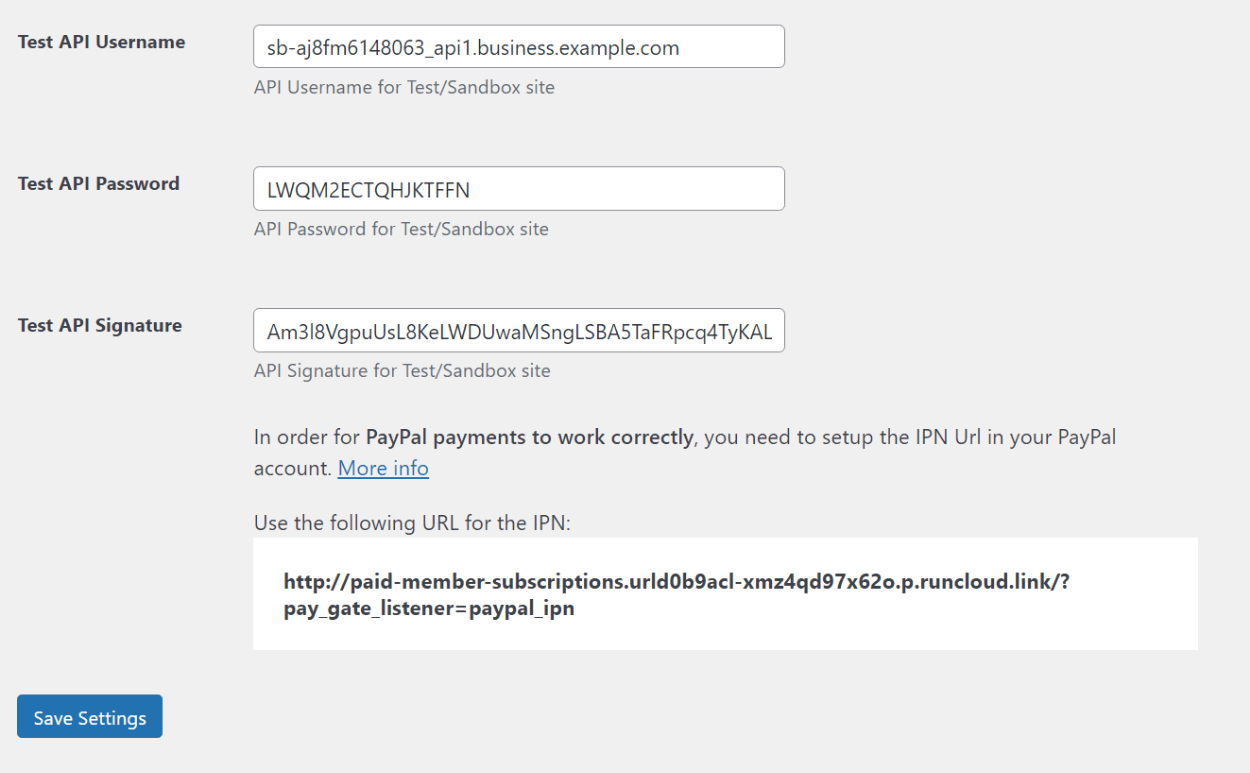
1. Set Up the PayPal API
In order to accept recurring payments with PayPal, you need to set up the PayPal API. You can add these details by going to Paid Member Subscriptions → Settings → Payments.
To learn how to access your PayPal credentials, you can follow the steps in this help doc (or this help doc if you want to use the test API while setting things up).

If you install the PayPal Express add-on, you can also choose between the different PayPal options in the Active Payment Gateways area of the Payments settings:


If you want to offer one-time sign-up fees or free trials, you’ll also need to enable PayPal Reference Payments – you can do that by following this help doc.
2. Create a Recurring Subscription Plan
Next, go to Paid Member Subscriptions → Subscription Plans → Add New to create a new PayPal payment option.
Now, though, you’ll get new options to set up recurring plans and adjust your pricing with one-time signup fees and/or free trials:
- Duration – how long the subscription lasts before it needs to renew. To have people pay every month, you’d set the duration to one month.
- Price – the price per payment.
- Sign-up fee – a one-time extra payment that only applies to the first billing cycle.
- Free trial – a free period before the first recurring payment starts.
- Renewal – whether to renew the subscription automatically, require the customer to opt-in to automatic renewals, or to only allow manual renewals.
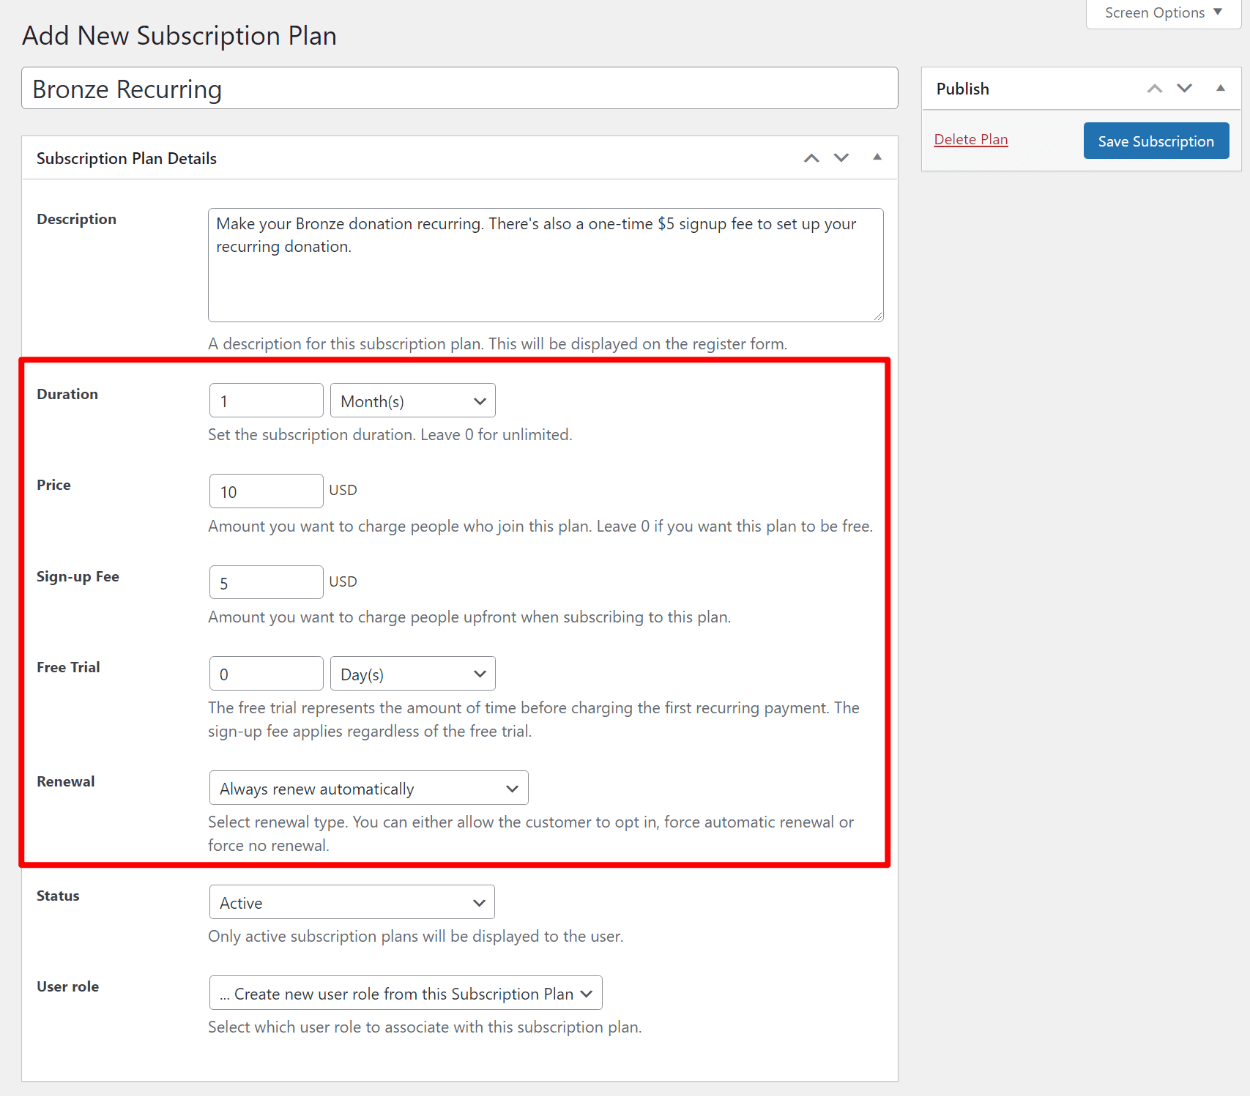

You can repeat the process to create as many additional payment options as needed.
3. Start Accepting Recurring PayPal Payments
Now, you’re ready to start accepting recurring payments.
Just as before, people can choose their payment plan from your custom register/payment form. Only now, they’ll also see an option for recurring payments, along with a summary of the recurring schedule:

When a person goes to check out with a recurring subscription, they’ll be prompted to log in to their PayPal account and complete the payment like usual. As we mentioned earlier, the exact flow that users experience will depend on whether you’re using PayPal Standard or PayPal Pro.
Other Add-Ons That You Can Use to Enhance Your PayPal Payments
Paid Memberships Pro also gives you access to a lot of other add-ons that you can use to enhance your PayPal payment forms. Let’s go through them…
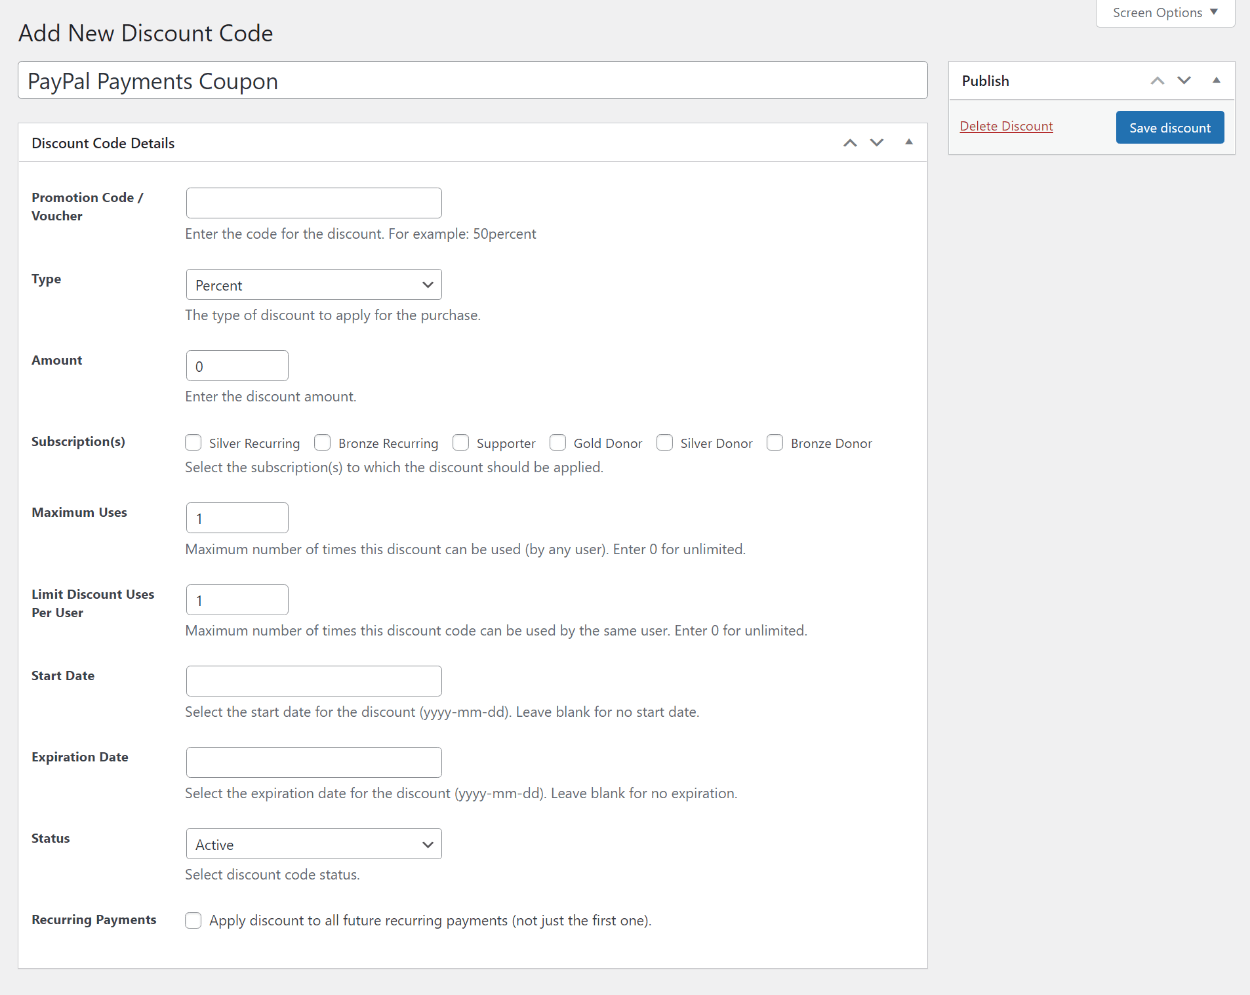
Coupons and Discounts
With the Discount Codes add-on, you can create your own flat-rate or percentage discounts that apply to your PayPal payments forms. You’ll also be able to set up restrictions such as:
- Which subscription plans the discount applies to – you can make all plans eligible for it or only certain plans.
- Start and stop dates.
- Max uses for all users and for each individual user.
- For recurring payments, whether the discount only applies to the first payment or to all future recurring payments.

Pay What You Want
So far, all of the examples have included set prices. But with the Pay What You Want add-on, you can let users enter their own price and PayPal will automatically charge them the amount that the user entered.
You can use this in any situation, but it can be an especially great option for donations because some users might want to give more or less than your suggestion.
Tax
If you need to collect tax on your PayPal payments, the Tax & EU VAT add-on lets you set up your own custom tax rates, including support for EU VAT.
You can also charge different tax rates depending on a user’s location, which gives you full control over everything.
Invoices
With the Invoices add-on, you can attach PDF invoices to the confirmation emails that your site sends to users after they make a one-time payment via PayPal or subscribe to a recurring plan.
Get Started With the Best WordPress PayPal Plugin Today
If you’re looking for a flexible WordPress PayPal plugin with a form, Paid Member Subscriptions can help you out.
The free version lets you accept one-time payments using PayPal Standard while the Pro version unlocks flexible recurring payments, along with access to PayPal Express and other useful features.
The benefit of using Paid Member Subscription’s registration-based approach is that everyone who makes a payment via PayPal will be able to manage their payment history from the front-end of your site. You’ll also be able to easily keep track of everyone who has paid you.
To get started with simple one-time PayPal payments, install the free version of Paid Member Subscriptions from WordPress.org.
Then, upgrade to Paid Member Subscriptions Pro to get access to recurring payments and PayPal Express, along with other useful features such as:
- Flexible coupons and discount codes.
- “Pay what you want” options.
- Tax and EU VAT based on users’ locations.
- Invoices.
Paid Member Subscriptions Pro
The best WordPress PayPal plugin with form for one-time or recurring payments using PayPal Standard or PayPal Express.
Do you still have any questions about setting up a WordPress PayPal integration? Let us know in the comments and we’ll try to help!
The post How to Set Up a WordPress PayPal Plugin With Form (One-Time or Recurring Payments) appeared first on Cozmoslabs.