


Are you having bother sending emails out of your WordPress website?
One simple approach to enhance WordPress electronic mail reliability is by utilizing the Amazon Easy Electronic mail Service, or Amazon SES.
On this article, we are going to present you step-by-step ship emails out of your WordPress website utilizing Amazon SES.

Why and When You Want Amazon SES for WordPress Emails
All too usually we hear that customers have bother sending emails from their WordPress web site. That’s an issue since you depend on electronic mail to maintain your web site working easily.
For instance, your website depends on electronic mail to reset misplaced passwords, or ship notifications when new customers register or somebody fills in your contact type.
By default, WordPress makes use of the PHP mail perform to ship out emails. Nonetheless, this perform doesn’t all the time work as anticipated. That’s actually because WordPress internet hosting corporations block it to stop abuse and spam.
Additionally, spam filters on standard electronic mail service suppliers examine incoming emails to confirm the sender. Default WordPress emails fail this examine and typically could not even make it to the spam folder.
SMTP (Easy Mail Switch Protocol) is the business commonplace for sending electronic mail. Not like the PHP mail perform, SMTP makes use of correct authentication, which will increase the possibilities your emails might be efficiently delivered.
Amazon SES is an SMTP service designed for enterprise electronic mail. It’s resolution for sending WordPress notification emails to simply you and your group, and in addition sending electronic mail newsletters to massive mailing lists.
The service is free for the primary yr. After that, chances are you’ll must pay as you go, relying on the variety of emails you ship and different components. You may get an concept of what it is going to value you on the Amazon SES pricing web page.
On this tutorial, we’ll present you ship electronic mail to the Amazon SES service out of your WordPress web site utilizing the WP Mail SMTP plugin.
Editor’s Observe: we consider that Amazon SES is a bit difficult for inexperienced persons. Because of this we typically advocate customers to make use of SMTP.com or Sendinblue which each works with WP Mail SMTP plugin as nicely.
Configuring Your Amazon AWS Account
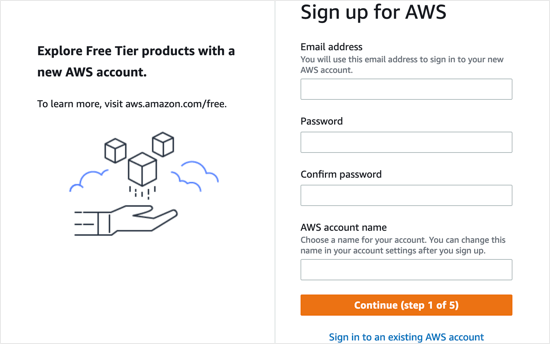
First, you’ll want to enroll in a free account by visiting the Amazon Internet Companies web site. Whereas the account is free, you have to to enter bank card particulars when establishing the account.

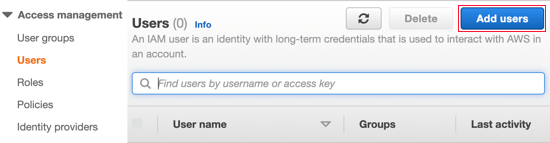
When you’ve created an AWS account, you’ll must arrange a Person. It will offer you entry keys wanted later.
To try this, it’s worthwhile to open the Amazon Internet Companies Customers web page. Inside this web page, it’s worthwhile to click on the ‘Add customers’ button.

Subsequent, it’s worthwhile to arrange a brand new consumer. Within the Person title subject, you possibly can add any title you’d like, however we advocate you employ the format yourdomain_wpmailsmtp.
This might be useful sooner or later in the event you create further customers for different web sites. You’ll know at a look which web site every consumer is for, and that it’s utilized by the WP Mail SMTP plugin.
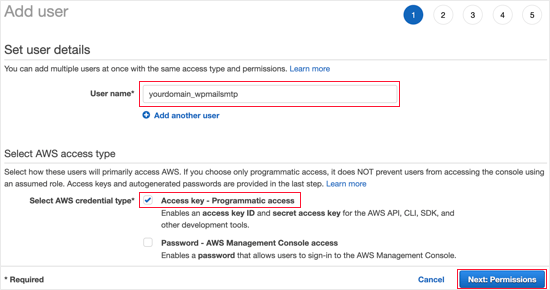

Additionally, you will want to pick out the AWS credential kind. It’s best to click on the checkbox subsequent to ‘Access key – Programmatic access’.
When you’re completed, you possibly can click on the ‘Next: Permissions’ button on the backside of the display screen.
You’ll now see the ‘Set permissions’ display screen. It is advisable to click on on the third choice, ‘Connect present insurance policies instantly’.
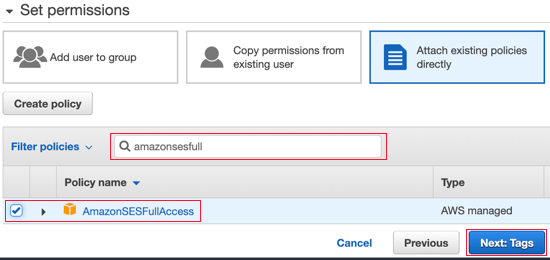

Then you need to kind ‘AmazonSESFullAccess’ into the search bar to filter the listing. Now only one coverage needs to be listed. Ensure you click on the checkbox on the left of that coverage.
After that, click on on the ‘Next: Tags’ button on the backside of the display screen. We don’t want to alter any settings on the ‘Add tags’ web page, so simply click on the ‘Next: Review’ button and also you’ll be taken to the Assessment web page.
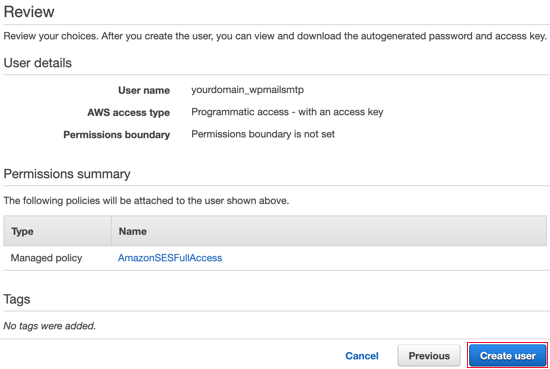
As soon as there, you possibly can see all the particulars you’ve chosen for this consumer. If all the pieces seems right, then merely click on on the ‘Create user’ button.

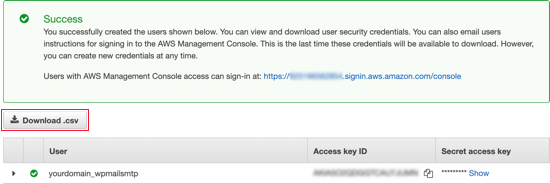
You’ll now see a message that you just efficiently created the consumer. Additionally, you will see an Entry Key ID and Secret Entry Key on your consumer.
You’ll want these later within the tutorial, so you need to make a replica of them in a secure location or just obtain the CSV file. Alternatively, simply preserve this browser window open so you possibly can come again to it later.

Switching Amazon Internet Companies to Manufacturing Mode
By default, your Amazon SES account might be run in Sandbox Mode. This restricted mode will solely permit you to ship emails to verified electronic mail addresses and is designed to cease spammers from abusing the system.
If you wish to ship emails to anybody, then you definitely’ll should make a request to maneuver from Sandbox Mode to Manufacturing Mode. Step one is to go to the AWS Help web page for creating a brand new case.
First you’ll must log in because the consumer you simply arrange. When you’re on the ‘Create case’ web page, you’ll must click on on the second choice, ‘Service limit increase’.


Subsequent, you have to to fill within the case particulars. Amazon will use your solutions to just remember to received’t be sending spam emails.
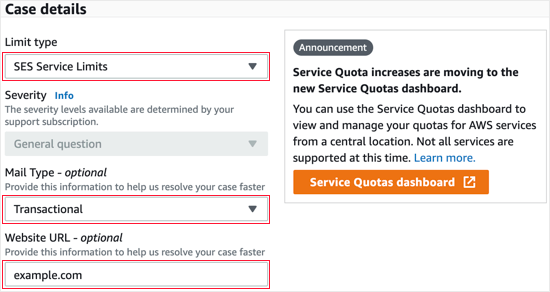
It’s best to depart the restrict kind as ‘SES Service Limits’ and choose ‘Transactional’ because the mail kind. Within the Web site URL subject you need to kind in your website’s handle.

The following part is labeled ‘Describe, intimately, how you’ll solely ship to recipients who’ve particularly requested your mail’. Right here you need to share some particulars about your electronic mail sending course of.
For instance, you could possibly say that you’re solely sending website notifications to the location administrator, or sending mail solely to those that have stuffed out a type in your website.
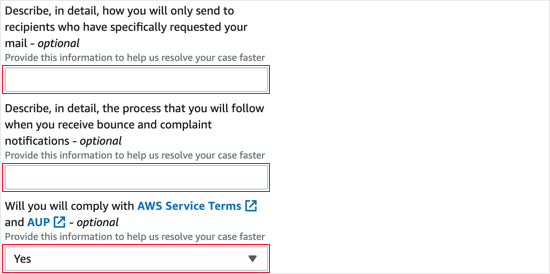

Then you might be requested to ‘Describe, intimately, the method that you’ll comply with once you obtain bounce and criticism notifications’. For instance, you possibly can clarify that the ‘Force From Email’ setting in WP Mail SMTP will ship all bounce notifications to a specified electronic mail handle.
When requested whether or not you’ll adjust to the AWS phrases of service, you need to reply ‘Yes’.
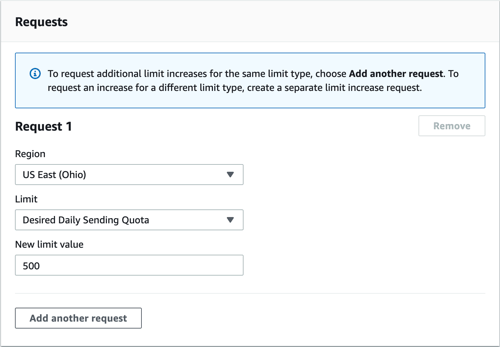
Subsequent, you need to scroll right down to the Requests part. Begin by choosing the identical area as once you arrange your AWS account. This would be the area closest to the place your website’s server is situated.
For the restrict subject, you need to choose ‘Desired Daily Sending Quota’ from the drop down menu. After that, below ‘New limit value’ you need to kind in your estimate of the utmost variety of emails you anticipate to ship in a day.

The final part on the web page is ‘Use Case Description’. Right here you need to share particulars of the form of web site you might have and why you’ll be sending emails.
Ensure you embody the forms of emails that might be despatched, resembling confirmations of type submissions, buy receipts, or newsletters. A extra detailed response right here could give your utility a larger likelihood of success.
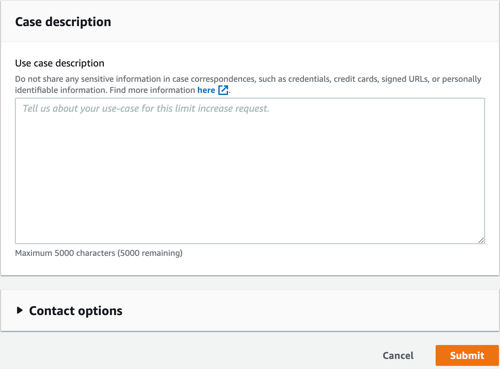

After getting accomplished the appliance, go forward and click on the Submit button. You’ll get two emails from Amazon Internet Companies confirming {that a} new case has been created.
It’s best to obtain a choice from Amazon inside one enterprise day. However within the meantime, you possibly can proceed with this tutorial.
Putting in WP Mail SMTP on Your WordPress Web site
WP Mail SMTP is one of the best SMTP plugin for WordPress. You’ll need to purchase a Professional plan or greater to make use of Amazon SMTP. This additionally offers you entry to premium help and white glove arrange by one among their consultants.
When you’d prefer to have the WP Mail SMTP help group set this up for you, you possibly can comply with their information on request white glove arrange for SMTP as an alternative of following the steps beneath.
First, you’ll want to put in and activate WP Mail SMTP in your web site. For extra particulars, try our information on set up a WordPress plugin.
Putting in WP Mail SMTP
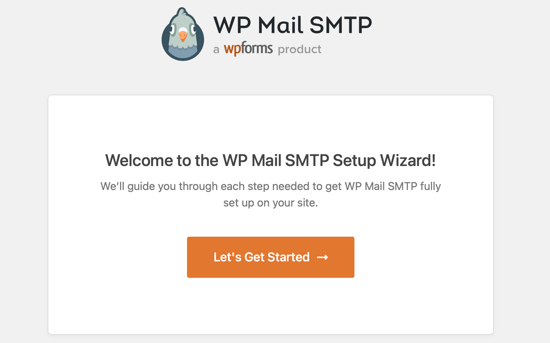
On activation, the WP Mail SMTP setup wizard will begin mechanically. You’ll must click on on the Let’s Get Began button.

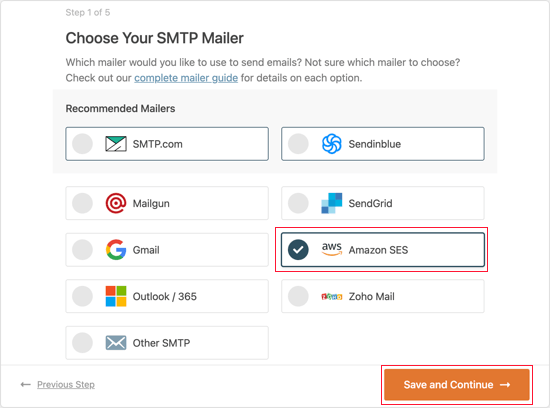
Subsequent, you’ll be proven an inventory of electronic mail companies which might be supported. Right here it’s worthwhile to choose Amazon SES after which click on on the ‘Save and Proceed’ button.

You will notice a message explaining that Amazon SES is an efficient alternative for technically superior customers. It’s best to click on the ‘I Understand, Continue’ button to dismiss the message.
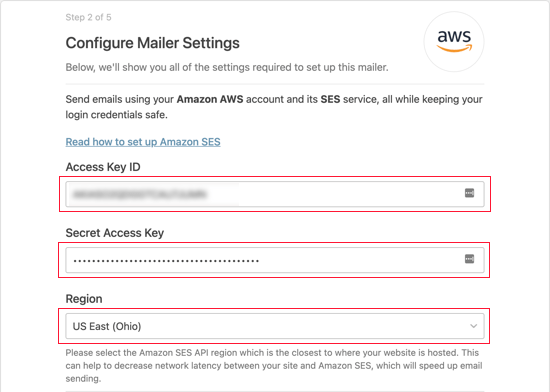
After that, you’ll be requested to configure your mailer settings. You’ll must fill within the Entry Key ID, Secret Entry Key, and Area fields with the knowledge you copied earlier once you created an Amazon AWS account.

Now it’s worthwhile to scroll right down to the SES Identities part. Right here you possibly can select to confirm both your area or electronic mail handle.
Verifying Your Area
The advantage of verifying by area is that it’ll confirm any electronic mail handle that makes use of that area. Verifying an electronic mail handle is simpler, however then you’ll have to confirm each electronic mail handle you want to use individually.
To confirm your area title on Amazon SES, it’s worthwhile to ensure the Confirm Area choice is chosen. After that, you need to kind within the area title you used when signing up for Amazon AWS.
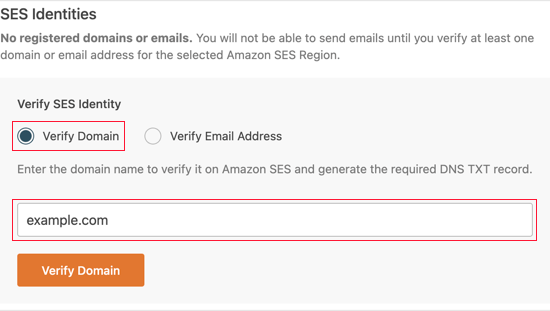

When you’ve entered the area title, it’s worthwhile to click on the Confirm Area button. You may be given a reputation and worth so as to add to a brand new TXT document in your area’s DNS settings.
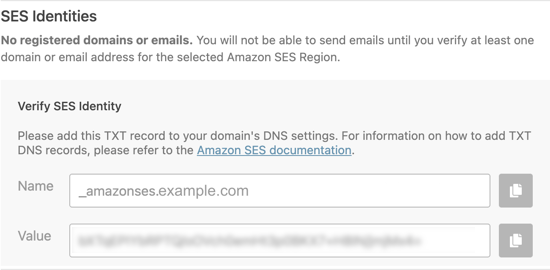

For directions on create a TXT document to your website’s DNS settings, see our DNS information
After you might have efficiently verified your area, you need to return to your website’s WP Mail SMTP settings after which refresh the web page. Any verified domains will now be displayed.
Now you can skip the ‘Verifying Your Email’ part beneath and transfer on to ‘Setting Up the From Name and Email’.
Verifying Your Electronic mail
When you solely plan on utilizing a single electronic mail handle with WP Mail SMTP, then verifying your electronic mail handle is an efficient alternative.
First, it’s worthwhile to click on on the Confirm Electronic mail Deal with choice after which you need to kind the e-mail handle you intend to make use of within the subject offered.
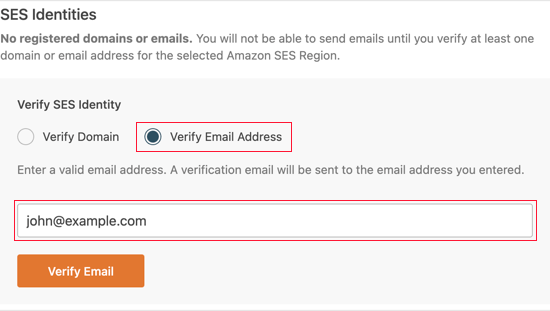
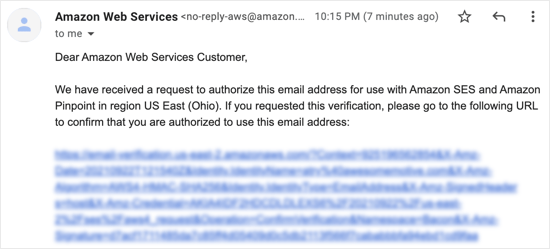
When you’ve entered the e-mail handle it’s worthwhile to click on the Confirm Electronic mail button. You will notice a discover asking you to examine your electronic mail inbox for a affirmation electronic mail.
This electronic mail might be despatched from Amazon Internet Companies and can embody a verification hyperlink. You should click on this hyperlink inside 24 hours as a way to confirm this electronic mail handle.

After you’ve efficiently verified your electronic mail, you possibly can return to your website’s WP Mail SMTP settings and refresh the web page. Any verified electronic mail addresses needs to be displayed.
Setting Up the From Title and Electronic mail
Now you need to scroll right down to the ultimate part of the web page the place you possibly can enter the ‘From’ title and electronic mail handle.
It is advisable to kind a reputation within the From Title subject. That is the title related to the emails you ship and might be set to your website’s title by default.
You may change this to any title, resembling your corporation title or private title. You may also examine the Power From Title choice to use this setting site-wide.
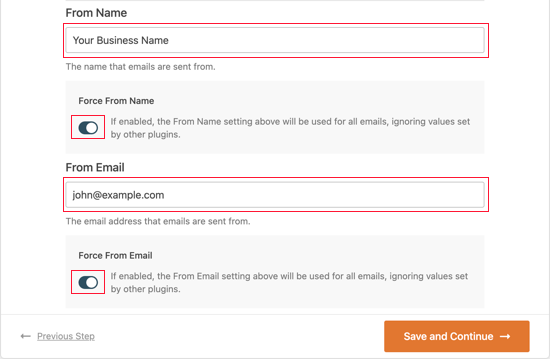

You may enter any verified electronic mail handle into the From Electronic mail subject. For finest outcomes, we advocate that you just use a enterprise electronic mail handle together with your website’s area resembling instance@yourwebsite.com.
We advocate you examine the field labeled Power From Electronic mail. This implies you’ll mechanically use the identical outgoing electronic mail handle throughout your WordPress website.
This feature will prevent the difficulty of modifying the e-mail settings all through your website and makes it much less possible that your emails will go to spam.
When you’ve completed coming into the settings, you possibly can click on the Save and Proceed button.
Enabling WP Mail SMTP Options
Lastly, you’ll be requested which electronic mail options you want to allow. By default, the primary three choices are enabled. These are improved electronic mail deliverability, electronic mail error monitoring, and a weekly electronic mail abstract.
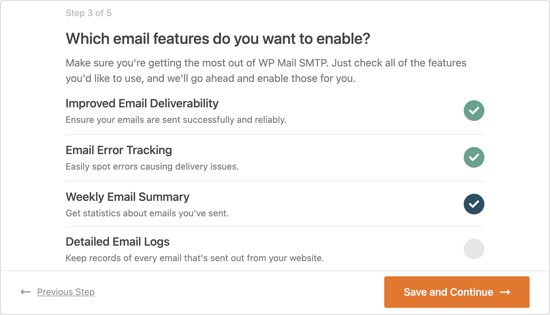

When you like, you possibly can allow detailed electronic mail logs as nicely. After getting made your choice, you need to click on the Save and Proceed button.
Coming into Your WP Mail SMTP License Key
Lastly, it’s worthwhile to enter your WP Mail SMTP license key. You have been despatched this key by electronic mail once you signed up on your WP Mail SMTP Professional account.
You may also discover your license key by clicking ‘View License Key, Details, and Downloads’ from the Account Web page on the WP Mail SMTP web site.


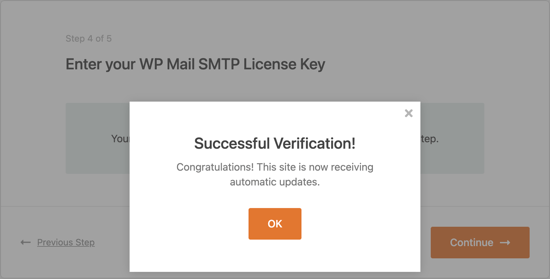
When you’ve entered your license key you need to click on the Confirm License Key button. It’s best to see successful message. Merely click on OK to acknowledge the message after which click on on the Proceed button.

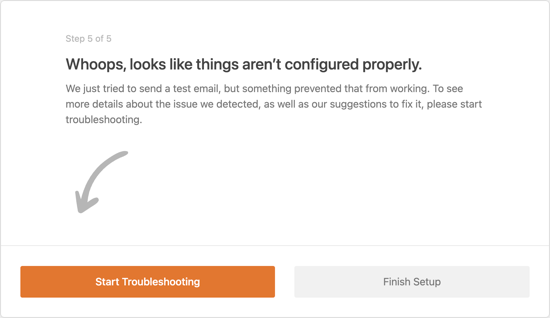
WP Mail SMTP will now examine your mailer configuration. If all the pieces is working as anticipated, then you definitely’ll see a display screen with the message ‘Congrats, you’ve efficiently arrange WP Mail SMTP!’
If there’s something incorrect, then you definitely’ll see a message that claims ‘Whoops, seems like issues aren’t configured correctly’. You’ll need to click on the Begin Troubleshooting button to repair the error.

Sending a Check Electronic mail
When you’ve completed troubleshooting, you would possibly prefer to ship out one other check electronic mail to ensure all the pieces is working accurately.
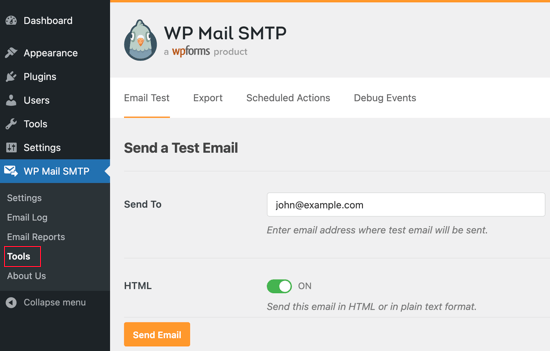
You’ll must navigate to WP Mail SMTP » Instruments after which click on on the ‘Email Test’ tab. By default, the check electronic mail might be despatched to your website’s admin electronic mail handle, however you possibly can change this. Subsequent, click on ‘Send Email’.

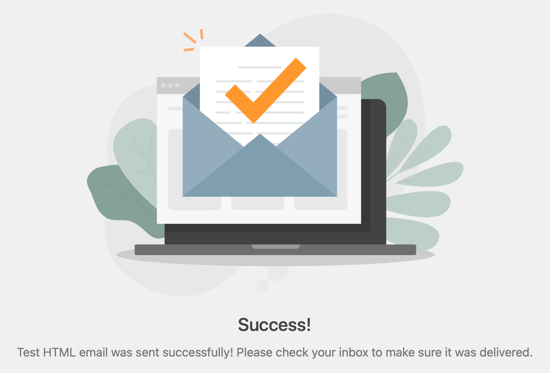
If all the pieces has been arrange accurately, then you need to see a Success! message.

That’s it! We hope this tutorial helped you learn to ship WordPress emails utilizing Amazon SES. You may additionally wish to be taught get a free SSL certificates on your WordPress web site or try our listing of will need to have WordPress plugins.
When you appreciated this text, then please subscribe to our YouTube Channel for WordPress video tutorials. You may also discover us on Twitter and Fb.
The publish How you can Ship WordPress Emails Utilizing Amazon SES (Step by Step) appeared first on WPBeginner.