

In in the present day’s Divi tutorial we’ll present you, step-by-step, methods to create a sticky navigation bar from backside to prime in Divi. This may permit the navigation bar to stay on the backside of the web page initially for a novel above-the-fold format. Then when you scroll previous the above-the-fold part of the web page, the navigation bar will follow the highest of the web page and stay there all through the remainder of the web page. You may say that the web page will “pick up” the menu on the backside of the display screen and convey a pleasant interacting impact to your major menu and to your web site.
Let’s get began!
Sneak Peek
That will help you visualize the end result we’re making an attempt to realize, let’s check out the ultimate end result:
Obtain the Format for FREE
To put your palms on the designs from this tutorial, you’ll first have to obtain it utilizing the button beneath. To achieve entry to the obtain you have to to subscribe to our Divi Day by day electronic mail checklist by utilizing the shape beneath. As a brand new subscriber, you’ll obtain much more Divi goodness and a free Divi Format pack each Monday! If you happen to’re already on the checklist, merely enter your electronic mail deal with beneath and click on obtain. You’ll not be “resubscribed” or obtain further emails.
@media solely display screen and ( max-width: 767px ) {.et_bloom .et_bloom_optin_1 .carrot_edge.et_bloom_form_right .et_bloom_form_content:earlier than { border-top-color: #ffffff !necessary; border-left-color: clear !necessary; }.et_bloom .et_bloom_optin_1 .carrot_edge.et_bloom_form_left .et_bloom_form_content:after { border-bottom-color: #ffffff !necessary; border-left-color: clear !necessary; }
}.et_bloom .et_bloom_optin_1 .et_bloom_form_content button { background-color: #f92c8b !necessary; } .et_bloom .et_bloom_optin_1 .et_bloom_form_content .et_bloom_fields i { coloration: #f92c8b !necessary; } .et_bloom .et_bloom_optin_1 .et_bloom_form_content .et_bloom_custom_field_radio i:earlier than { background: #f92c8b !necessary; } .et_bloom .et_bloom_optin_1 .et_bloom_border_solid { border-color: #f7f9fb !necessary } .et_bloom .et_bloom_optin_1 .et_bloom_form_content button { background-color: #f92c8b !necessary; } .et_bloom .et_bloom_optin_1 .et_bloom_form_container h2, .et_bloom .et_bloom_optin_1 .et_bloom_form_container h2 span, .et_bloom .et_bloom_optin_1 .et_bloom_form_container h2 robust { font-family: “Open Sans”, Helvetica, Arial, Lucida, sans-serif; }.et_bloom .et_bloom_optin_1 .et_bloom_form_container p, .et_bloom .et_bloom_optin_1 .et_bloom_form_container p span, .et_bloom .et_bloom_optin_1 .et_bloom_form_container p robust, .et_bloom .et_bloom_optin_1 .et_bloom_form_container type enter, .et_bloom .et_bloom_optin_1 .et_bloom_form_container type button span { font-family: “Open Sans”, Helvetica, Arial, Lucida, sans-serif; } p.et_bloom_popup_input { padding-bottom: 0 !necessary;}


Obtain For Free
Be part of the Divi E-newsletter and we’ll electronic mail you a replica of the final word Divi Touchdown Web page Format Pack, plus tons of different wonderful and free Divi assets, ideas and tips. Observe alongside and you can be a Divi grasp very quickly. In case you are already subscribed merely sort in your electronic mail deal with beneath and click on obtain to entry the format pack.
You could have efficiently subscribed. Please examine your electronic mail deal with to substantiate your subscription and get entry to free weekly Divi format packs!
To import the part format to your Divi Library, navigate to the Divi Library.
Click on the Import button.
Within the portability popup, choose the import tab and select the obtain file out of your pc.
Then click on the import button.


As soon as finished, the part format shall be accessible within the Divi Builder.
Let’s get to the tutorial, lets?
What You Must Get Began


To get began, you have to to do the next:
- If you happen to haven’t but, set up and activate the Divi Theme.
- Create a brand new web page in WordPress and use the Divi Builder to edit the web page on the entrance finish (visible builder).
- Select the choice “Build From Scratch”.
After that, you’ll have a clean canvas to begin designing in Divi.
Making a Sticky Navigation Bar from Backside to Prime in Divi
Half 1: Creating the Above-the-Fold Part and Heading
For the primary a part of this tutorial, we’re going to create the above-the-fold part and heading that can function the primary header part of our web page. The part shall be fullscreen on desktop with the intention to be sure that the part takes up your entire viewport.
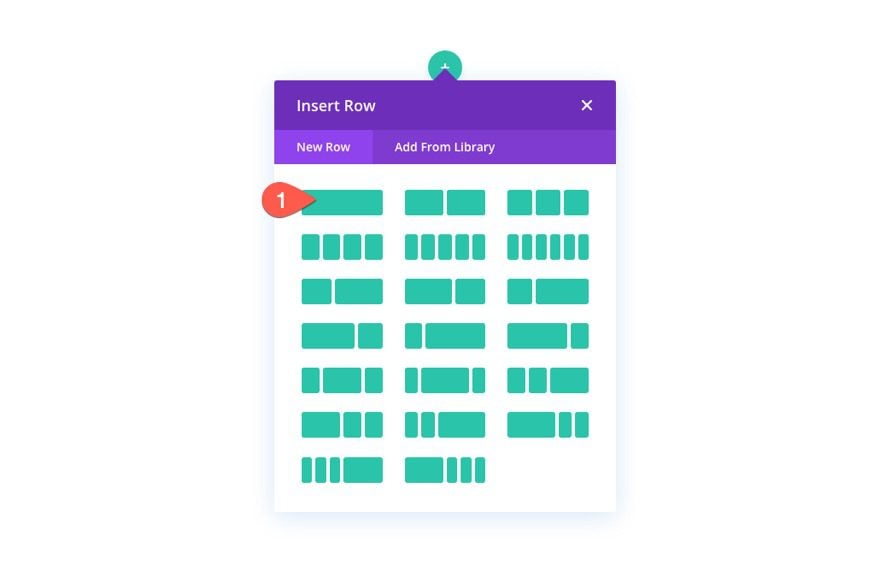
Add Row
To begin, add a one-column row to the default part.

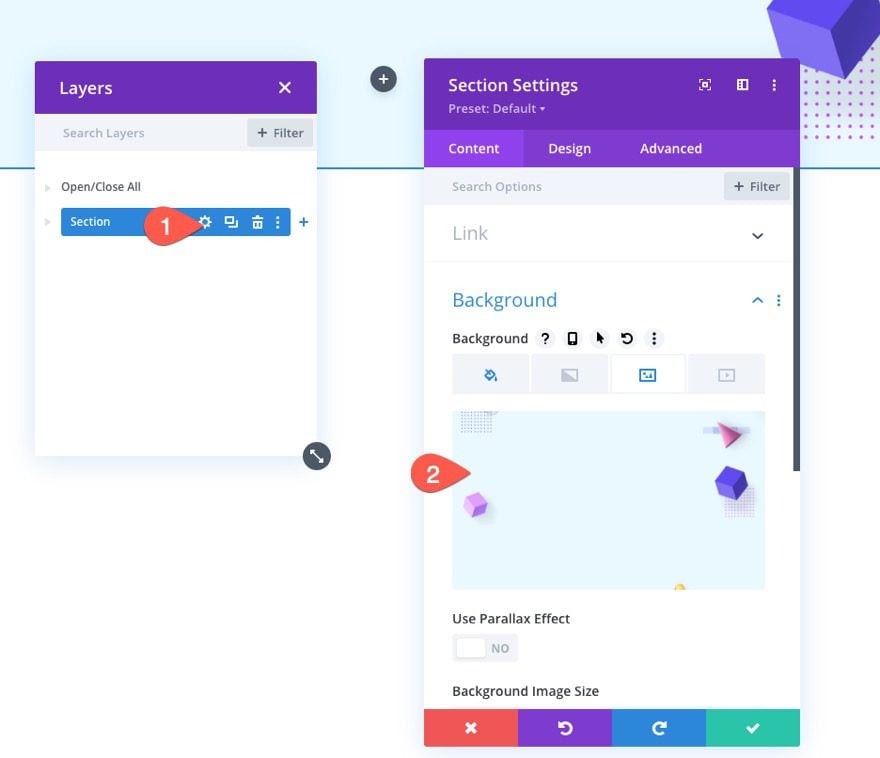
Part Settings
Earlier than including a module, open the settings for the part and add a background as follows:
- Background Coloration: #e9f9ff
- Background Picture: [add image]

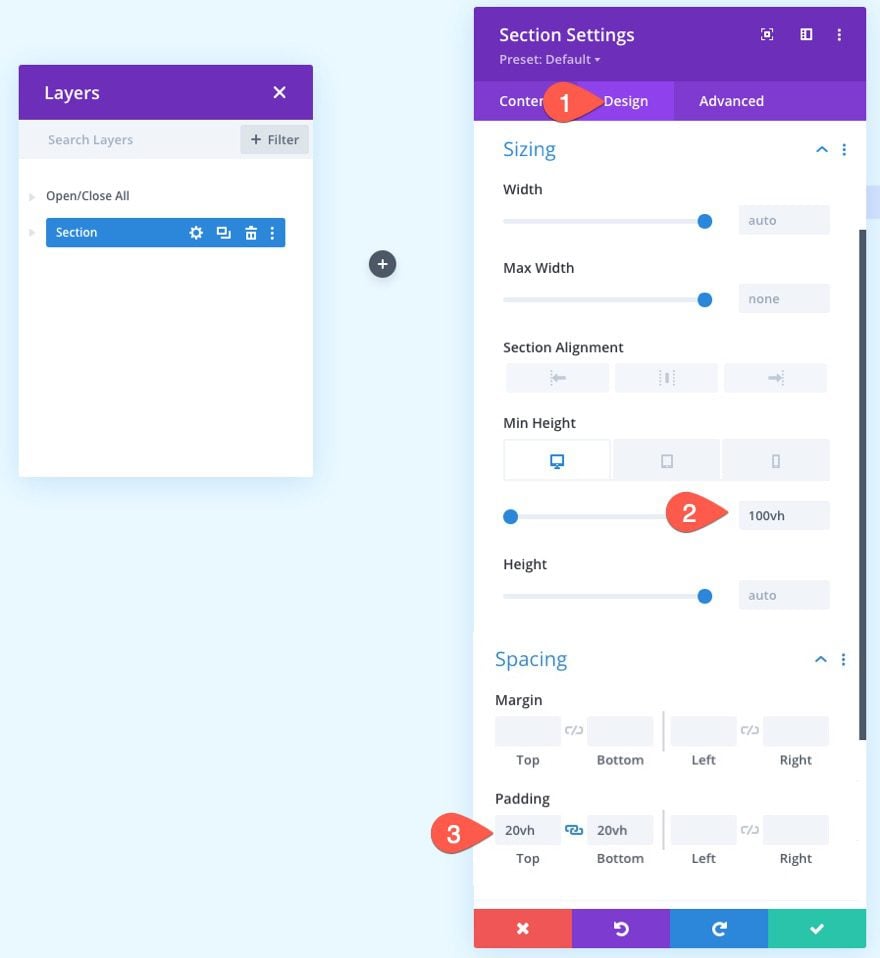
Beneath the design tab, replace the min-height and padding.
- Min Peak: 100vh (desktop), auto (pill and cellphone)
- Padding: 20vh prime, 20vh backside

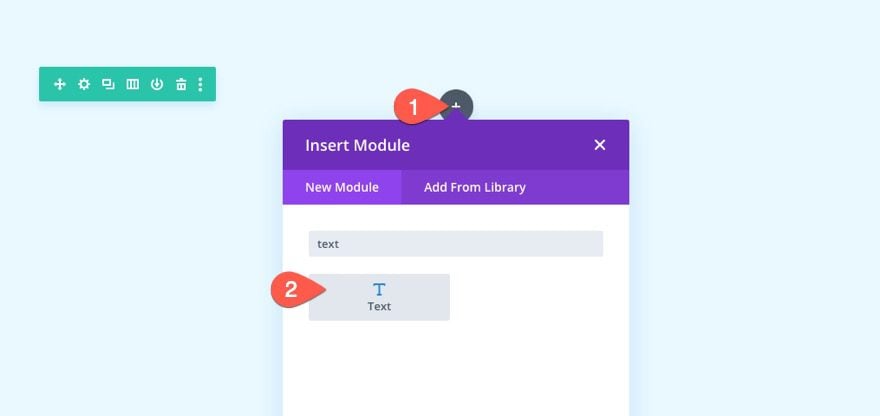
Heading Textual content
To create the heading textual content, add a brand new textual content module to the row.

Then replace the content material with the next H1 heading:
<h1>Above the Fold</h1>
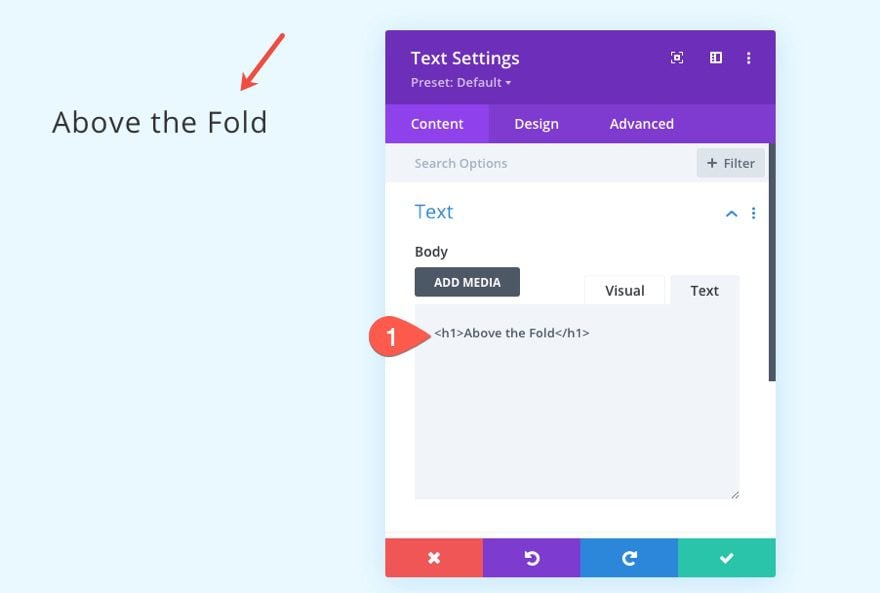

Textual content Settings
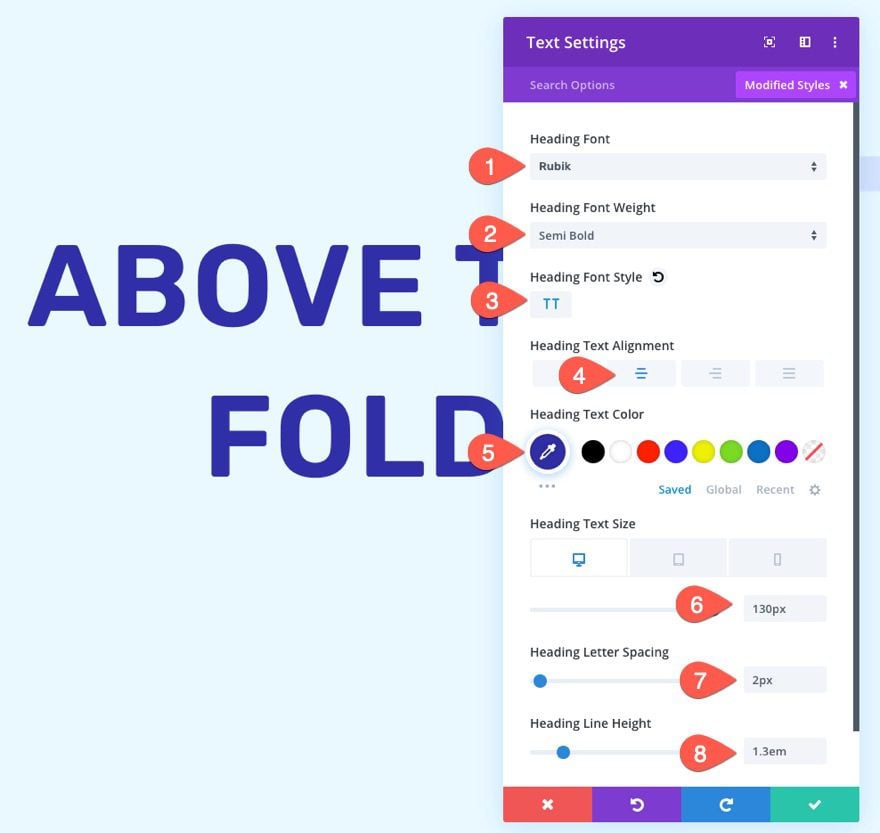
Beneath the design tab of the textual content settings, replace the heading font kinds as follows:
- Heading Font: Rubik
- Heading Font Weight: Semi Daring
- Heading Font Type TT
- Heading Textual content Alignment: Heart
- Heading Textual content Coloration: #302ea7
- Heading Textual content Dimension: 130px (desktop), 70px (pill), 40px (cellphone)
- Heading Letter Spacing: 2px
- Heading Line Peak: 1.3em

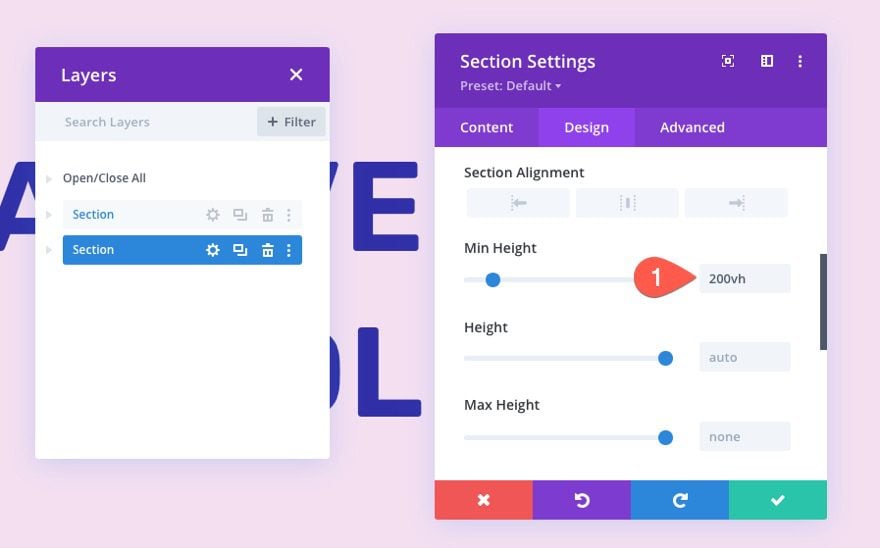
Half 2: Creating the Under-the-Fold Part
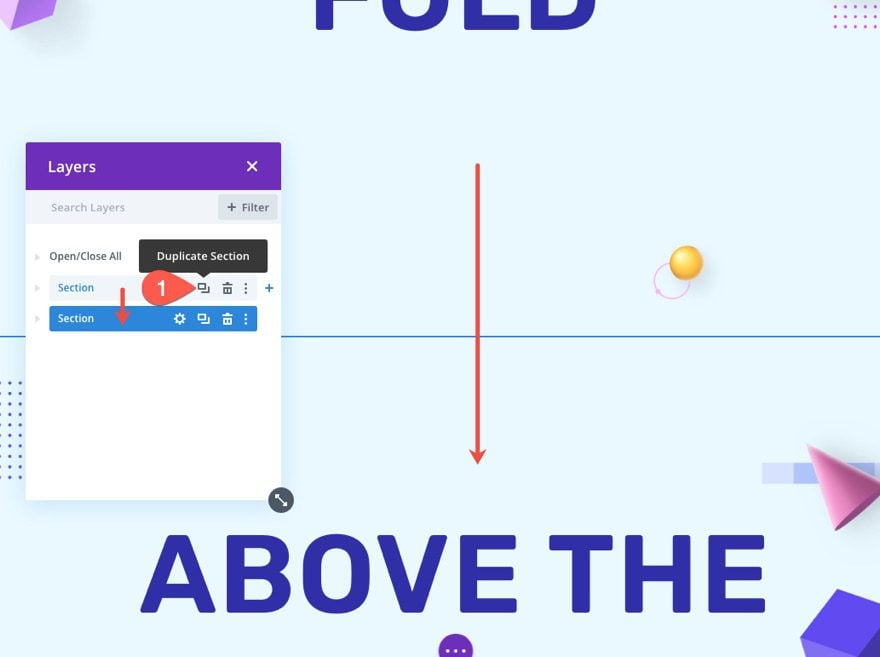
As a way to exhibit the performance of the sticky navigation bar, we have to add a below-the-fold part in order that we will have some room to scroll.
To create the part, duplicate the above-the-fold part we simply created.

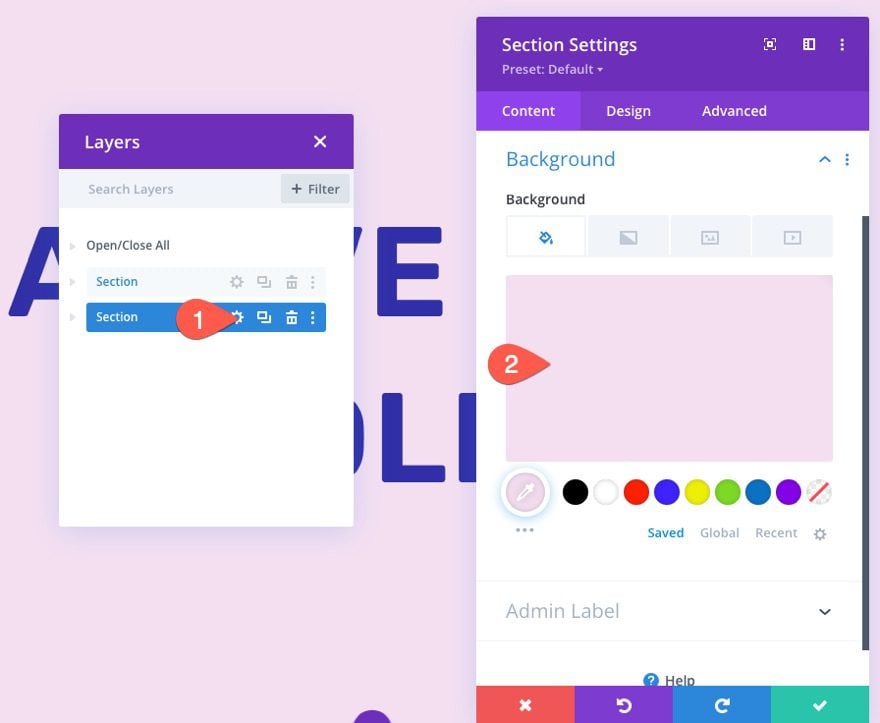
Replace the duplicate part background.
- Background Coloration: #f4def1

Then give the part a big min top in order that we have now room to scroll down the web page. That is only a fill-in part in place of the particular content material of a web page.
- Min Peak: 200vh

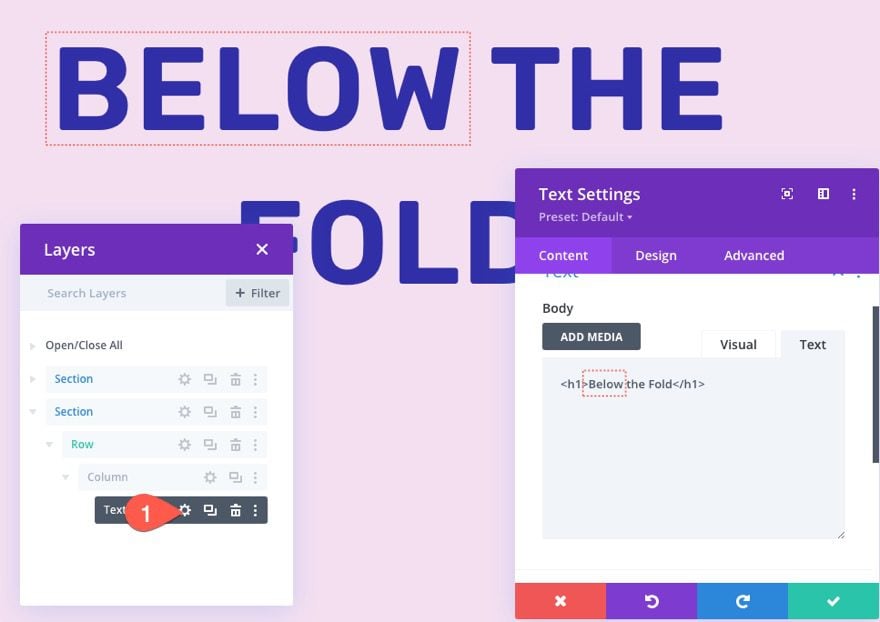
Then replace the textual content module content material by changing the phrase “Below” with “Above”.

Half 3: Creating the Sticky Navigation Bar
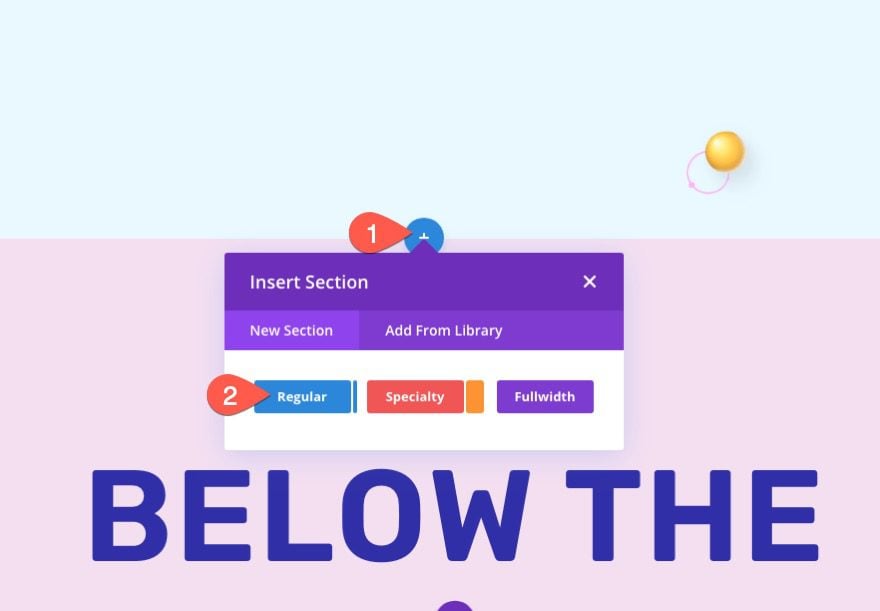
To create the sticky navigation bar from backside to prime, our first step is to create a brand new part with a one-column row.
Add New Part and Row
Add a brand new common part instantly beneath the above-the-fold part.

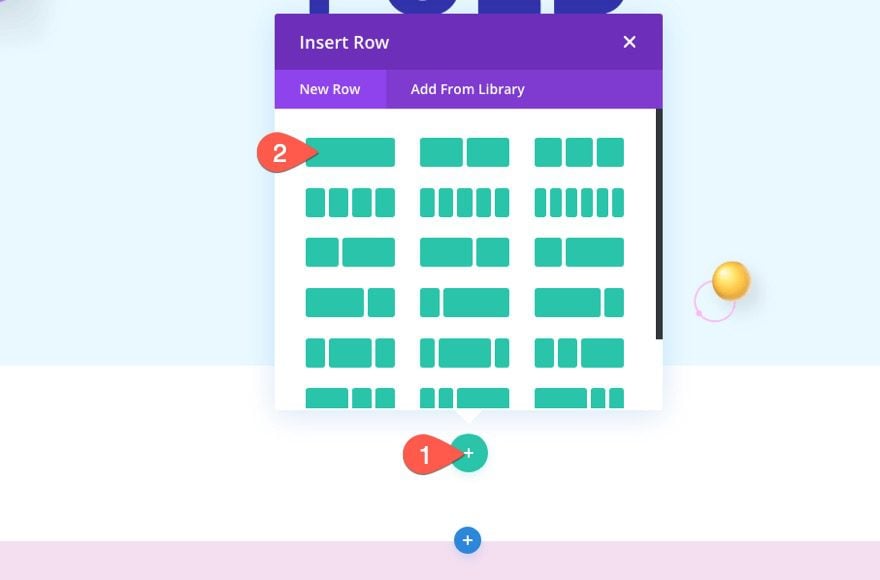
Then add a one-column row to the part.

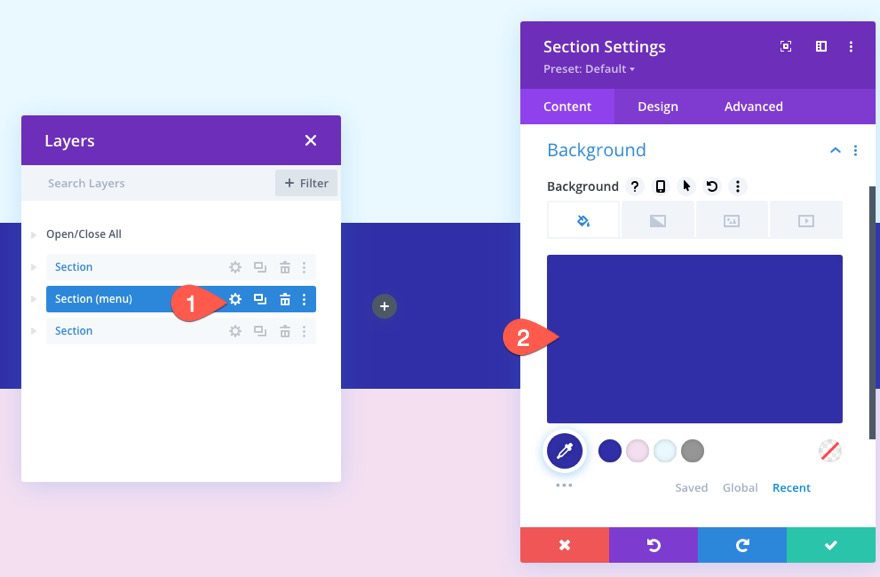
Part Background and Padding
Open the part settings and replace the background coloration.
- Background Coloration: #302ea7

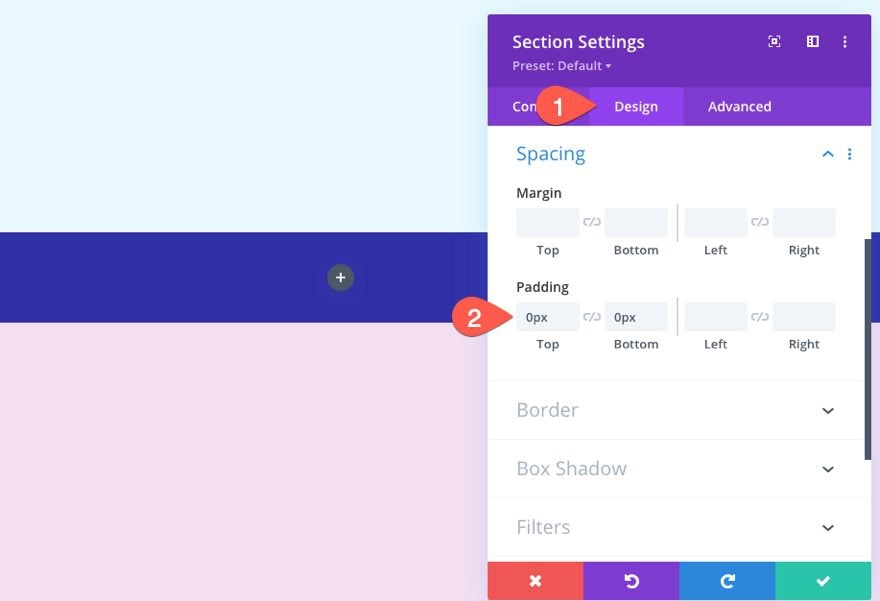
Then take out the highest and backside padding so the navigation bar has much less top.
- Padding: 0px prime, 0px backside

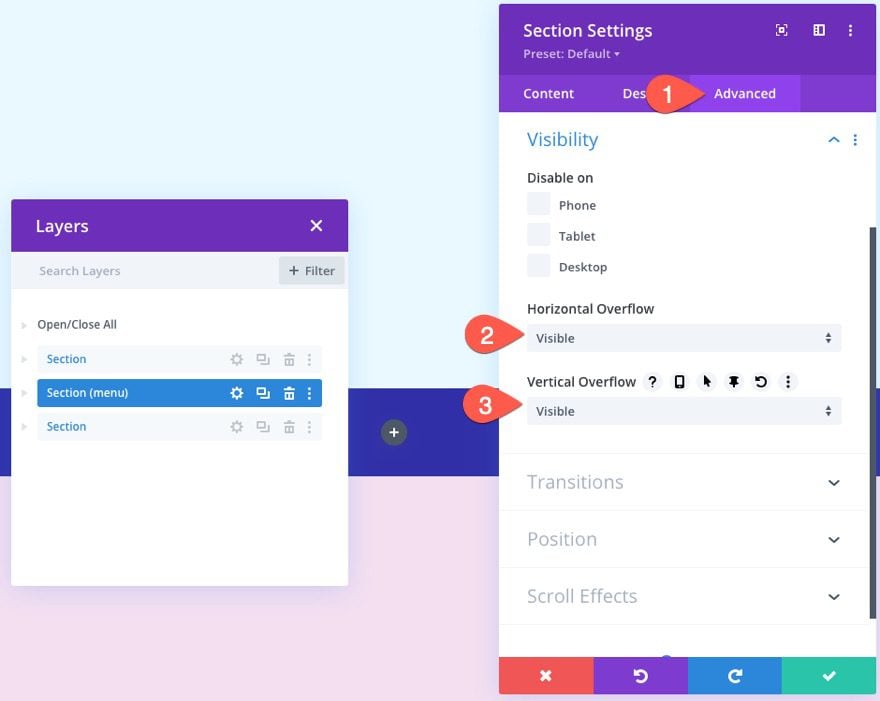
Add Seen Overflow
As a way to be sure that the dropdown menus will stay seen, replace the visibility choices as follows:
- Horizontal Overflow: Seen
- Vertical Overflow: Seen

Give Part an Absolute Place on Cell
The cell dropdown menu will open beneath the hamburger icon by default. If we maintain the navigation bar on the backside, this is able to disguise the dropdown menu if the person clicks it on the backside place. For a greater person expertise, we would like the navigation bar to begin on the very prime of the web page on pill and cellphone show.
To do that, give the part an absolute place on pill and cellphone.
- Place: Relative (desktop), Absolute (pill and cellphone)


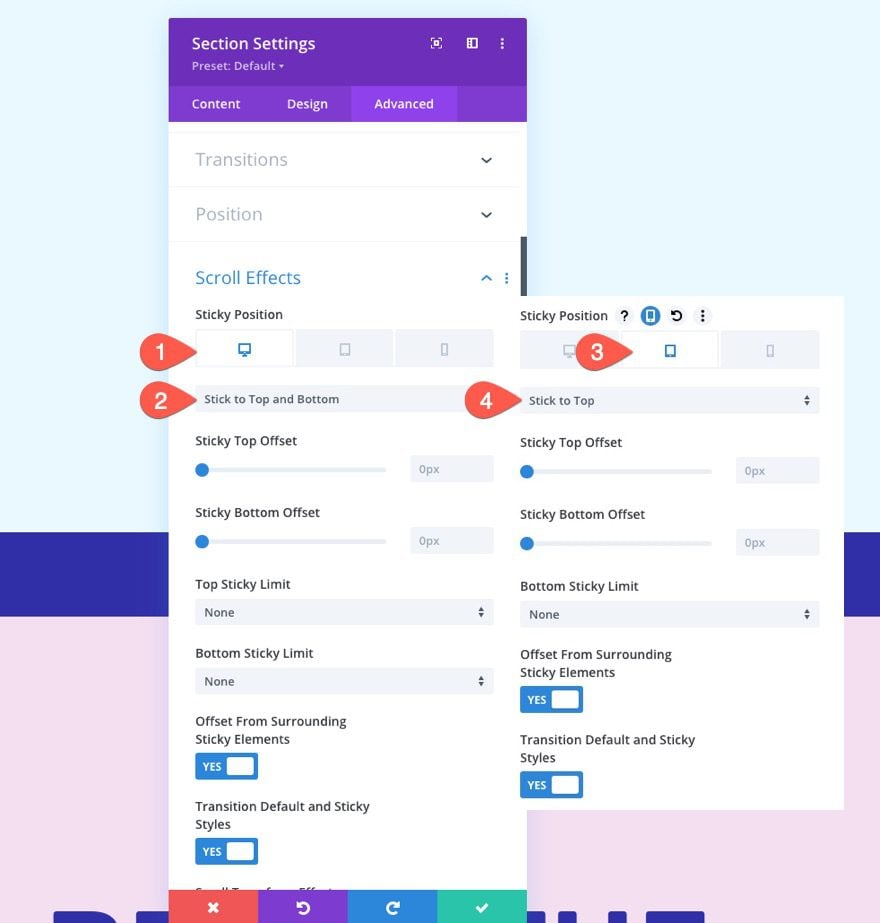
Add Sticky Place for Desktop and Cell
So as to add the sticky place to the navigation bar part, replace the next:
- Sticky Place: Stick with Prime and Backside (desktop), Stick with Prime (pill and cellphone)

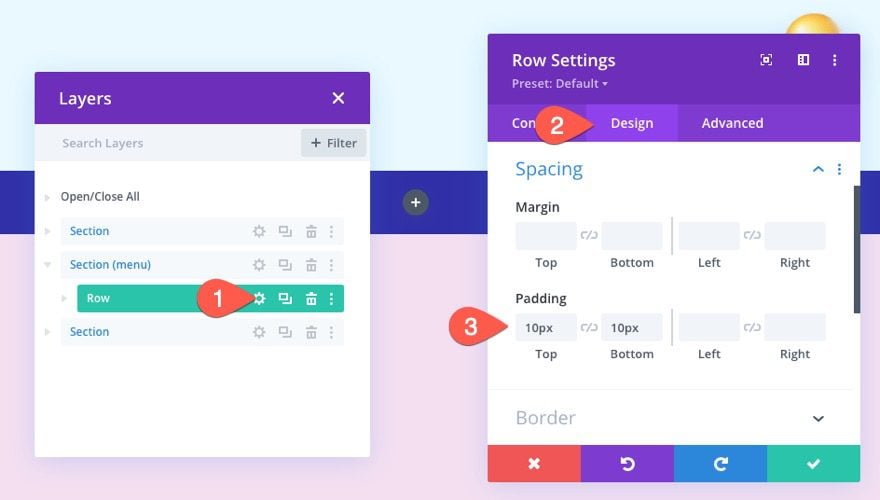
Replace Row Padding
As soon as the sticky part is full, open the settings for the row contained in the part and replace the padding as follows:
- Padding: 10px prime, 10px backside

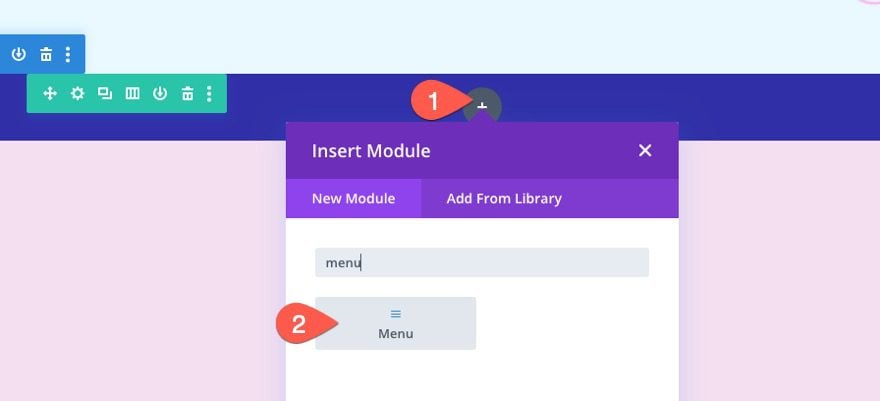
Create Navigation Menu
With the part and row in place, we’re able to create the navigation menu.
Begin by including a menu module to the one-column row.

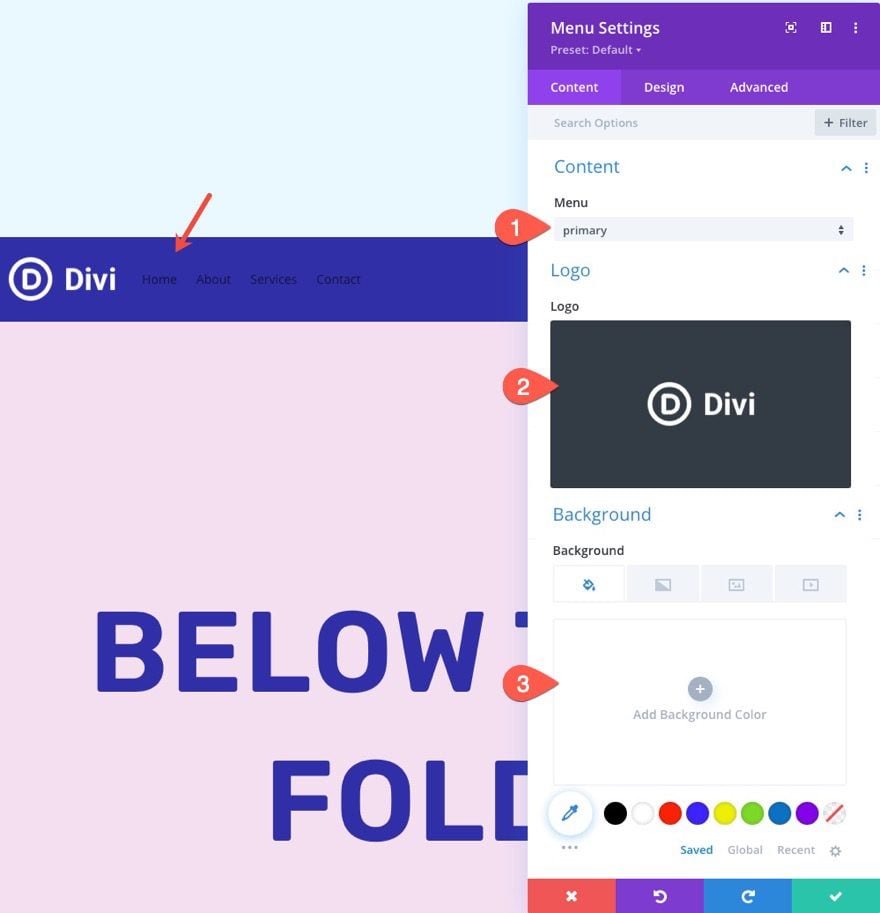
Menu Content material
Replace the content material of the menu as follows:
- choose menu from the dropdown
- add brand picture (I’m utilizing a picture that’s 122px by 52px)
- take out the default background coloration

Beneath the design tab, replace the next menu textual content and icon settings:
- Lively Hyperlink Coloration: #fff
- Menu Font: Rubik
- Menu Font Type: TT
- Menu Textual content Coloration: #fff
- Menu Textual content Dimension: 16px
- Textual content Alignment: Proper
- Dropdown Menu Line Coloration: #e19dff
- Cell Menu Textual content Coloration: #302ea7
- Purchasing Cart Icon Coloration: #fff
- Search Icon Coloration: #fff
- Hamburger Menu Icon Coloration: #fff


Utilizing a Border to Offset the Absolute Place of the Navigation Bar on Cell
As a result of the navigation bar part has an absolute place on cell, the bar will sit above (and lower off) the highest part of the web page. As a way to repair this, we have to offset the highest part utilizing a prime border that’s the similar top because the navigation bar/part.
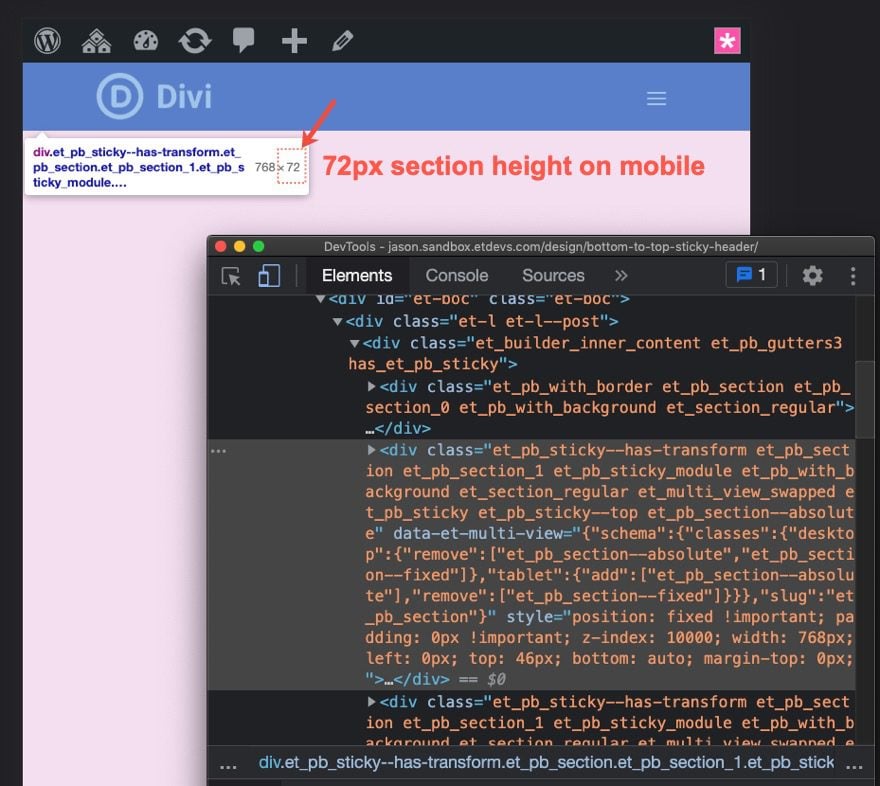
Examine the Peak of the Navigation Bar Part on Cell
To find out the peak of the navigation bar on cell, open a stay model of the web page in a brand new browser window. Then you’ll be able to shrink the browser width beneath 980px to see the cell menu. Proper-click on the part containing the menu and select the examine aspect choice from the right-click menu on the browser. You need to see a toolbox beneath the part displaying the size (together with the peak) of the part. For this instance, the peak of the navigation bar part is 72px.

Add Prime Border Offset to Above-the-Fold Part
Now that we have now decided the peak of the part, open the settings for the highest (above-the-fold) part.
Beneath the design tab, add the next prime border on pill and cellphone:
- Prime Border Width: 72px (pill and cellphone)
- Prime Border Coloration: #302ea7
As a result of the border is similar top because the part with absolutely the place, you received’t be capable of see the border as a result of it solely serves to push the part down in order that it doesn’t get lower off.


Remaining Consequence
Take a look at the ultimate end result!
Remaining Ideas
Making a sticky navigation bar from backside to prime can simply be achieved by utilizing Divi’s built-in place and sticky choices. The hot button is to offer the above-the-fold part a top of 100vh after which add the navigation bar part beneath that sticks to the underside and prime of the browser. Hopefully, this can assist so as to add a extra distinctive and interesting above-the-fold to your web site.
This sticky navigation bar works finest for a single web page design somewhat than a worldwide template. That mentioned, you’ll be able to simply select to make use of this as a homepage design and use a worldwide header for the remainder of the pages utilizing the Divi Theme builder.
I stay up for listening to from you within the feedback.
Cheers!
.inline-code{padding: 0px 4px; coloration: crimson; font-family: Monaco,consolas,bitstream vera sans mono,courier new,Courier,monospace!necessary} video.with-border {border-radius: 8px;box-shadow: 0 8px 60px 0 rgba(103,151,255,.11), 0 12px 90px 0 rgba(103,151,255,.11);show:block;margin: 0 auto;}
The submit Methods to Create a Sticky Navigation Bar from Backside to Prime in Divi appeared first on Elegant Themes Weblog.