

Responsive grid layouts are good for showcasing a set of photos with hyperlinks (or CTAs) as a result of they appear good on each system. The Divi builder has some implausible built-in modules which use grid shows, together with the Portfolio Grid, the Weblog Grid, and the Gallery Grid. However typically you would possibly wish to construct your personal customized picture grid structure with CTAs. This provides you extra management over the design and content material you wish to be displayed for every grid merchandise with out having to resort to a plugin.
At present, we’re going to indicate you tips on how to create a responsive picture grid structure with CTAs utilizing Divi’s built-in design choices. To do that we’ll be getting artistic with how we manage the grid utilizing a specialty part and add overlays to every picture utilizing a Name to Motion module.
Let’s get began!
Sneak Peek
Here’s a fast take a look at the design we’ll construct on this tutorial.
Obtain the Format for FREE
To put your fingers on the designs from this tutorial, you’ll first must obtain it utilizing the button beneath. To achieve entry to the obtain you will have to subscribe to our Divi Day by day e mail listing by utilizing the shape beneath. As a brand new subscriber, you’ll obtain much more Divi goodness and a free Divi Format pack each Monday! In case you’re already on the listing, merely enter your e mail handle beneath and click on obtain. You’ll not be “resubscribed” or obtain additional emails.
@media solely display and ( max-width: 767px ) {.et_bloom .et_bloom_optin_1 .carrot_edge.et_bloom_form_right .et_bloom_form_content:earlier than { border-top-color: #ffffff !necessary; border-left-color: clear !necessary; }.et_bloom .et_bloom_optin_1 .carrot_edge.et_bloom_form_left .et_bloom_form_content:after { border-bottom-color: #ffffff !necessary; border-left-color: clear !necessary; }
}.et_bloom .et_bloom_optin_1 .et_bloom_form_content button { background-color: #f92c8b !necessary; } .et_bloom .et_bloom_optin_1 .et_bloom_form_content .et_bloom_fields i { shade: #f92c8b !necessary; } .et_bloom .et_bloom_optin_1 .et_bloom_form_content .et_bloom_custom_field_radio i:earlier than { background: #f92c8b !necessary; } .et_bloom .et_bloom_optin_1 .et_bloom_border_solid { border-color: #f7f9fb !necessary } .et_bloom .et_bloom_optin_1 .et_bloom_form_content button { background-color: #f92c8b !necessary; } .et_bloom .et_bloom_optin_1 .et_bloom_form_container h2, .et_bloom .et_bloom_optin_1 .et_bloom_form_container h2 span, .et_bloom .et_bloom_optin_1 .et_bloom_form_container h2 sturdy { font-family: “Open Sans”, Helvetica, Arial, Lucida, sans-serif; }.et_bloom .et_bloom_optin_1 .et_bloom_form_container p, .et_bloom .et_bloom_optin_1 .et_bloom_form_container p span, .et_bloom .et_bloom_optin_1 .et_bloom_form_container p sturdy, .et_bloom .et_bloom_optin_1 .et_bloom_form_container kind enter, .et_bloom .et_bloom_optin_1 .et_bloom_form_container kind button span { font-family: “Open Sans”, Helvetica, Arial, Lucida, sans-serif; } p.et_bloom_popup_input { padding-bottom: 0 !necessary;}


Obtain For Free
Be part of the Divi Publication and we’ll e mail you a replica of the final word Divi Touchdown Web page Format Pack, plus tons of different superb and free Divi assets, suggestions and tips. Comply with alongside and you can be a Divi grasp very quickly. In case you are already subscribed merely kind in your e mail handle beneath and click on obtain to entry the structure pack.
You will have efficiently subscribed. Please examine your e mail handle to verify your subscription and get entry to free weekly Divi structure packs!
To import the part structure to your Divi Library, navigate to the Divi Library.
Click on the Import button.
Within the portability popup, choose the import tab and select the obtain file out of your pc.
Then click on the import button.


As soon as performed, the part structure shall be out there within the Divi Builder.
Let’s get to the tutorial, lets?
What You Must Get Began


To get began, you will have to do the next:
- In case you haven’t but, set up and activate the Divi Theme.
- Create a brand new web page in WordPress and use the Divi Builder to edit the web page on the entrance finish (visible builder).
- Select the choice “Build From Scratch”.
After that, you should have a clean canvas to start out designing in Divi.
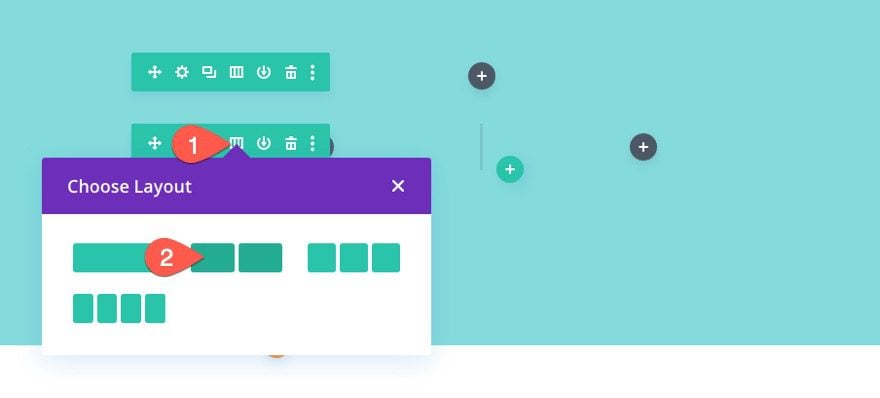
Making a Responsive Picture Grid Format with CTAs and Hover Overlays in Divi
Half 1: Creating the Particular Part Format
To start, add a brand new specialty part with a one-third two-thirds left sidebar structure.
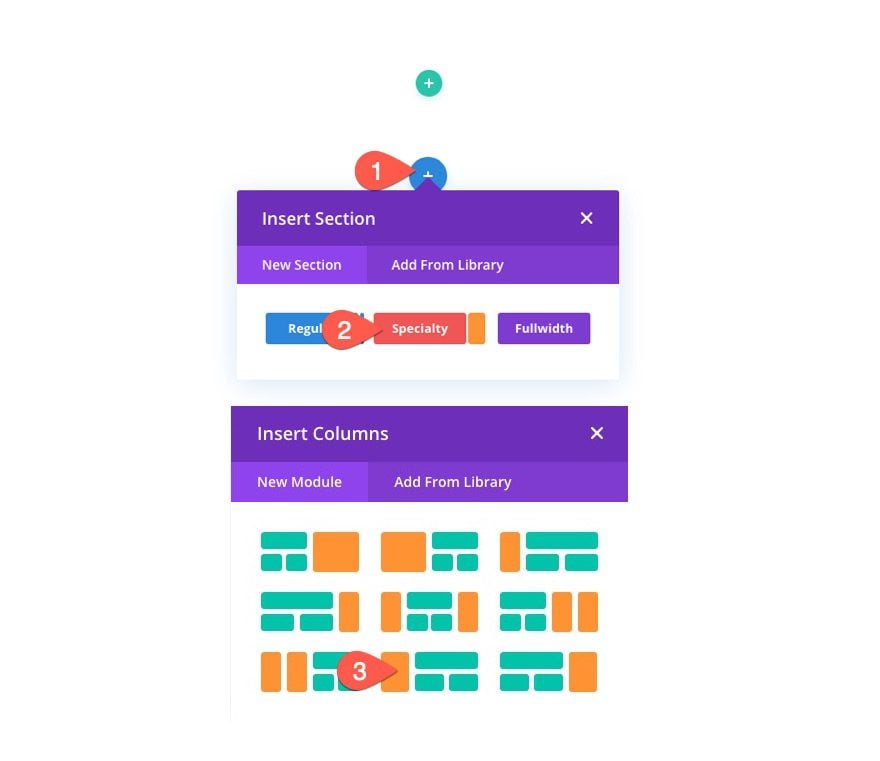

Delete the default common part in order that solely the brand new specialty part stays.
Open the part settings and replace the background shade as follows:
- Background Shade: #84dbda


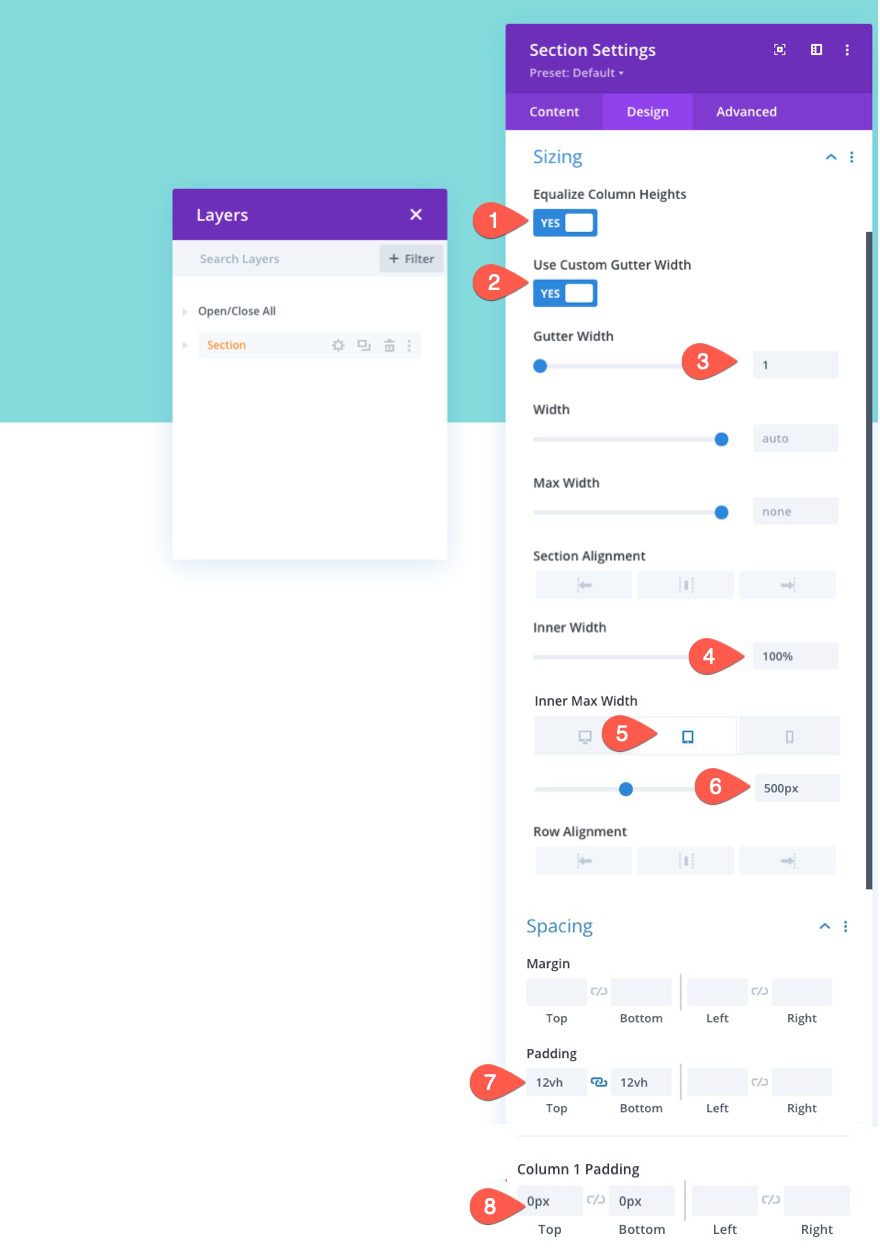
Underneath the design tab, replace the sizing, width and padding choices as follows:
- Equalize Column Heights: YES
- Use Customized Gutter Width: YES
- Gutter Width: 1
- Inside Width: 100%
- Inside Max Width: 1080px (desktop), 500px (pill and telephone)
- Padding: 12vh prime, 12vh backside
- Column 1 Padding: 0px prime, 0px backside

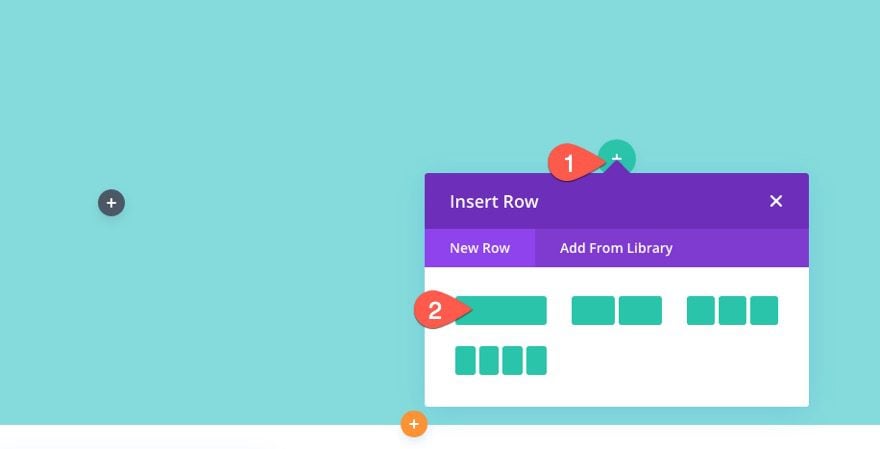
After the Part kinds are in place, add a one-column row to the part.

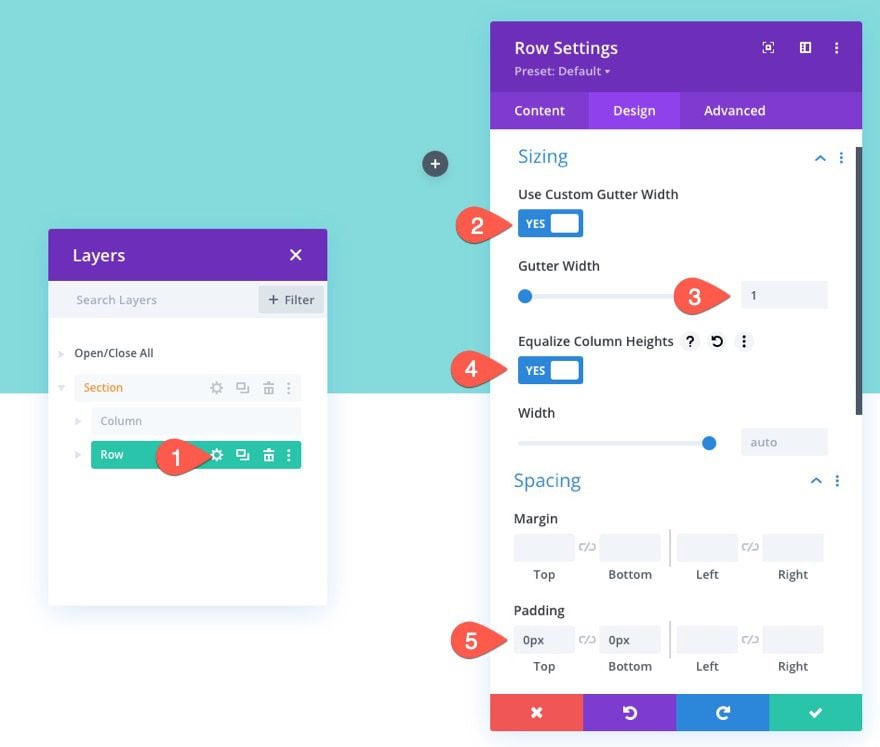
Row Settings
Replace the row settings as follows:
- Gutter Width: 1
- Equalize Column Heights: YES
- Padding: 0px prime, 0px backside

To create a second row, duplicate the primary row.


Then replace the duplicate row with a two-column structure.

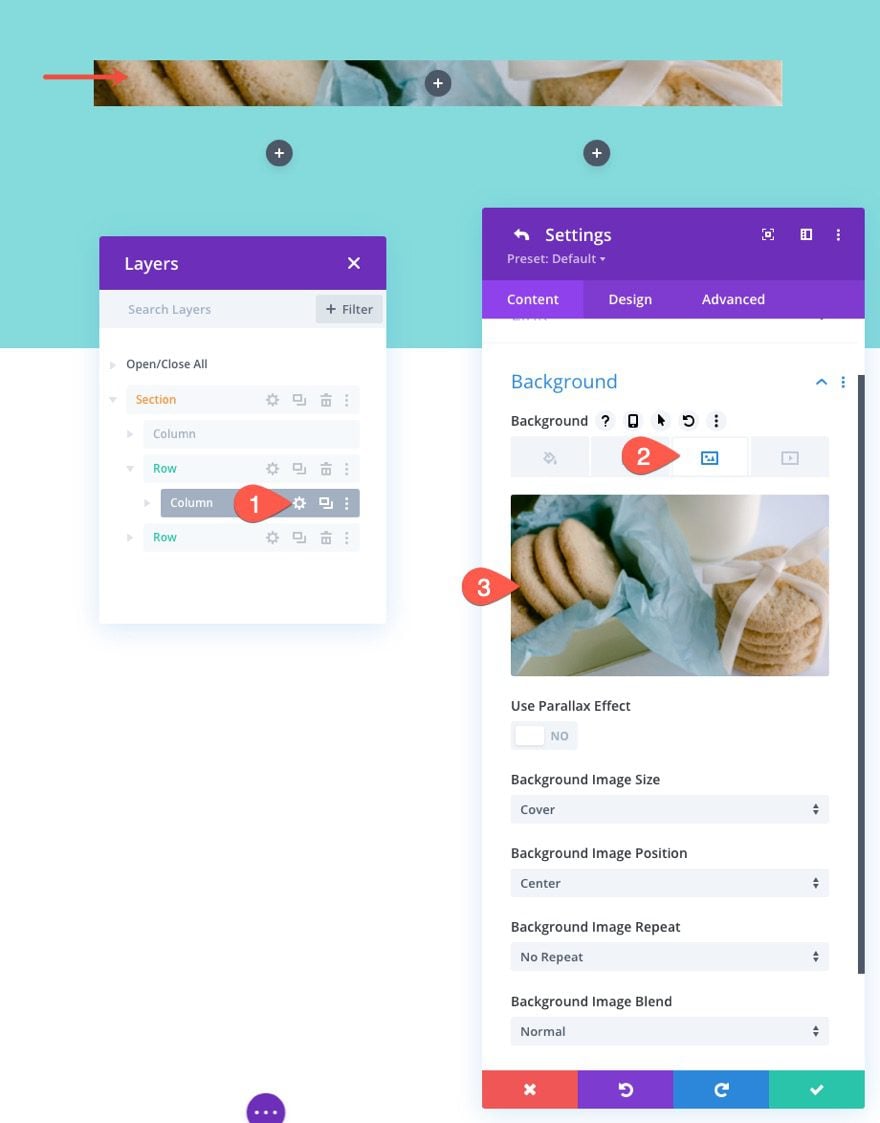
Half 2: Including Photographs as Column Background Photographs
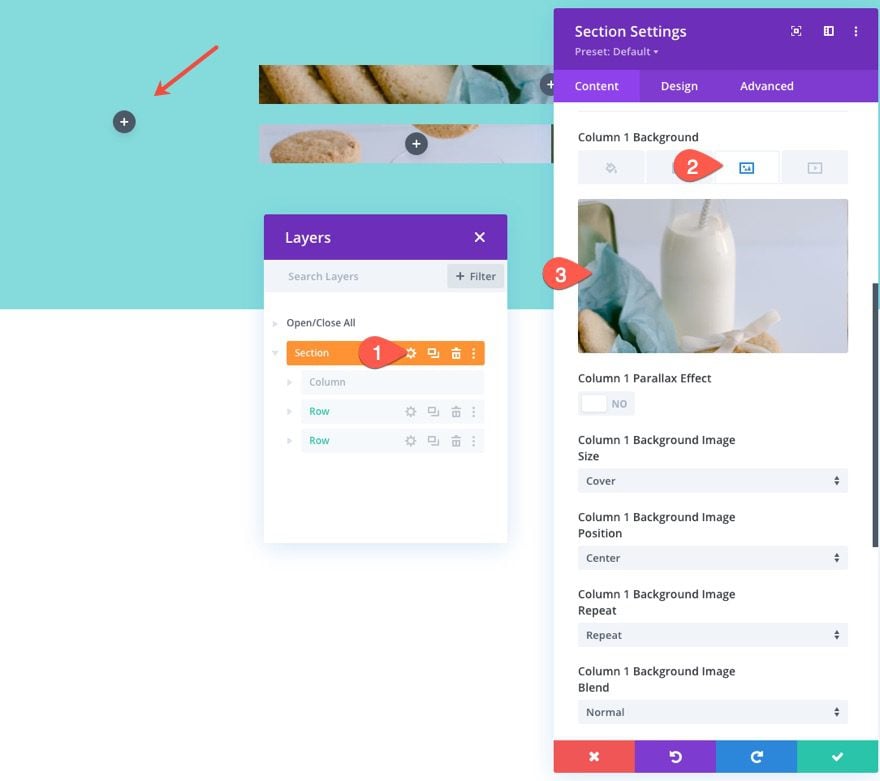
Now that each one the rows and columns are in place, we’re prepared so as to add our photos to our grid structure. In an effort to make certain the pictures are responsive inside the grid structure, we’re going to add every of our photos as background photos to every of the 4 columns all through the part. As a result of every background picture could have a background dimension of “cover”, the picture will all the time fill the complete column when adjusting the browser dimension.
High Row Column Background Picture
To start out, open the column settings for the column within the prime row.
Then add a background picture to the column.

Backside Row Columns Background Photographs
Subsequent, open the settings for column 1 within the second (backside) row and add a background picture to that column as nicely.
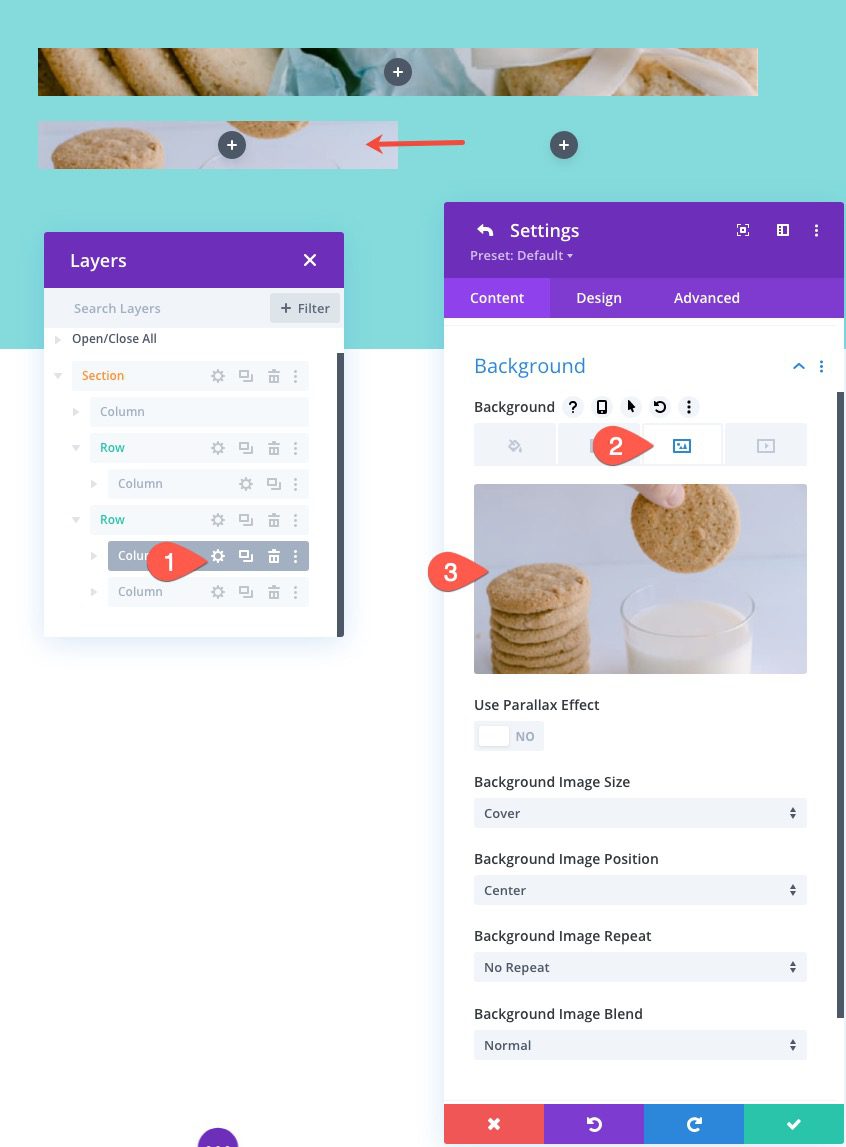

Then, add a background picture to column 2 in the identical row.
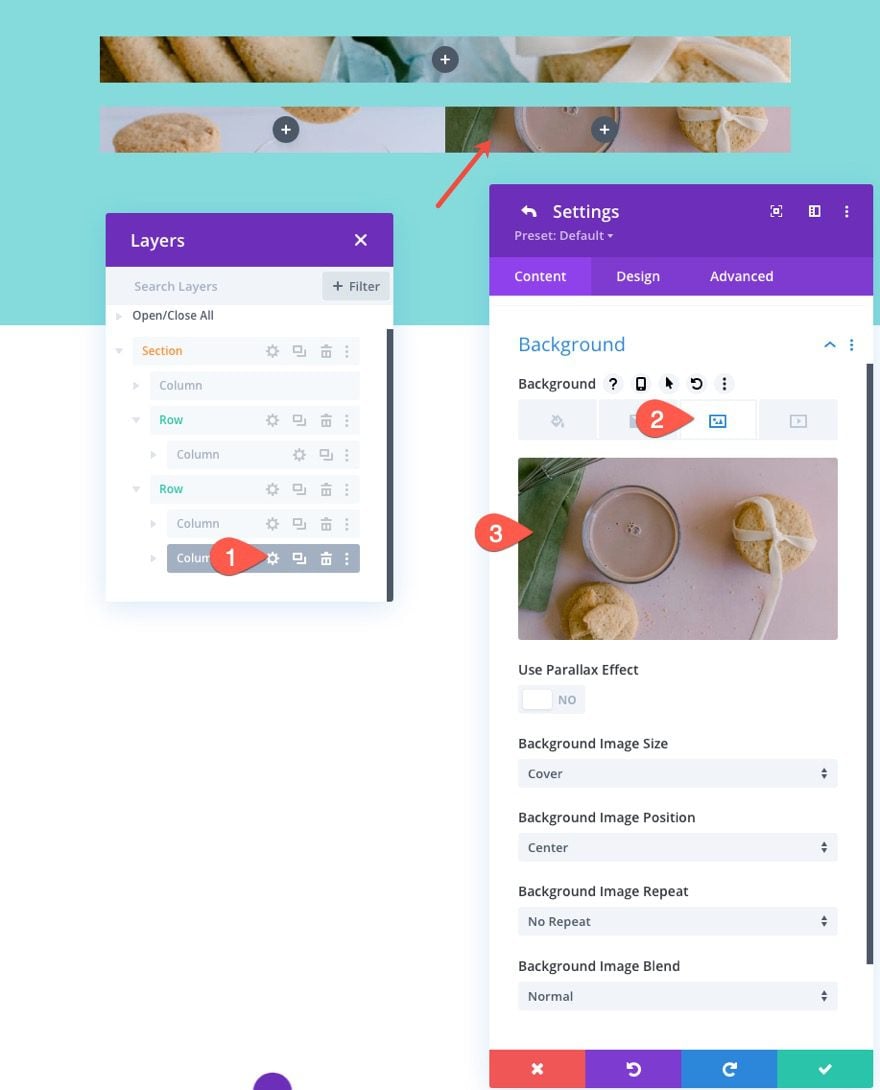

Specialy Part Column 1 Background Picture
And eventually, open the settings of the specialty part and add a background picture to column 1.

Half 3: Including the Picture Overlay Name To Motion to every Column
Now that our background photos have been added to every column of the grid structure, we’re going to add a name to motion module to every column with will function an overlay for the picture with a button CTA. Utilizing a name to motion module as an overlay on prime of the column’s background picture will will let you add customized background overlay kinds and hover results to the picture with ease. Plus it offers you the choice of including a customized CTA over the picture as nicely. For this instance, we’re going to merely use the button ingredient on the Name to motion module, however you may simply add to title or physique content material above the button as nicely utilizing the content material choices.
Creating the Name to Motion Module
So as to add the primary picture overlay name to motion, add a name to motion module to the column within the prime row.
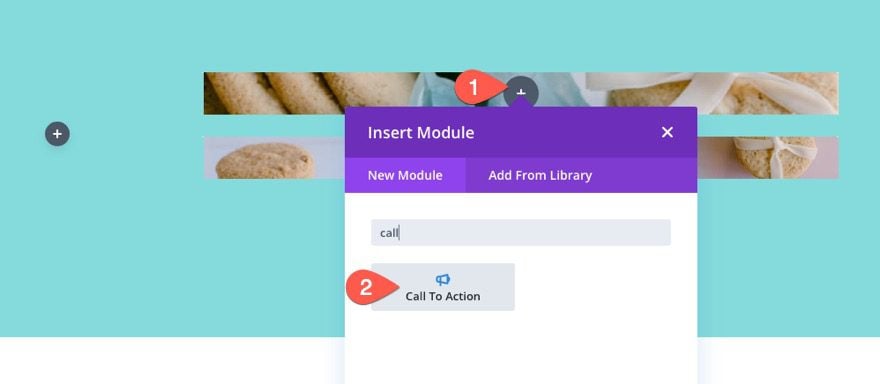

Content material
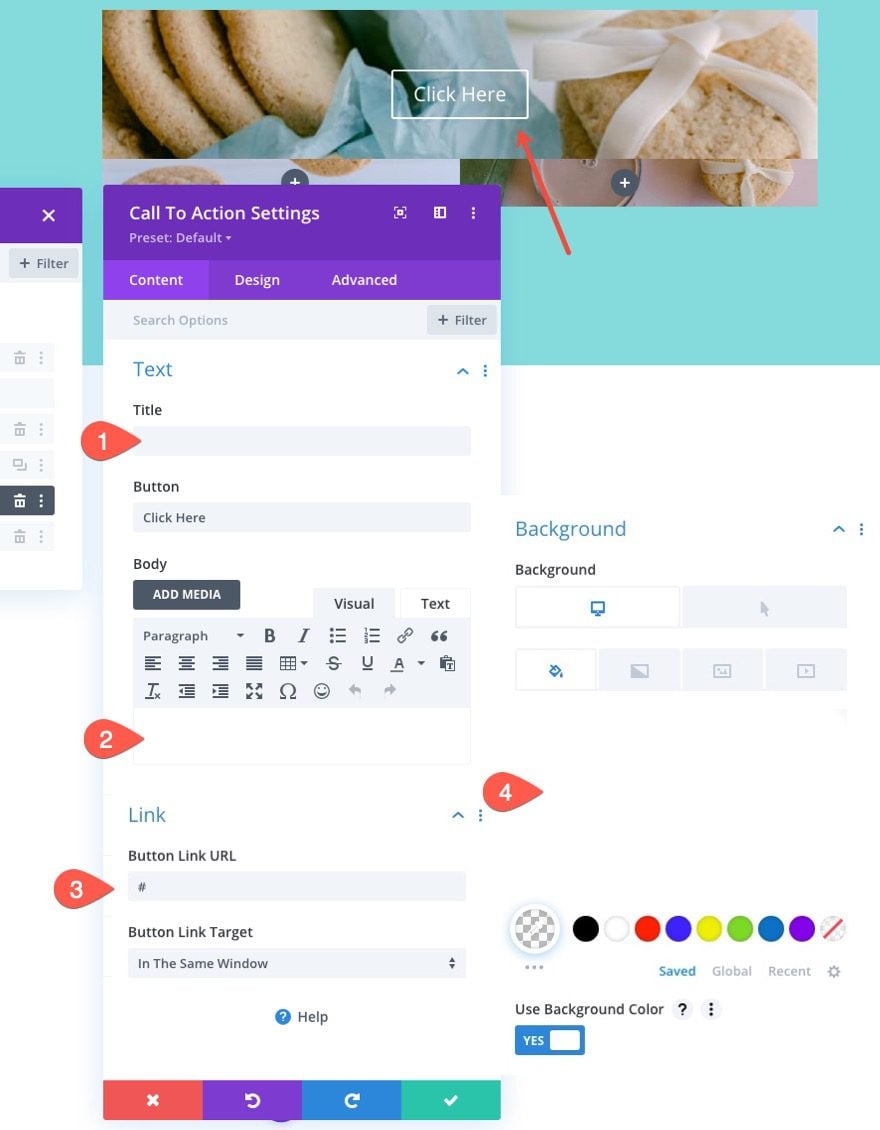
The replace the content material for the decision to motion as follows:
- delete the title textual content
- delete the physique textual content
- Button Hyperlink URL: #
- Background Shade: clear (desktop), rgba(255,235,77,0.5) (hover)
NOTE: Including a “#” for the button hyperlink URL is only a filler for now in order that the button exhibits up. Including the semi-transparent background shade on hover offers you a pleasant customized overlay shade when hovering over the module (and the picture behind it).

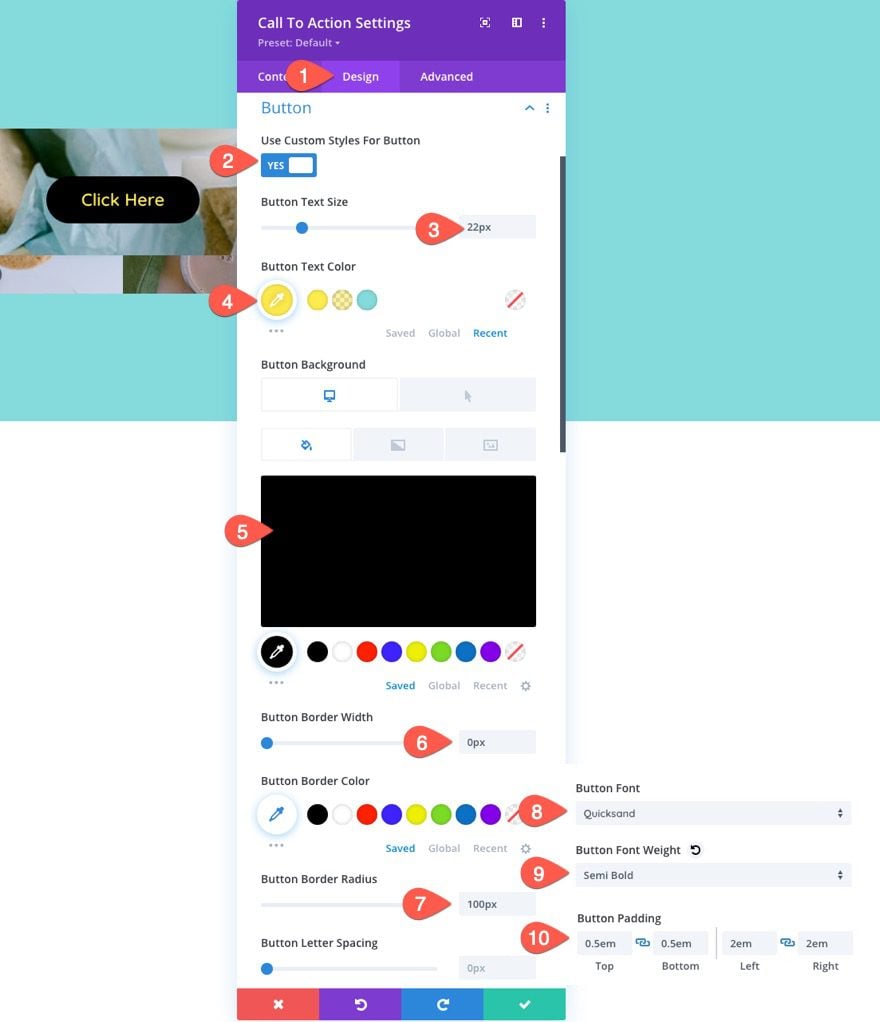
Buttton Types
Proceed replace the decision to motion design settings for the button as follows:
- Use Customized Types for Button: YES
- Button Textual content Dimension: 22px
- Button Textual content Shade: #ffeb4d
- Button Background Shade: #000 (desktop), #ec5f00 (hover)
- Button Border Width: 0px
- Button Border Radius: 100px
- Button Font: Quicksand
- Button Font Weight: Semi Daring
- Button Padding: 0.5em prime, 0.5em backside, 2em left, 2em proper

Sizing, Padding, and Border
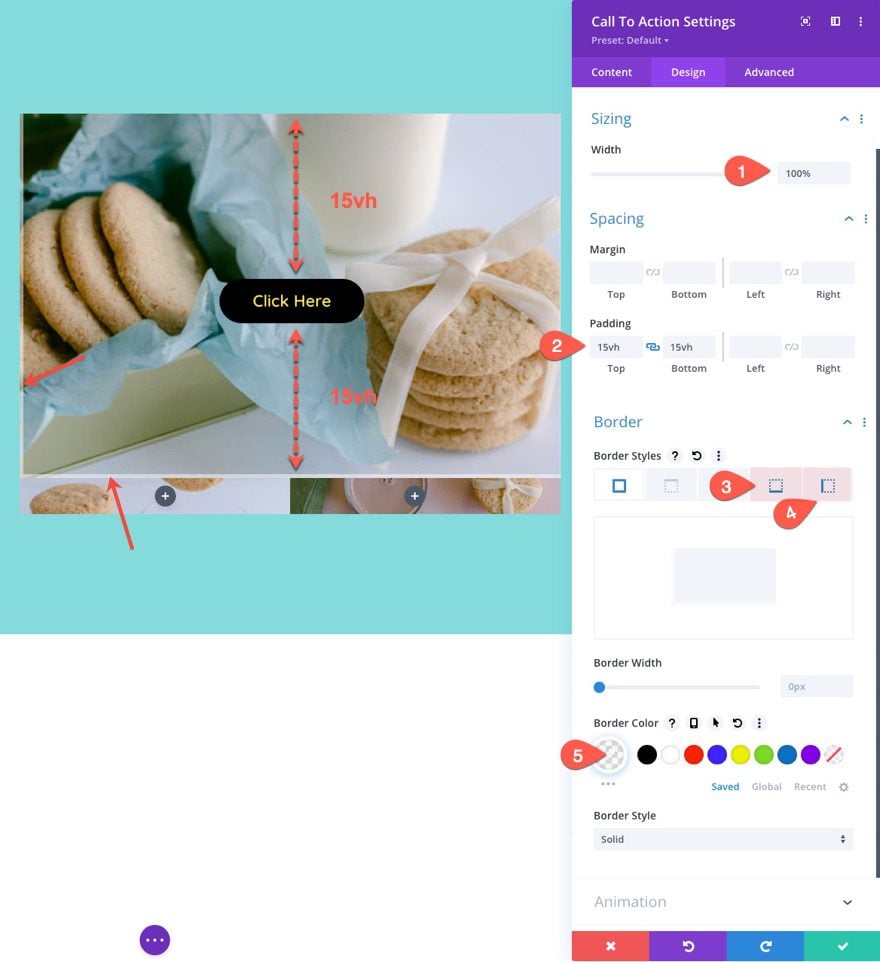
Subsequent, we have to make it possible for our module has some peak to reveal the column background picture behind it. To do that we’ll add some padding to the highest and backside of the module. We’ll additionally add a delicate border to the module so to offer it a bit separation from different photos within the grid structure.
Replace the next:
- Width: 100%
- Padding: 15vh prime, 15vh backside
- Backside Border Width: 5px
- Left Border Width: 5px
- Border Shade: rgba(255,255,255,0.5)
NOTE: Utilizing the vh size unit for the padding will make the padding worth relative to the browser viewport peak. So, your picture grid gadgets will improve and reduce in peak because the browser window will increase and reduces in peak.

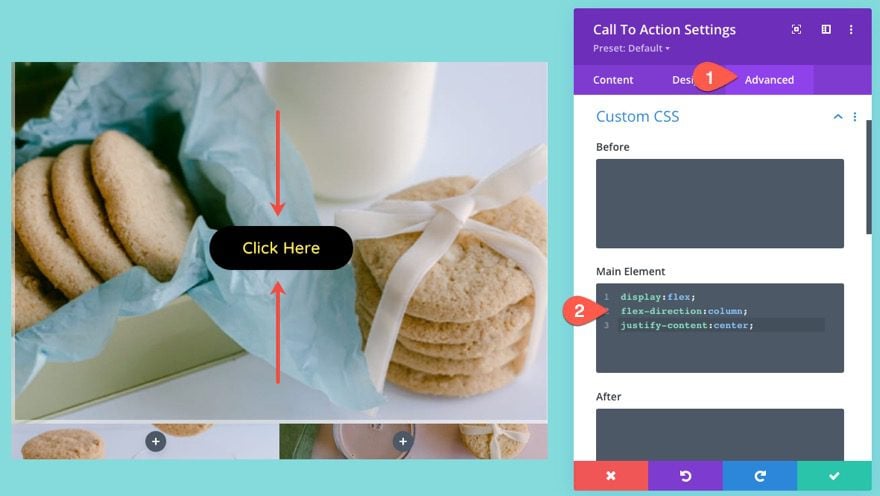
Vertically centering the CTA Content material
To make sure the content material inside the name to motion module stays vertically centered, we will add a small snippet of customized CSS utilizing the flex property.
Underneath the superior tab, add the next CSS to the Principal Aspect:
show:flex;
flex-direction:column;
justify-content:middle;

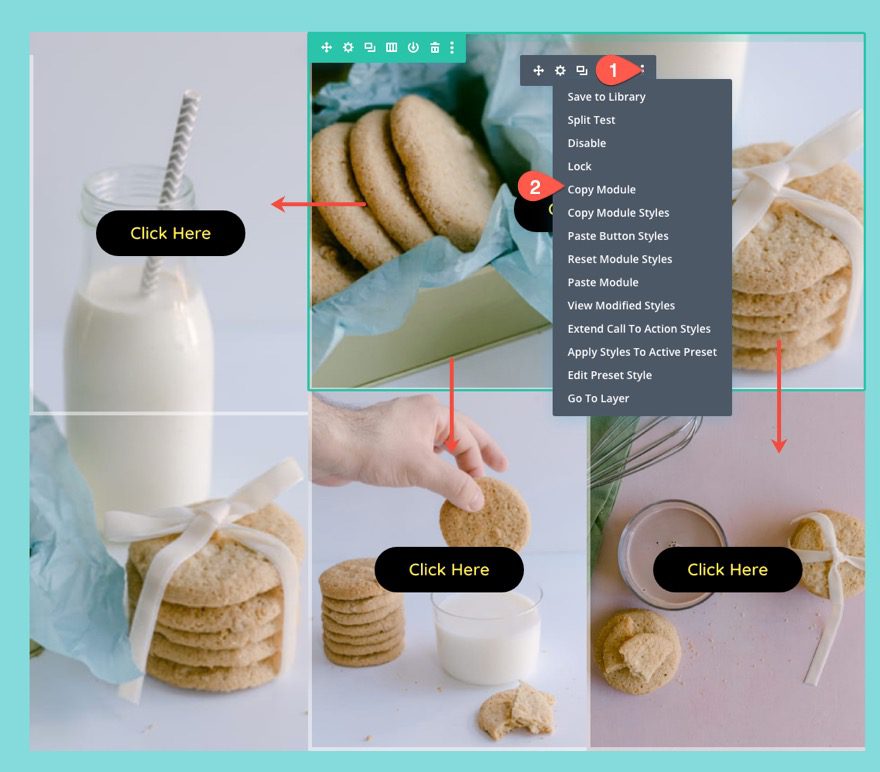
Including the Name to Motion Overlay to the opposite columns
Now that the primary name to motion module is styled, copy and paste the module to the opposite 3 columns all through the structure together with the two columns within the backside row and column 1 within the specialty part.

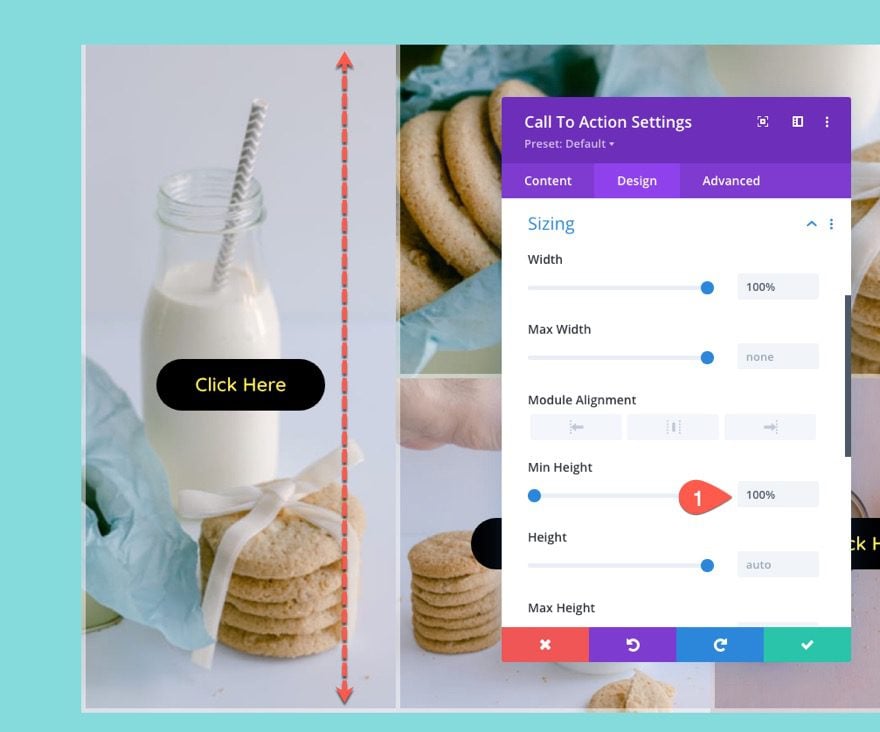
To ensure the decision to motion module spans the total peak of column 1 within the specialty part, replace the min-height to 100%.
- Min Peak: 100%
Usually, this wouldn’t work for a module in a traditional column. However, due to the flex property on the column, the module is basically a flex baby ingredient, so the 100% min-height worth will work.

That’s it. Let’s try the ultimate consequence.
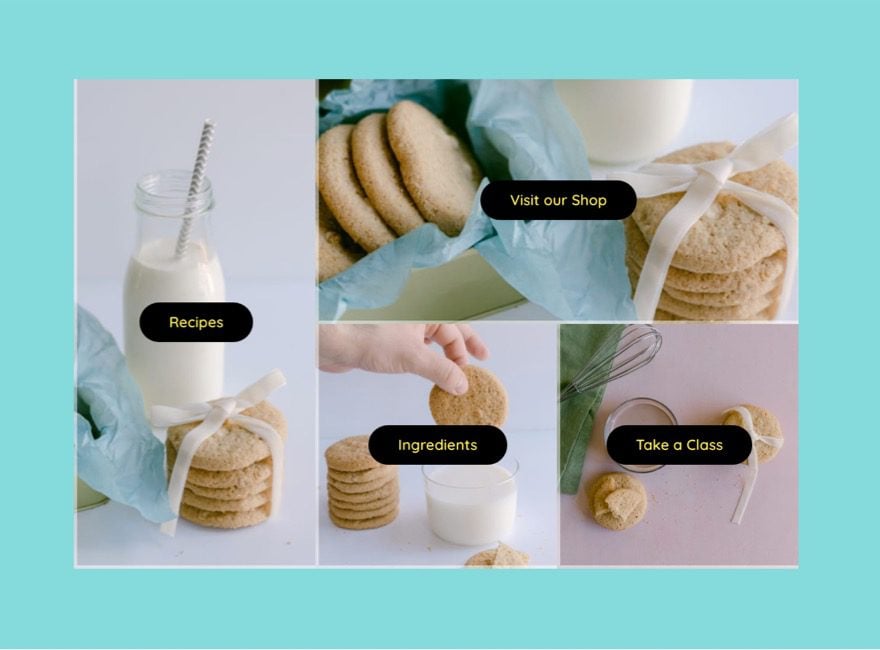
Ultimate Consequence
Right here is the ultimate results of the responsive picture grid structure on a reside web page.

And listed below are the hover results.
And right here is how the design responds when adjusting the browser dimension.
Ultimate Ideas
Responsive picture grid layouts proceed to be a well-liked facet of many web sites. The visible facet offered by the background picture mixed with the Name to Motion overlay can actually make these necessary navigation hyperlinks pop. Plus, the responsive nature of the picture grid structure will look nice on all units which is all the time a necessity. Hope it is available in hand on your subsequent mission.
I stay up for listening to from you within the feedback.
Cheers!
.inline-code{padding: 0px 4px; shade: crimson; font-family: Monaco,consolas,bitstream vera sans mono,courier new,Courier,monospace!necessary} video.with-border {border-radius: 8px;box-shadow: 0 8px 60px 0 rgba(103,151,255,.11), 0 12px 90px 0 rgba(103,151,255,.11);show:block;margin: 0 auto;}
The submit The best way to Create a Responsive Picture Grid Format with CTAs and Hover Overlays in Divi appeared first on Elegant Themes Weblog.