


Divi’s built-in situation choices enable us to show content material based mostly on a Web page Go to situation. This lets you show any Divi component provided that the consumer has visited a selected web page in your web site. In different phrases, the content material will stay hidden till the consumer has visited the web page. This performance is nice for retargeting guests with an announcement bar after they go to a touchdown web page. As a result of the guests have confirmed to have an interest (they got here again to the touchdown web page), we are able to leverage this by displaying bulletins (reductions, limited-time gives, promotions, and so on.) to steer them in the suitable path.
On this tutorial, we’ll present you easy methods to retarget a touchdown web page go to with an announcement bar in Divi by making the most of Divi’s built-in situation choices. All it takes is a number of clicks.
Let’s get began!
Sneak Peek
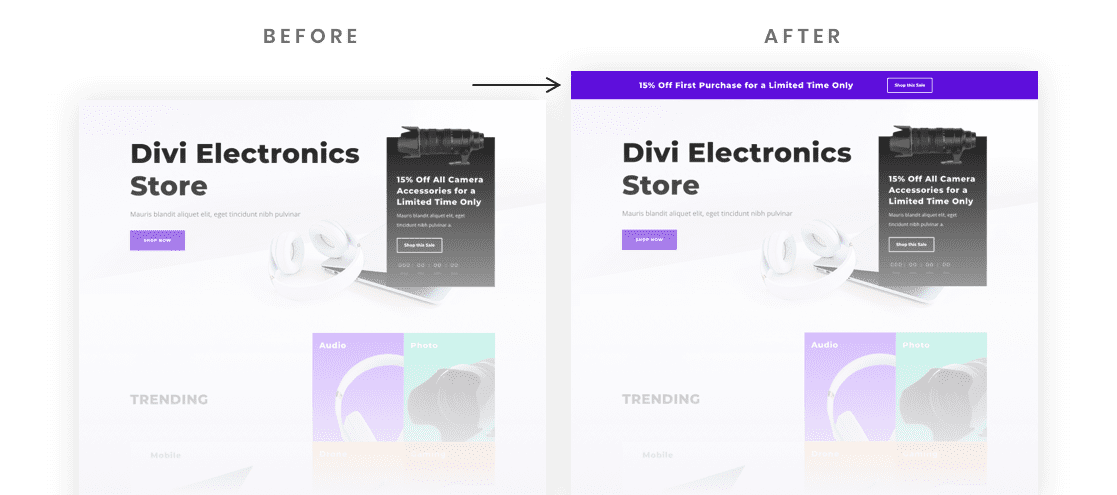
Here’s a fast take a look at the design we’ll construct on this tutorial.
This Announcement Bar will probably be displayed after a consumer visits the web page.

Obtain the Format for FREE
To put your arms on the format from this tutorial, you’ll first have to obtain it utilizing the button beneath. To achieve entry to the obtain you have to to subscribe to our Divi Each day e-mail record by utilizing the shape beneath. As a brand new subscriber, you’ll obtain much more Divi goodness and a free Divi Format pack each Monday! Should you’re already on the record, merely enter your e-mail deal with beneath and click on obtain. You’ll not be “resubscribed” or obtain additional emails.
@media solely display and ( max-width: 767px ) {.et_bloom .et_bloom_optin_1 .carrot_edge.et_bloom_form_right .et_bloom_form_content:earlier than { border-top-color: #ffffff !necessary; border-left-color: clear !necessary; }.et_bloom .et_bloom_optin_1 .carrot_edge.et_bloom_form_left .et_bloom_form_content:after { border-bottom-color: #ffffff !necessary; border-left-color: clear !necessary; }
}.et_bloom .et_bloom_optin_1 .et_bloom_form_content button { background-color: #f92c8b !necessary; } .et_bloom .et_bloom_optin_1 .et_bloom_form_content .et_bloom_fields i { shade: #f92c8b !necessary; } .et_bloom .et_bloom_optin_1 .et_bloom_form_content .et_bloom_custom_field_radio i:earlier than { background: #f92c8b !necessary; } .et_bloom .et_bloom_optin_1 .et_bloom_border_solid { border-color: #f7f9fb !necessary } .et_bloom .et_bloom_optin_1 .et_bloom_form_content button { background-color: #f92c8b !necessary; } .et_bloom .et_bloom_optin_1 .et_bloom_form_container h2, .et_bloom .et_bloom_optin_1 .et_bloom_form_container h2 span, .et_bloom .et_bloom_optin_1 .et_bloom_form_container h2 sturdy { font-family: “Open Sans”, Helvetica, Arial, Lucida, sans-serif; }.et_bloom .et_bloom_optin_1 .et_bloom_form_container p, .et_bloom .et_bloom_optin_1 .et_bloom_form_container p span, .et_bloom .et_bloom_optin_1 .et_bloom_form_container p sturdy, .et_bloom .et_bloom_optin_1 .et_bloom_form_container type enter, .et_bloom .et_bloom_optin_1 .et_bloom_form_container type button span { font-family: “Open Sans”, Helvetica, Arial, Lucida, sans-serif; } p.et_bloom_popup_input { padding-bottom: 0 !necessary;}


Obtain For Free
Be a part of the Divi E-newsletter and we are going to e-mail you a duplicate of the last word Divi Touchdown Web page Format Pack, plus tons of different wonderful and free Divi assets, suggestions and tips. Observe alongside and you may be a Divi grasp very quickly. In case you are already subscribed merely kind in your e-mail deal with beneath and click on obtain to entry the format pack.
You’ve gotten efficiently subscribed. Please verify your e-mail deal with to verify your subscription and get entry to free weekly Divi format packs!
To import the part format to your Divi Library, navigate to the Divi Library.
Click on the Import button.
Within the portability popup, choose the import tab and select the obtain file out of your pc.
Then click on the import button.


As soon as performed, the part format will probably be out there within the Divi Builder.
The Key Idea
The right way to Show a Part Provided that a Customer has Visited a Particular Web page
As beforehand talked about, Divi’s built-in situation choices embody a Web page Go to situation that means that you can show any Divi component provided that the consumer has visited a selected web page in your web site. In different phrases, the content material will stay hidden till the consumer has visited the web page.
Alternatively, you’ll be able to select to show a Divi component provided that the consumer has not visited a selected web page. In different phrases, the content material will stay hidden to the consumer till they go to the web page.
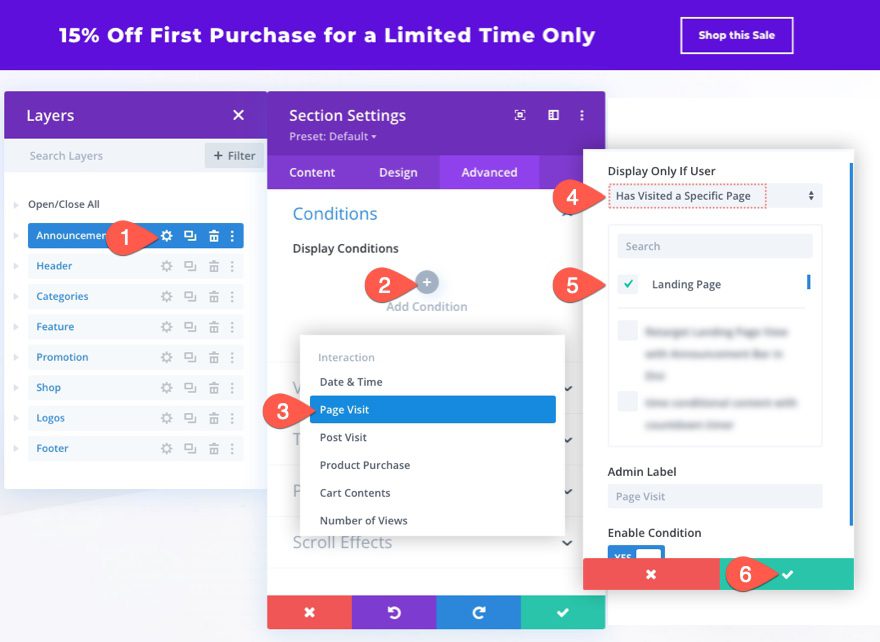
On this tutorial, we’re going to use Divi’s situation choices to show an announcement bar provided that a consumer has visited the touchdown web page. The announcement bar will be constructed simply utilizing the Divi Builder to incorporate any kind of content material or design you need. As soon as constructed, you’ll be able to add the Web page Go to situation to the announcement bar (which on this case is a Divi part) by doing these easy steps:
- Open the part settings for the part used to create the announcement bar.
- Below the superior tab, click on the plus icon underneath Show Circumstances so as to add a brand new situation to the part.
- From the situation dropdown, choose the Web page Go to situation from the record.
- Within the Web page Go to situation settings popup, choose the choice to show provided that the consumer has visited a selected web page.
- Choose the particular web page from the record of pages out of your web site (which on this case could be the Touchdown Web page).

That’s it! As soon as performed the announcement bar (or part) won’t seem to customers till they’ve first visited the Touchdown web page beforehand.
Now that you’ve got a grasp on the important thing idea, let’s get to the tutorial, lets?
What You Must Get Began


To get began, you have to to do the next:
- Should you haven’t but, set up and activate the Divi Theme.
- Create a brand new web page in WordPress and use the Divi Builder to edit the web page on the entrance finish (visible builder).
- Select the choice “Build From Scratch”.
After that, you’ll have a clean canvas to start out designing in Divi.
The right way to Retarget a Touchdown Web page Go to with an Announcement Bar in Divi
Half 1: Loading the Electronics Retailer Touchdown Web page Format
Earlier than we are able to retarget a touchdown web page, we have to construct one first.
To hurry up the method, we’re going to use the Electronics Retailer Touchdown Web page Format from Divi’s Electronics Retailer Format Pack which is accessible from throughout the Divi Builder.
To load the format to the web page, click on the Add From Library button (the plus icon) from the settings menu. Below the premade layouts tab, choose the Electronics Retailer Touchdown Web page format and click on the Use This Format button.


You could possibly, after all, use an present touchdown web page in your web site, or select to construct one by yourself. However for now, it will work.
Half 2: Making a Part with The Web page Go to Situation
To be able to construct the announcement bar, we’re going to use a Divi Part. Go forward and add a brand new common part underneath the present prime part of the format.


As soon as added, drag the part to the highest of the web page format and add a three-fourths 0ne-fourth row to the part.


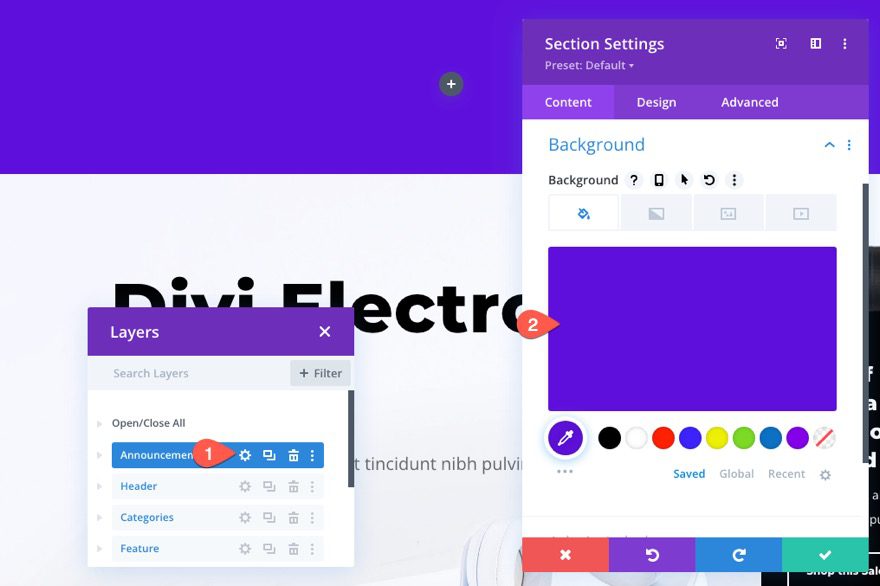
Open the part settings and add the next background shade to the part:
- Background Coloration: #5e10da

Below the design tab, replace the spacing and add an animation impact to the part as follows:
- Padding: 0px prime, 0px backside
- Animation Fashion: Slide
- Animation Route: Down
- Animation Beginning Opacity: 100%
This can shorten the peak of the announcement bar in addition to give it an attention-grabbing animation impact when the web page hundreds.


Below the superior tab, add a brand new show situation by doing the next:
- Click on the plus icon underneath Show Circumstances so as to add a brand new situation to the part.
- From the situation dropdown, choose the Web page Go to situation from the record.
- Within the Web page Go to situation settings popup, choose the choice to show provided that the consumer has visited a selected web page.
- Choose the particular web page from the record of pages out of your web site (which on this case could be the Touchdown Web page).
- Save Settings.


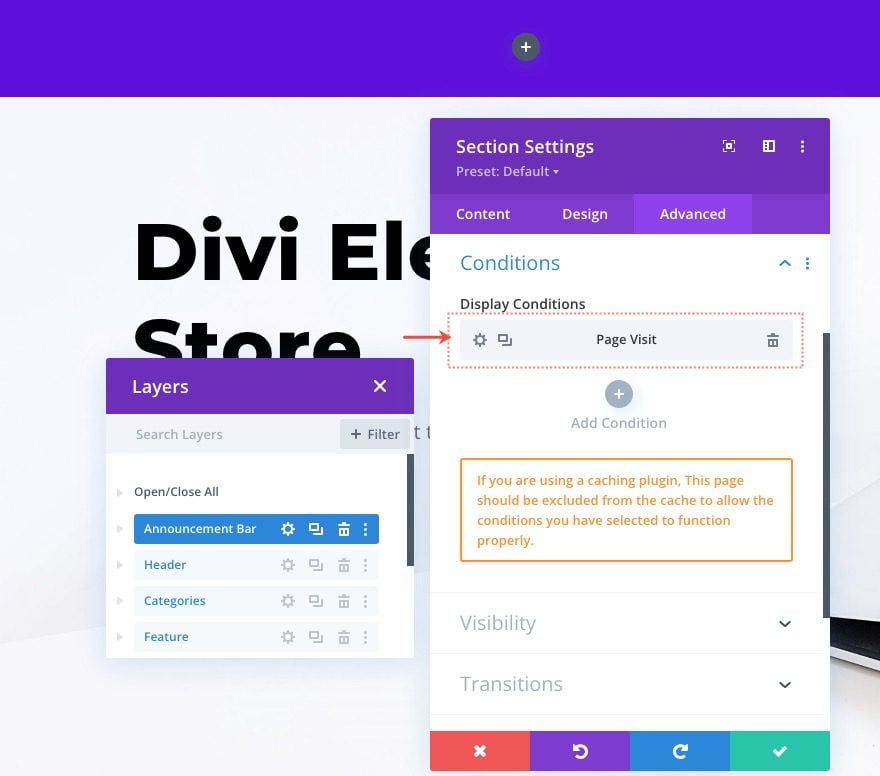
Now you’ll have a brand new Web page Go to show situation for the part.
Word: In case you are utilizing a caching plugin, this web page ought to be excluded from the cache to permit the show situation to perform correctly.

Half 3: Creating the Announcement Bar Content material
At this level, we have now the part and row for our announcement bar in place. And our part has the Web page View show situation energetic. So, any content material we add contained in the part will inherit the show situation of its mum or dad container (the part). All we have to do now could be fill the part with content material to complete the creation of the announcement bar.
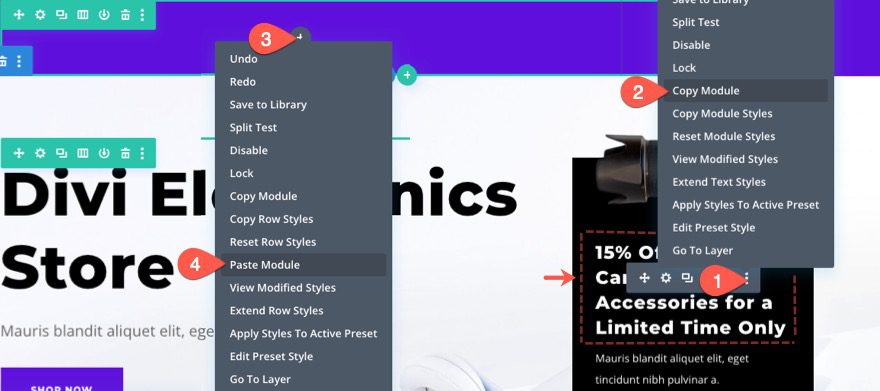
The primary piece of content material would be the announcement bar textual content. So as to add the textual content, copy the textual content module beneath the digicam picture in the suitable column of the row within the present header part of the format. Then paste the textual content module contained in the left column of the row within the announcement bar part.

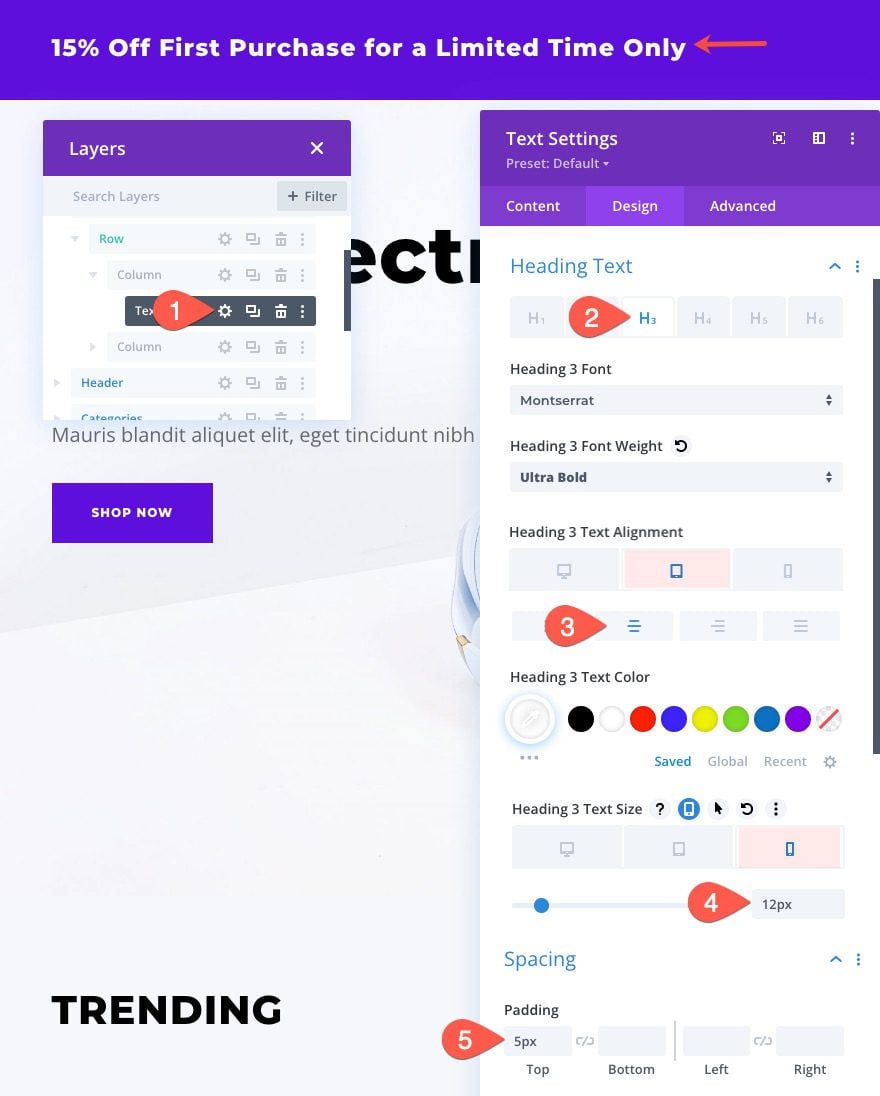
As soon as the brand new textual content module is added, open the textual content settings and replace the next:
- Heading 3 Textual content Alignment (pill and cellphone): Heart
- Heading 3 Textual content Measurement (cellphone): 12px
- Padding: 5px prime

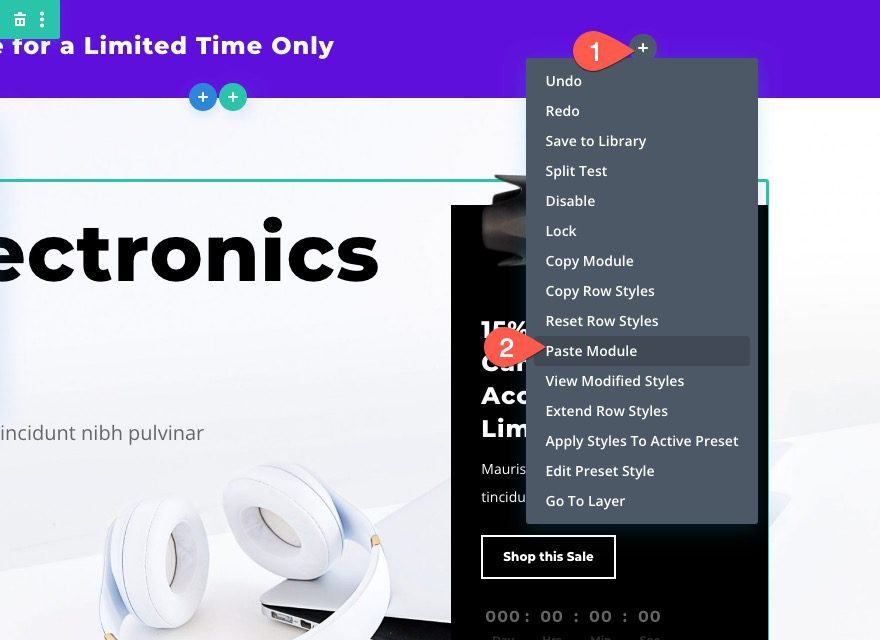
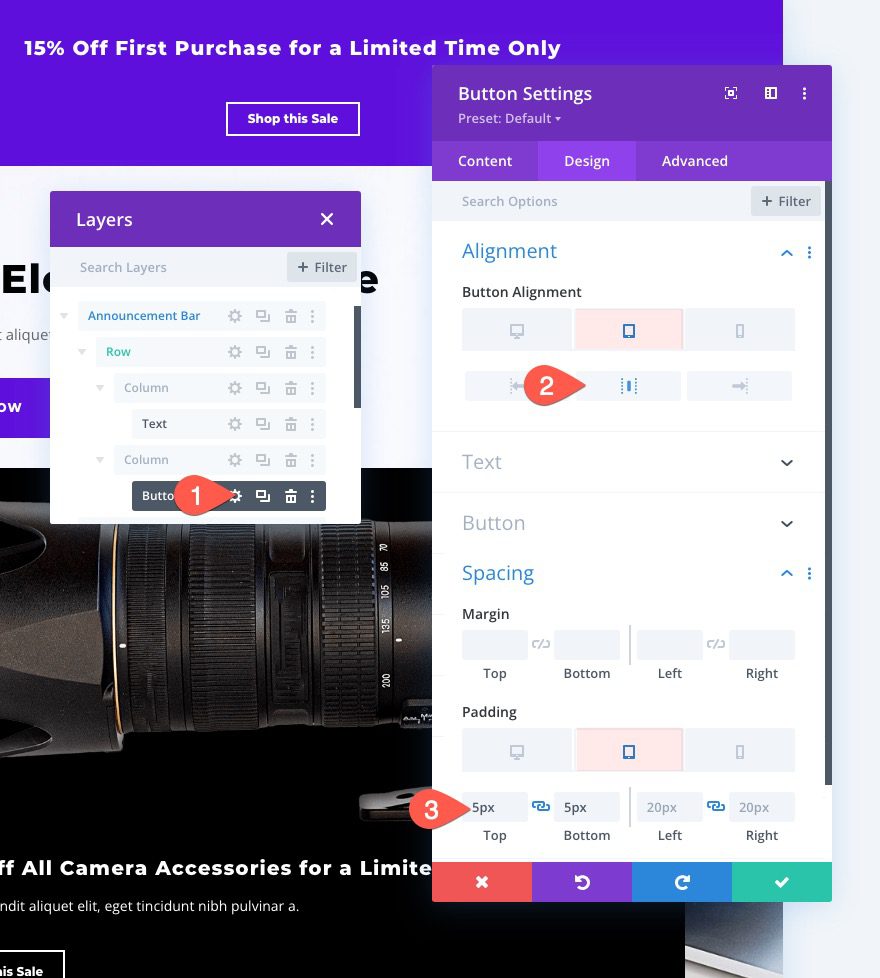
In the suitable column of the announcement bar, we’re going to add a button. To do that, copy the present button module above the countdown timer in the suitable column of the row within the present header part of the format.
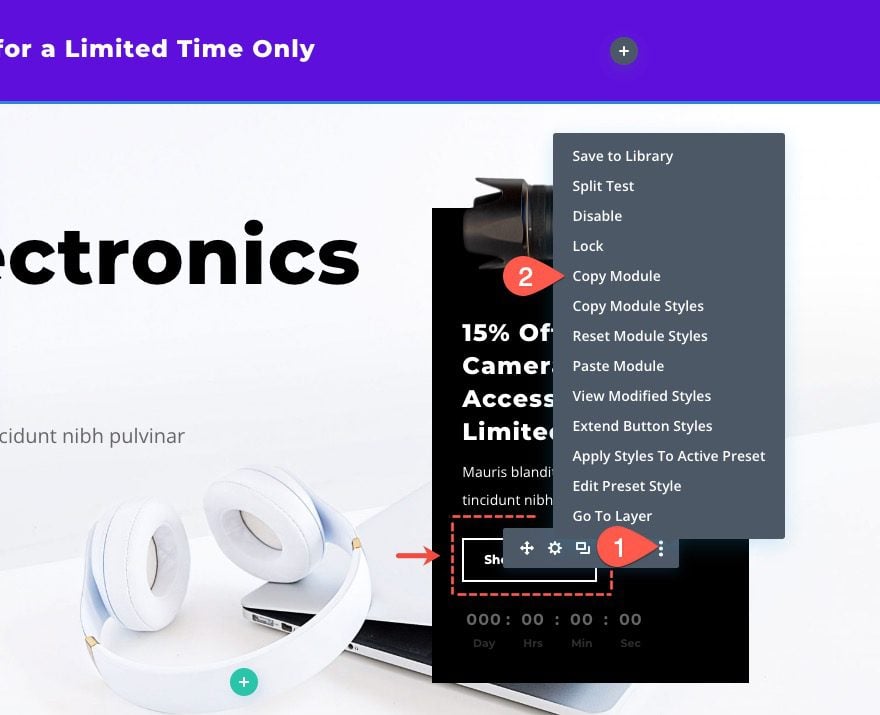

Then paste the button module inside the suitable column of the row within the announcement bar part.

As soon as added, open the settings for the button module and replace the next:
- Button Alignment (pill and cellphone): Heart
- Padding (pill and cellphone): 5px prime, 5px backside

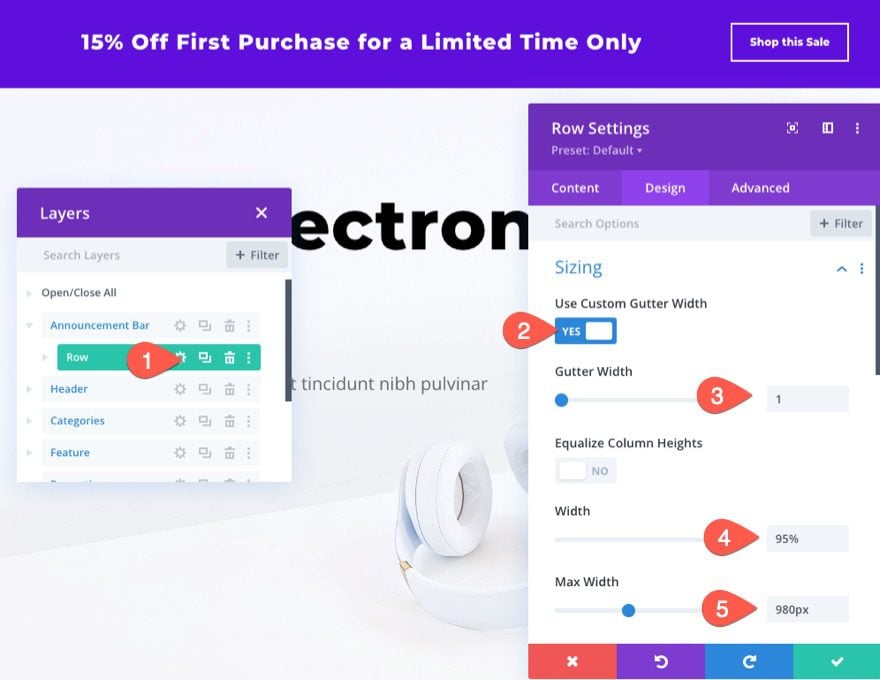
Half 4: Adjusting the Row Settings
To place the ultimate touches on the design of the announcement bar, open the settings for the row and replace the sizing choices as follows:
- Gutter Width: 1
- Width: 95%
- Max Width: 980px

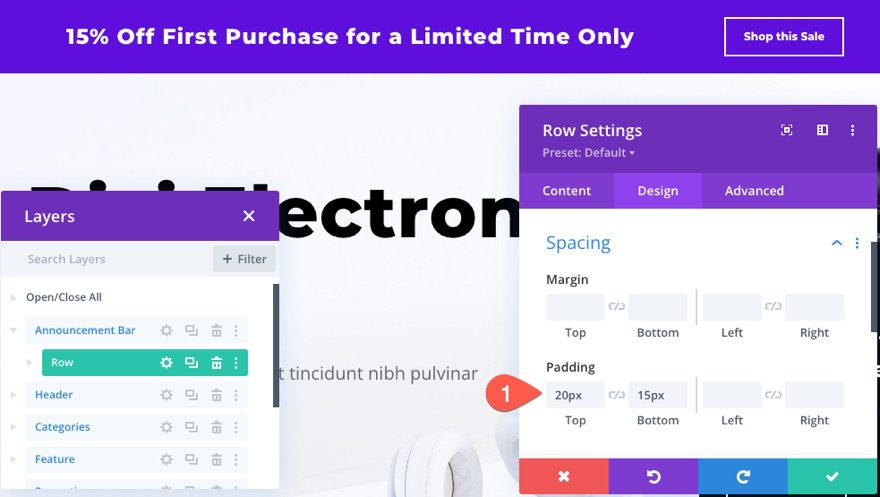
- Padding: 20px prime, 15px backside

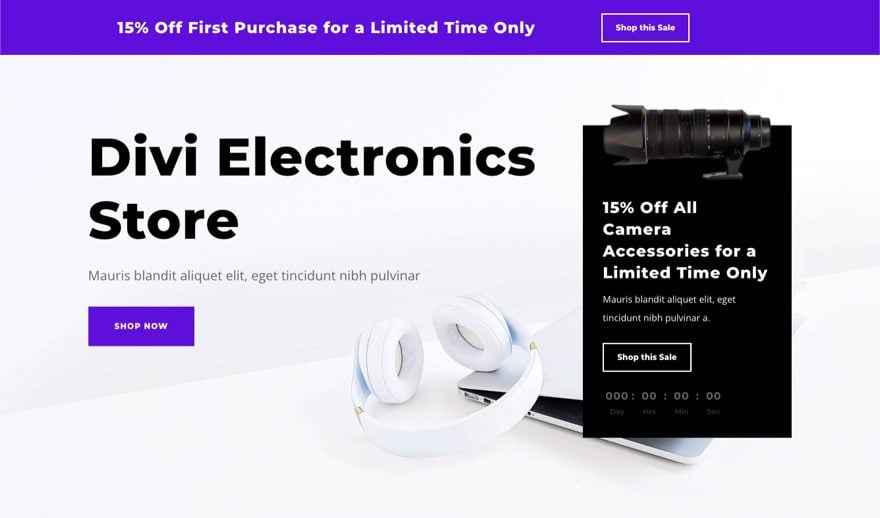
Remaining End result
That’s it! To take a look at the consequence on the reside web page, keep in mind that you’ll not see the announcement bar till you go to the touchdown web page (or no matter web page you chose for the Web page View situation).
Here’s what the announcement bar will appear to be as soon as it does seem.

And right here is the animation of the announcement bar on web page load.
Remaining Ideas
The Web page View show situation highlighted on this tutorial is just one of many situation choices out there in Divi. Be happy to mix the web page view situation with different situations that make sense for an announcement bar. For instance, you might additionally embody the Product Buy situation to supply a first-time buy low cost solely to guests who haven’t made a purchase order. Plus, you too can experiment with displaying different content material in addition to an announcement bar as nicely. Have enjoyable!
I sit up for listening to from you within the feedback.
Cheers!
.inline-code{padding: 0px 4px; shade: crimson; font-family: Monaco,consolas,bitstream vera sans mono,courier new,Courier,monospace!necessary} video.with-border {border-radius: 8px;box-shadow: 0 8px 60px 0 rgba(103,151,255,.11), 0 12px 90px 0 rgba(103,151,255,.11);show:block;margin: 0 auto;}
The submit The right way to Retarget a Touchdown Web page Go to with an Announcement Bar in Divi appeared first on Elegant Themes Weblog.