


Retargeting deserted carts is an efficient advertising and marketing method that incentivizes prospects to purchase the objects they deserted after including them to their cart in your web site. One efficient technique for bringing these prospects again to complete the acquisition is to supply a reduction on the objects they supposed to purchase. The difficult half is to supply these reductions solely to customers who’ve deserted their carts.
Divi’s situation choices embrace show circumstances that will let you present or cover content material primarily based on a person’s WooCommerce cart content material and web page visits. This situation combo makes it doable to retarget these customers who’ve deserted their carts with a reduction or promo popup.
On this tutorial, we’re going to present you the way to retarget deserted carts by creating a wise promo popup that reveals on a touchdown web page provided that the person has objects of their cart and has visited the checkout web page.
Let’s get began!
Sneak Peek
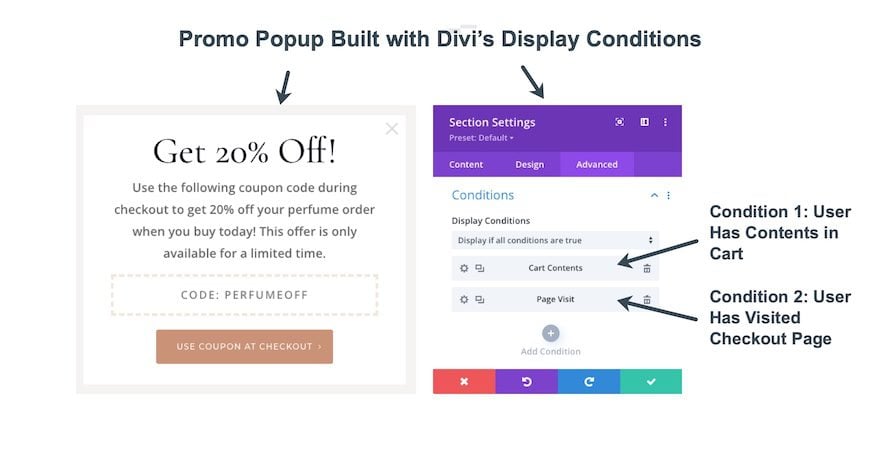
Here’s a fast have a look at the promo popup we’ll construct on this tutorial.
This promo popup will show on the web page if the person has added a product to their cart and visited the checkout web page.
Obtain the Retargeting Deserted Cart Promo Popup Structure for FREE
To put your fingers on the structure from this tutorial, you’ll first must obtain it utilizing the button under. To achieve entry to the obtain you will have to subscribe to our Divi Day by day e mail listing by utilizing the shape under. As a brand new subscriber, you’ll obtain much more Divi goodness and a free Divi Structure pack each Monday! When you’re already on the listing, merely enter your e mail tackle under and click on obtain. You’ll not be “resubscribed” or obtain further emails.
@media solely display screen and ( max-width: 767px ) {.et_bloom .et_bloom_optin_1 .carrot_edge.et_bloom_form_right .et_bloom_form_content:earlier than { border-top-color: #ffffff !vital; border-left-color: clear !vital; }.et_bloom .et_bloom_optin_1 .carrot_edge.et_bloom_form_left .et_bloom_form_content:after { border-bottom-color: #ffffff !vital; border-left-color: clear !vital; }
}.et_bloom .et_bloom_optin_1 .et_bloom_form_content button { background-color: #f92c8b !vital; } .et_bloom .et_bloom_optin_1 .et_bloom_form_content .et_bloom_fields i { coloration: #f92c8b !vital; } .et_bloom .et_bloom_optin_1 .et_bloom_form_content .et_bloom_custom_field_radio i:earlier than { background: #f92c8b !vital; } .et_bloom .et_bloom_optin_1 .et_bloom_border_solid { border-color: #f7f9fb !vital } .et_bloom .et_bloom_optin_1 .et_bloom_form_content button { background-color: #f92c8b !vital; } .et_bloom .et_bloom_optin_1 .et_bloom_form_container h2, .et_bloom .et_bloom_optin_1 .et_bloom_form_container h2 span, .et_bloom .et_bloom_optin_1 .et_bloom_form_container h2 sturdy { font-family: “Open Sans”, Helvetica, Arial, Lucida, sans-serif; }.et_bloom .et_bloom_optin_1 .et_bloom_form_container p, .et_bloom .et_bloom_optin_1 .et_bloom_form_container p span, .et_bloom .et_bloom_optin_1 .et_bloom_form_container p sturdy, .et_bloom .et_bloom_optin_1 .et_bloom_form_container type enter, .et_bloom .et_bloom_optin_1 .et_bloom_form_container type button span { font-family: “Open Sans”, Helvetica, Arial, Lucida, sans-serif; } p.et_bloom_popup_input { padding-bottom: 0 !vital;}


Obtain For Free
Be part of the Divi E-newsletter and we are going to e mail you a duplicate of the last word Divi Touchdown Web page Structure Pack, plus tons of different superb and free Divi sources, ideas and methods. Comply with alongside and you’ll be a Divi grasp very quickly. In case you are already subscribed merely kind in your e mail tackle under and click on obtain to entry the structure pack.
You will have efficiently subscribed. Please test your e mail tackle to verify your subscription and get entry to free weekly Divi structure packs!
To import the part structure to your Divi Library, navigate to the Divi Library.
Click on the Import button.
Within the portability popup, choose the import tab and select the obtain file out of your laptop.
Then click on the import button.


As soon as finished, the part structure will likely be out there within the Divi Builder.
Understanding the Idea
Earlier than moving into the nitty-gritty constructing strategy of the tutorial, it would assist to know the essential idea of what we’re going to construct. The concept is to make use of the Divi Builder to construct a promo popup on an present touchdown web page. As soon as the promo popup part is constructed, we wish to add the situation choices that can show the part when each of the next circumstances are met.
- The person has contents of their Cart
- The person has visited the Checkout web page
This may be finished utilizing Divi’s built-in situation choices when modifying the part (or any Divi Ingredient).

As soon as the situation choices are set for that part (or promo popup), we will now retarget customers who’ve deserted their cart by displaying the popup at any time when they’ve met the circumstances. The method would go one thing like this…
- The person visits the touchdown web page with out the promo popup displayed
- The person provides contents to their Cart (assembly situation #1)
- The person visits the Checkout web page (assembly situation #2) however for no matter purpose, the person doesn’t full the checkout course of and leaves.
- Then later the person revisits the touchdown web page that now shows the promo popup which redirects them to the entire the checkout course of with a reduction.
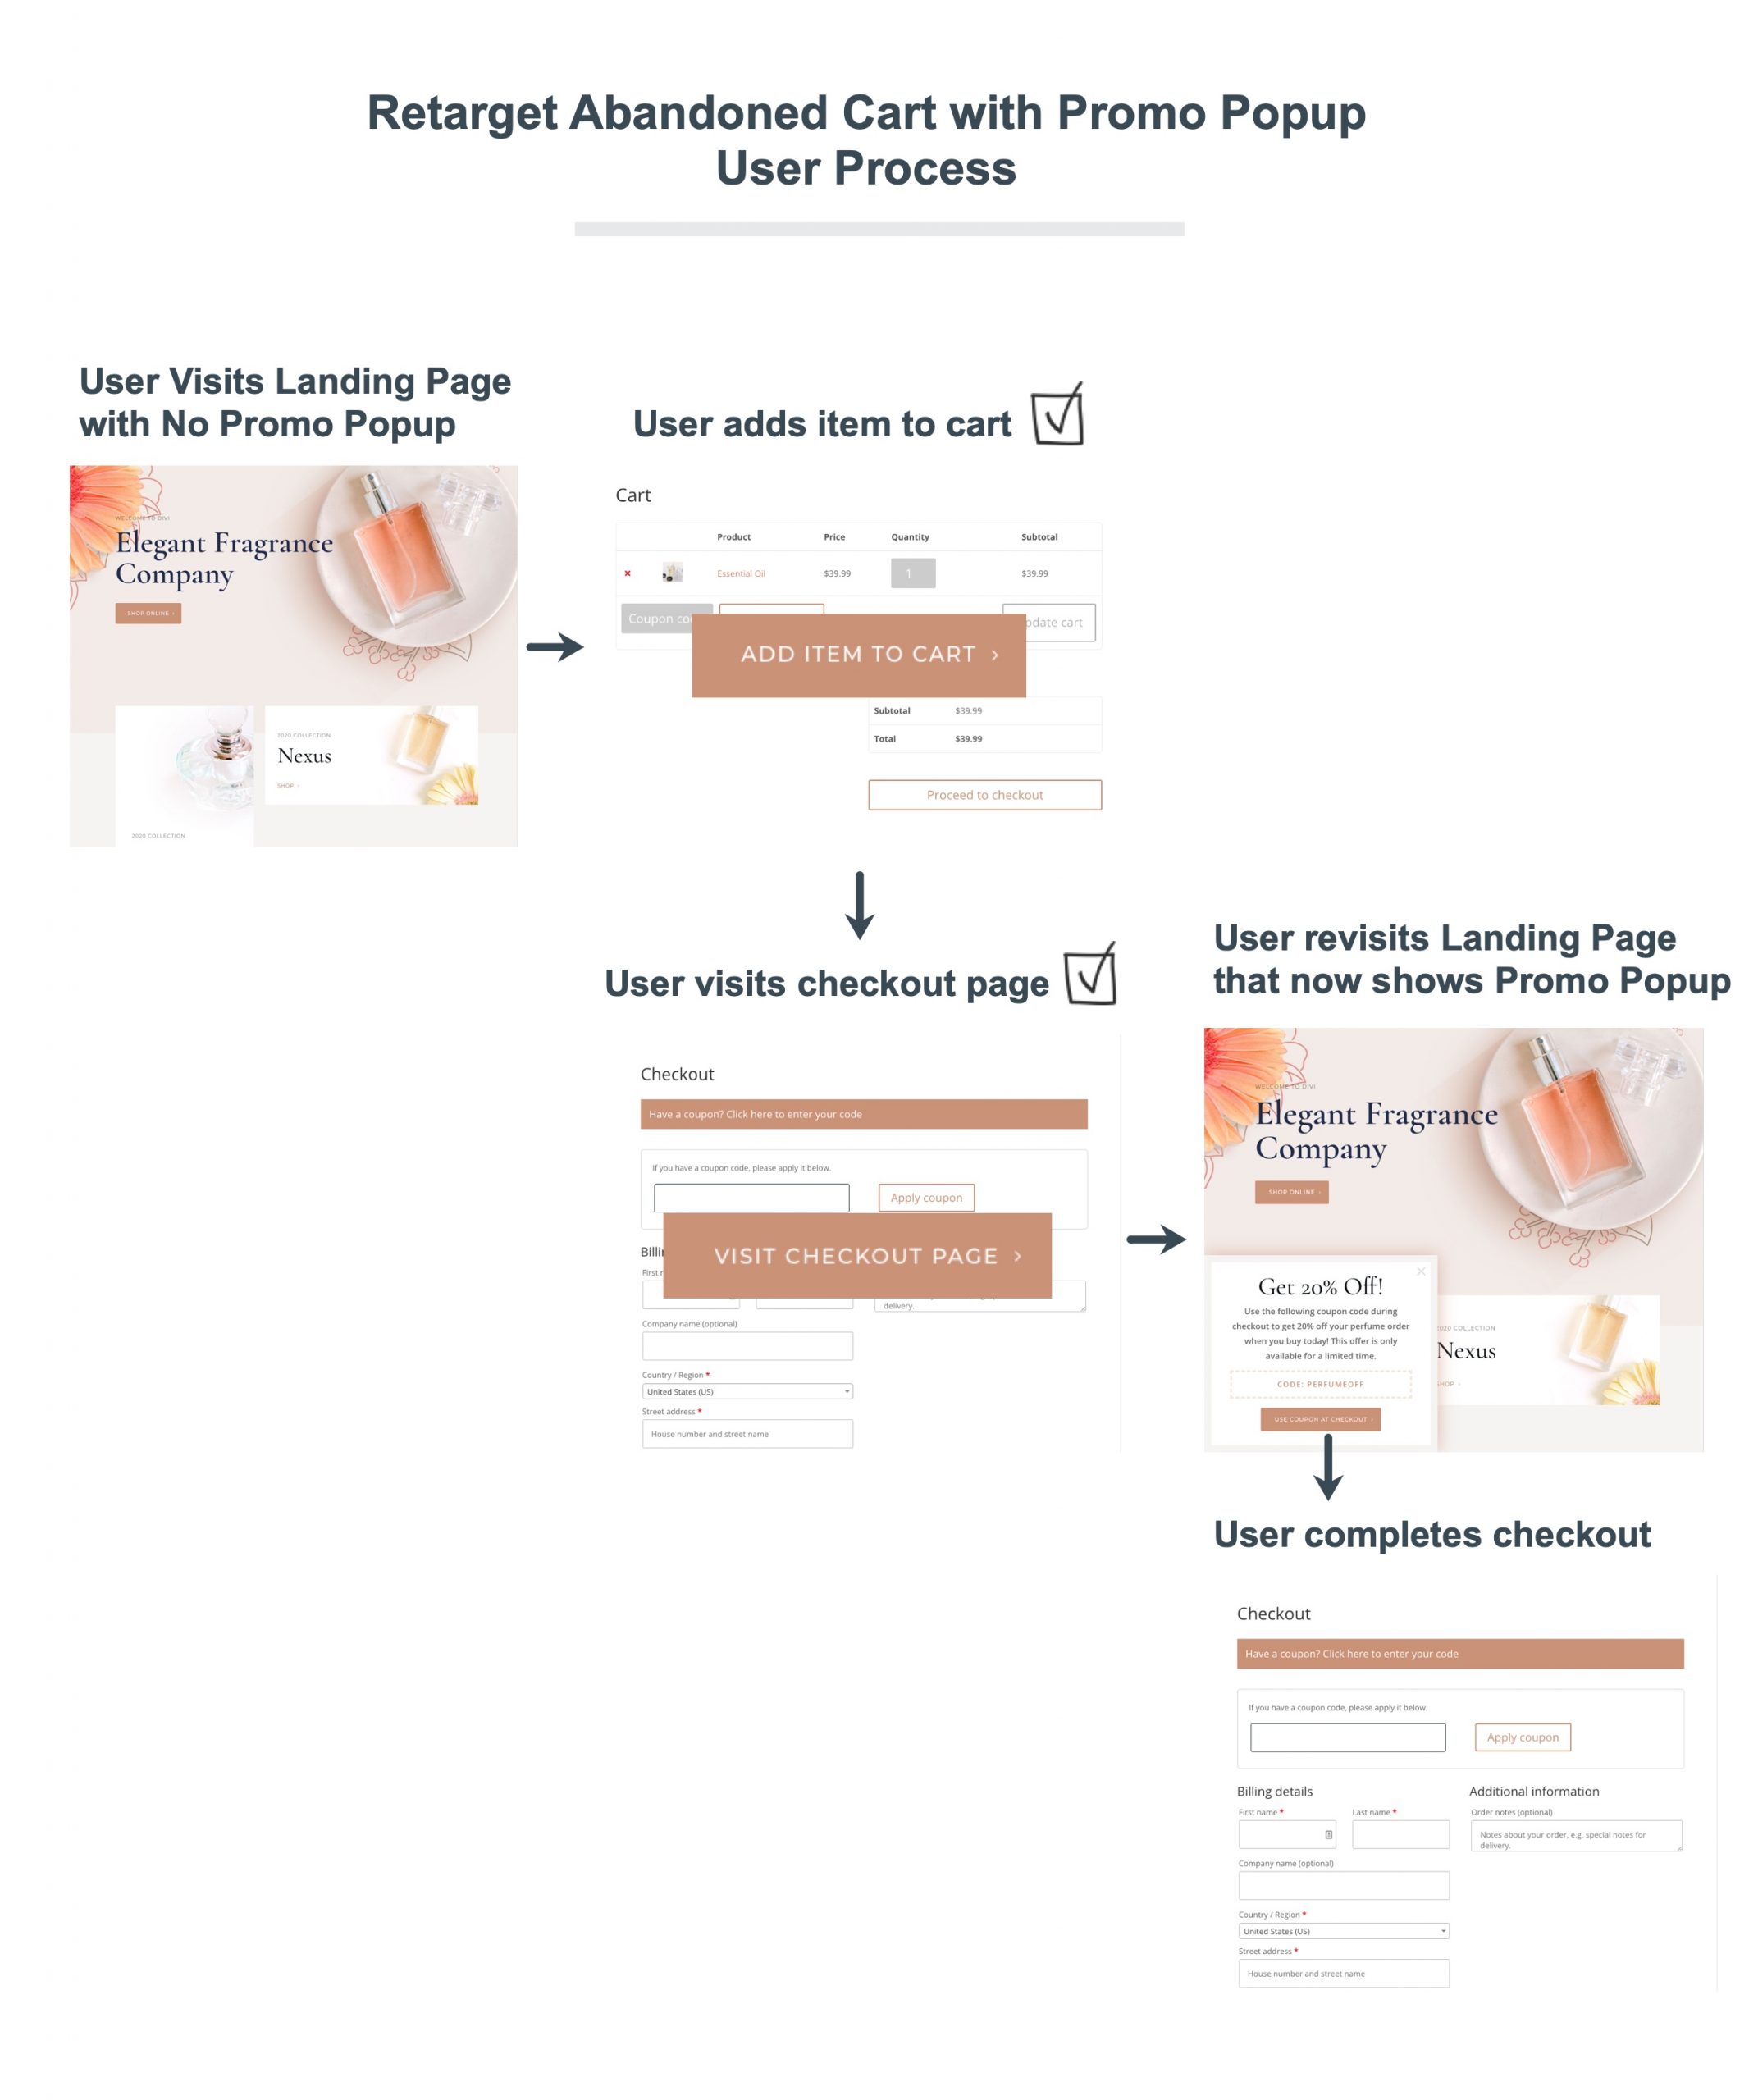

Fairly cool stuff! Now that you simply perceive the idea, let’s get to the tutorial, we could?
What You Must Get Began


To get began, you will have to do the next:
- When you haven’t but, set up and activate the Divi Theme.
- Create a brand new web page in WordPress and use the Divi Builder to edit the web page on the entrance finish (visible builder).
- Select the choice “Build From Scratch”.
After that, you’ll have a clean canvas to start out designing in Divi.
Retargeting Deserted Carts with a Promo Popup utilizing Divi’s Situation Choices
Half 1: Importing the Premade Touchdown Web page
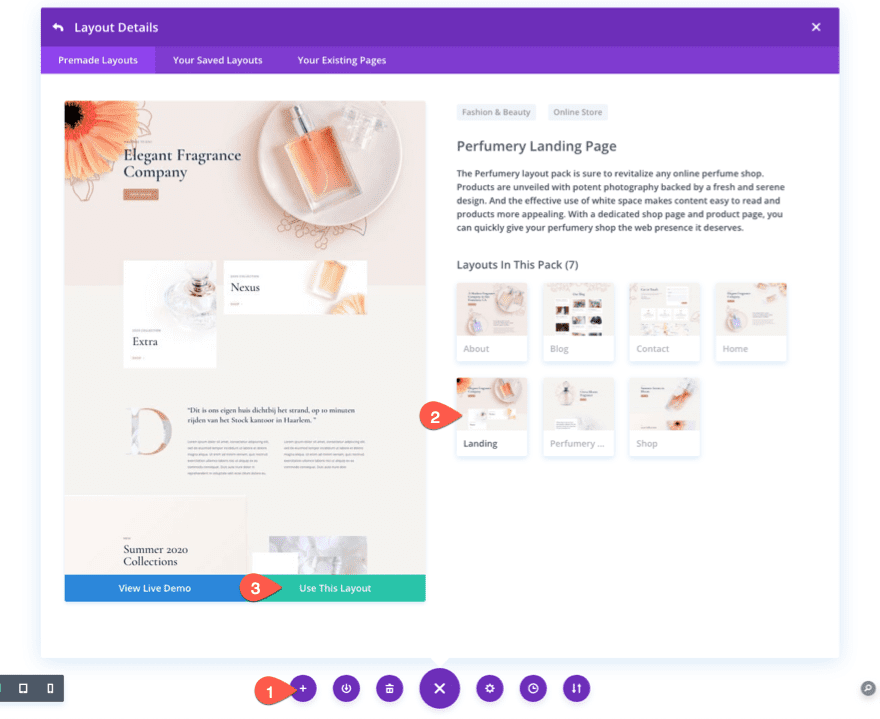
For this tutorial, we’re going to add the promo popup to the touchdown web page of a Divi web site. To jumpstart this course of, we’re going to import the Perfumery Touchdown Web page structure from inside the Divi Builder.
To do that, open the settings menu and click on the Add From Library icon. Then search and discover the Perfumery Structure Pack and click on to make use of the Perfumery Structure Web page Structure.

Half 2: Constructing a Fastened Part because the Promo Popup Container
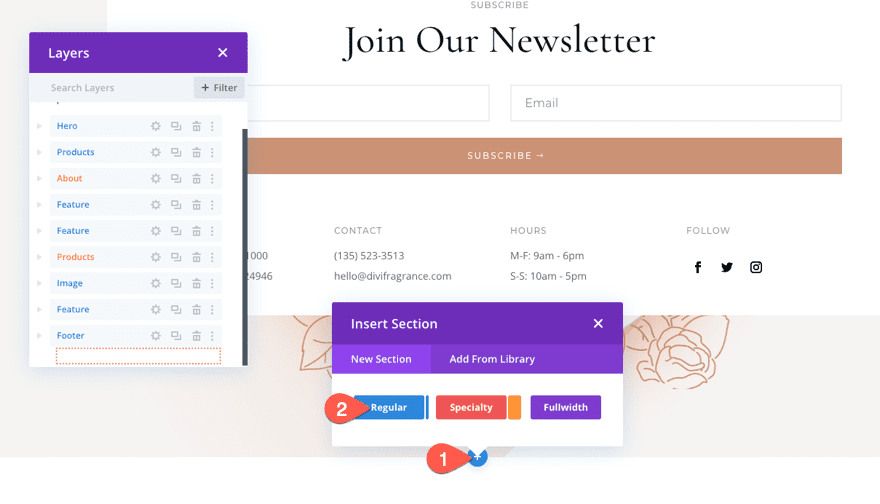
As soon as the touchdown web page is loaded. Scroll to the underside of the web page and add a brand new common part under the footer part of the web page.

Part Settings
Width and Padding
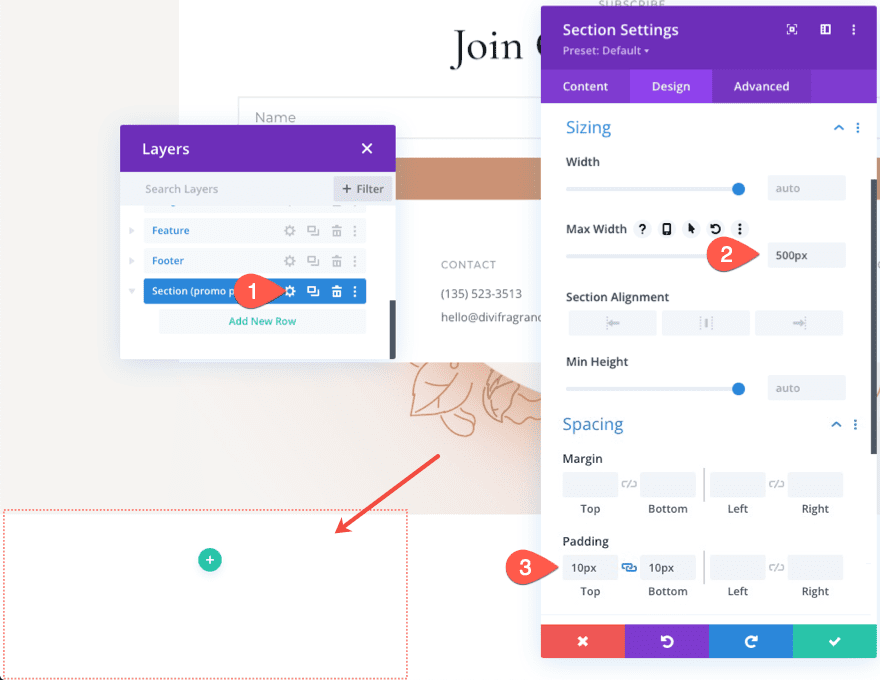
Subsequent, replace the part settings with a customized max-width and padding as follows:
- Max Width: 500px
- Padding: 10px prime, 10px backside

Border
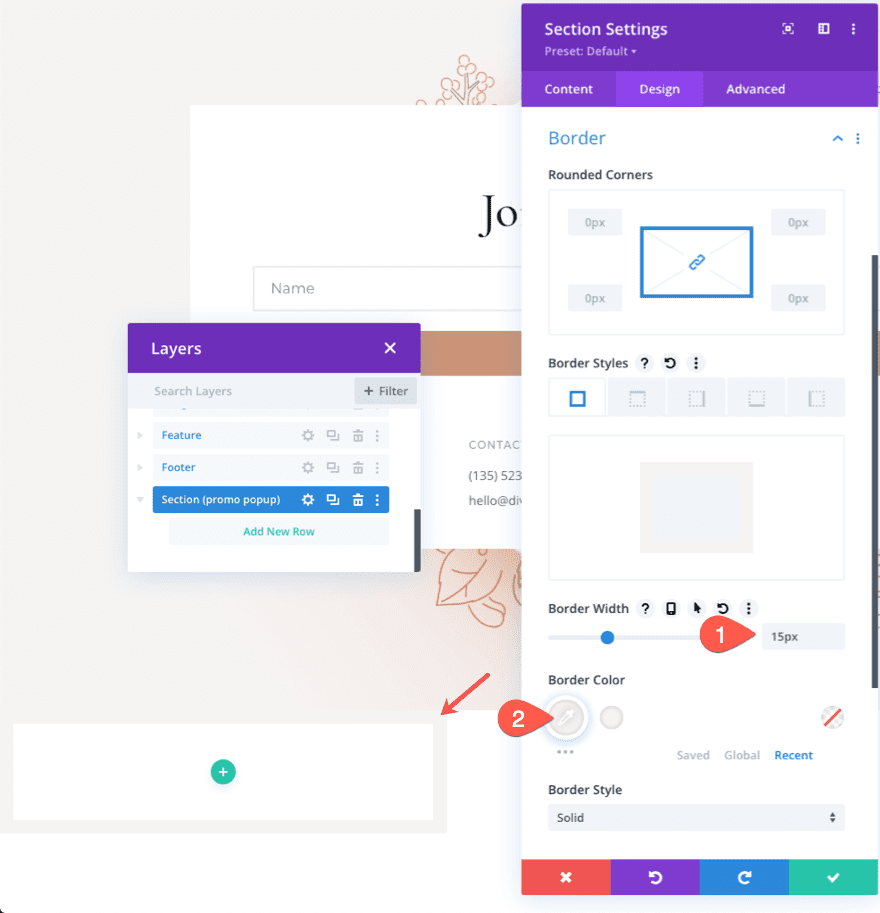
Then give the part a border.
- Border Width: 15px
- Border Shade: #f6f4f2

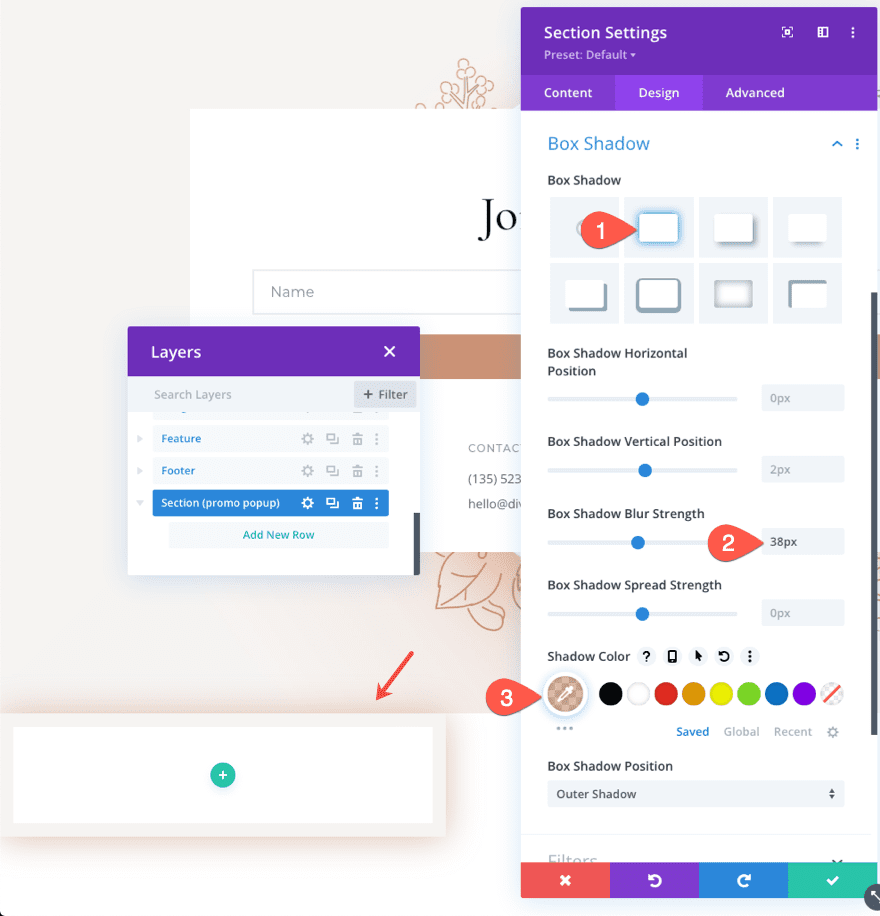
Field Shadow
As soon as the border is in place, add a field shadow to the part for a bit depth:
- Field Shadow: see screenshot
- Field Shadow Blur Energy: 38px
- Shadow Shade: rgba(203,146,116,0.6)

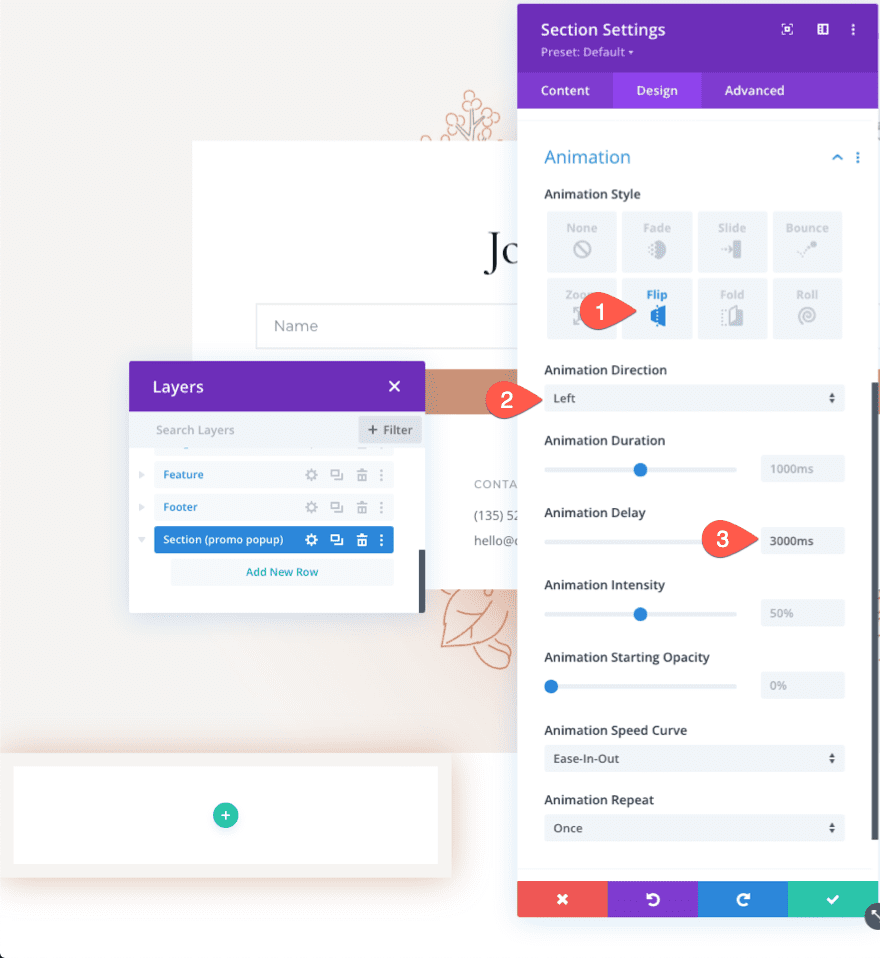
Animation
To offer the popup a delayed animation, replace the animation model as follows:
- Animation Model: Flip
- Animation Route: Left
- Animation Length: 3000ms
This may present the popup part 3 seconds after web page load with a pleasant flip animation.

Place
Underneath the Superior tab, replace the place in order that the part stays fastened on the backside left of the browser window.
- Place: Fastened
- Location: Backside Left
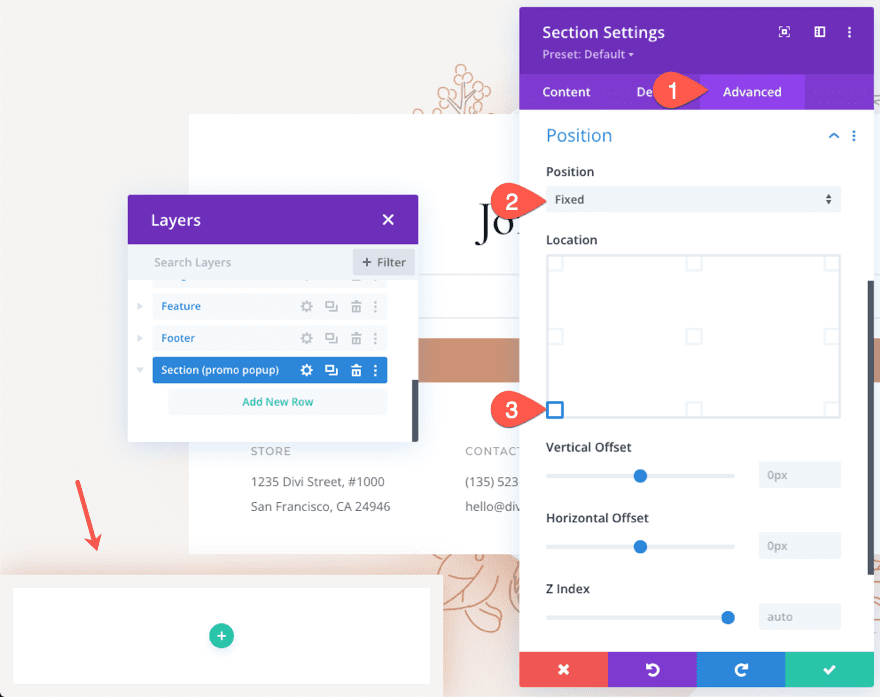

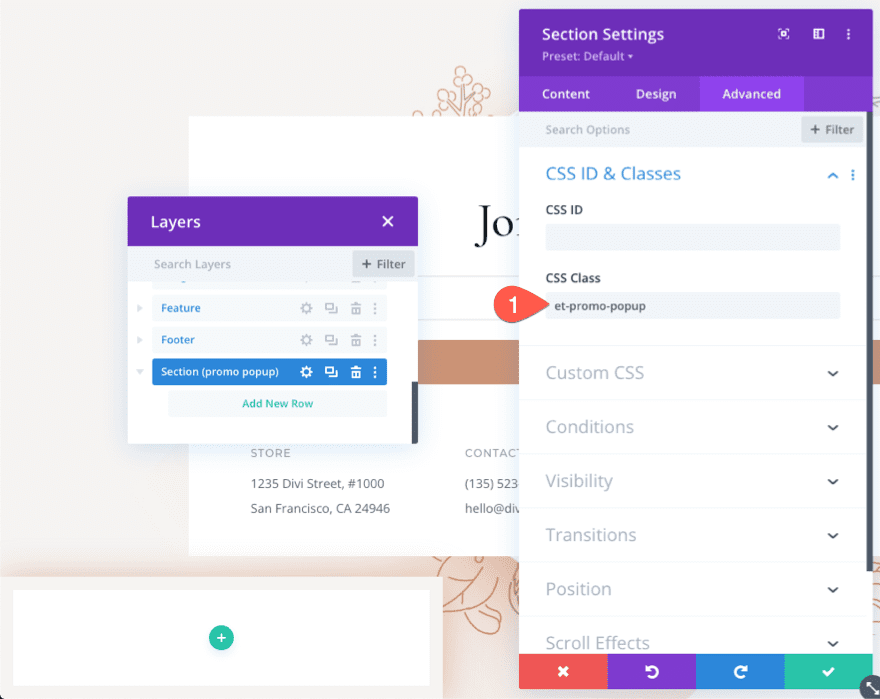
CSS Class
Ultimately, we’re going to add a clickable “X” icon that can shut/cover the popup. We have to add a customized CSS Class to the part in an effort to goal it with jQuery.
Enter the next CSS Class:
- CSS Class: et-promo-popup

Half 3: Including Situation Choices to Part
As soon as the part (our popup container) is constructed, we’re prepared so as to add the situation choices that can show the part when each of the next circumstances are met.
- The person has contents of their Cart
- The person has visited the Checkout web page
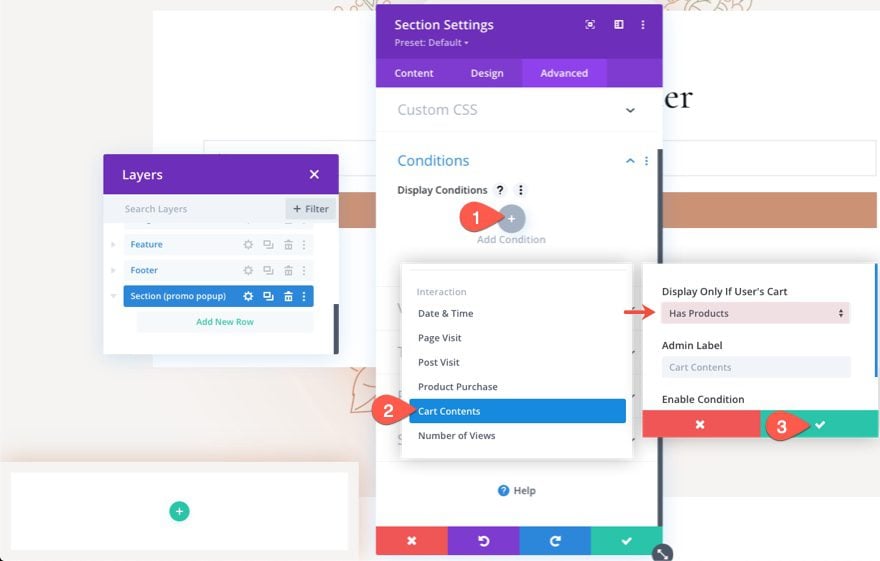
Show Situation 1: Cart Contents
First, we’re going to add a show situation that can show the part/popup at any time when the person has contents of their cart.
To do that, go to the superior tab underneath the part settings. Then click on the plus icon so as to add a brand new situation.
Within the dropdown menu, choose the Cart Contents situation.
Within the Cart Contents settings popup, be sure that the choice Show Solely If Person’s Cart is about to “Has Products”.
Then save modifications.
NOTE: This situation is restricted to Divi websites utilizing WooCommerce.

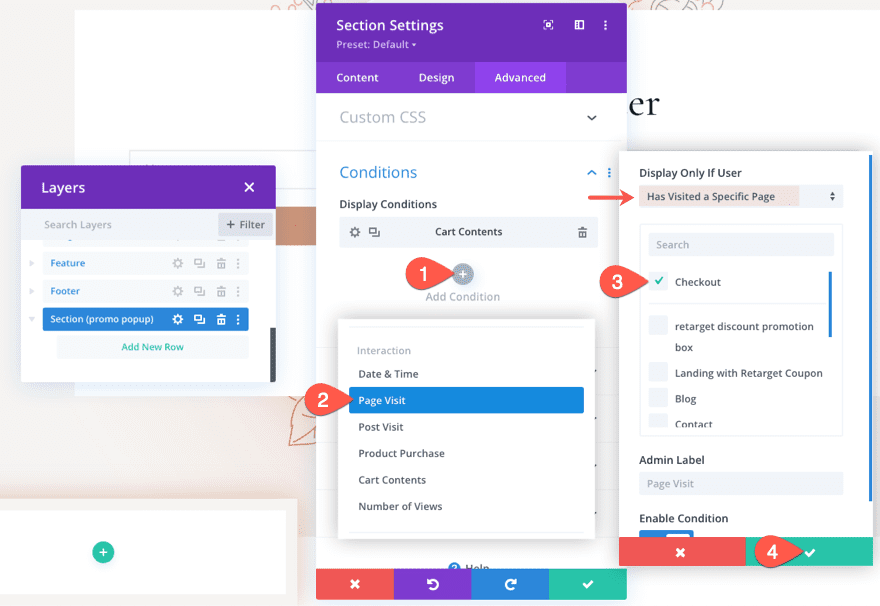
Show Situation 2: Web page Go to
Subsequent, we’re going to add a show situation that can show the part/popup at any time when the person has visited a selected web page, which, on this case, would be the Checkout web page on a WooCommerce web site.
To do that, go to the superior tab underneath the part settings. Then click on the plus icon so as to add a brand new situation.
Within the dropdown menu, choose the Web page Go to situation.
Within the Cart Contents settings popup, be sure that the choice Show Solely If Person is about to “Has Visited a Specific Page”. Then choose the Checkout web page from the listing of pages within the popup.
Then save modifications.

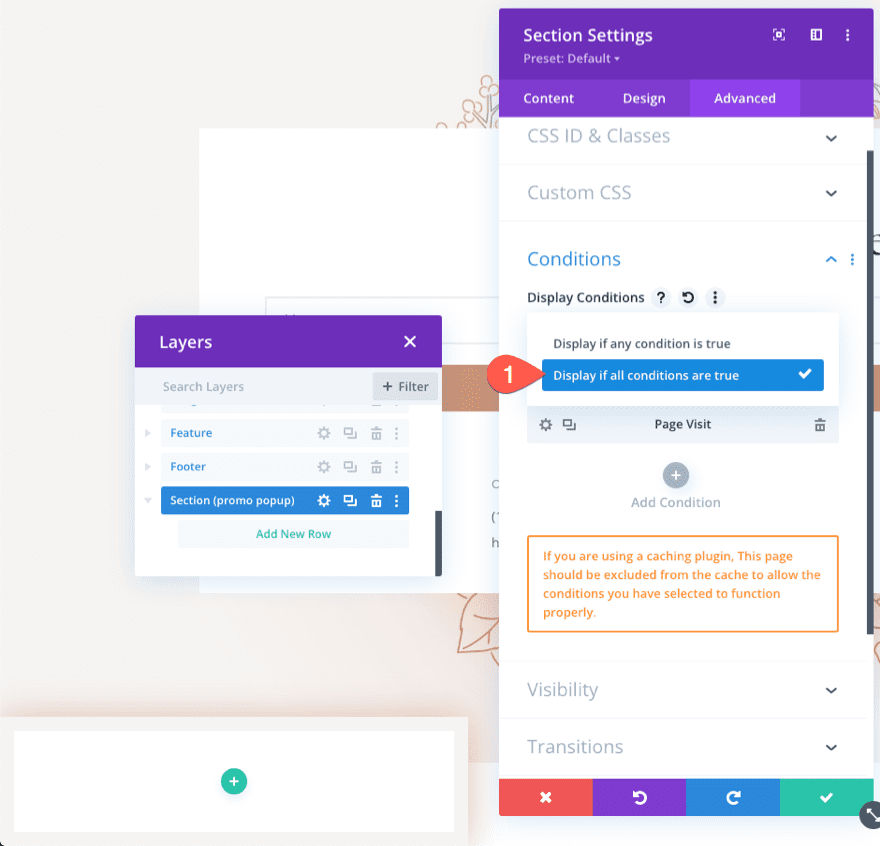
Show If All Circumstances Are True
Since we’ve a number of circumstances in play, we will select to show the part if any or all circumstances are true.
On this case, it is sensible to show the promo popup when all circumstances are true (the person has contents of their cart they usually have visited the check-out web page).
Underneath Show Circumstances, choose the next:
- Show if all circumstances are true

At this level, the situation performance we’re on the lookout for is already in place to indicate the part solely when a person has cart contents and has visited the checkout web page. Now, all we have to do is fill the part with the content material wanted to create the promo.
Half 4: Creating the Promo Popup Content material
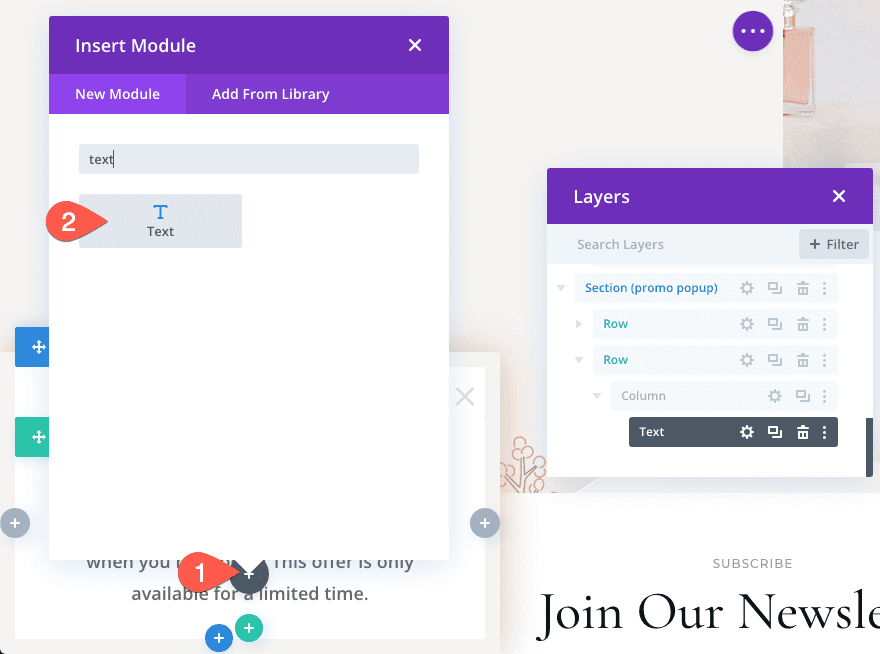
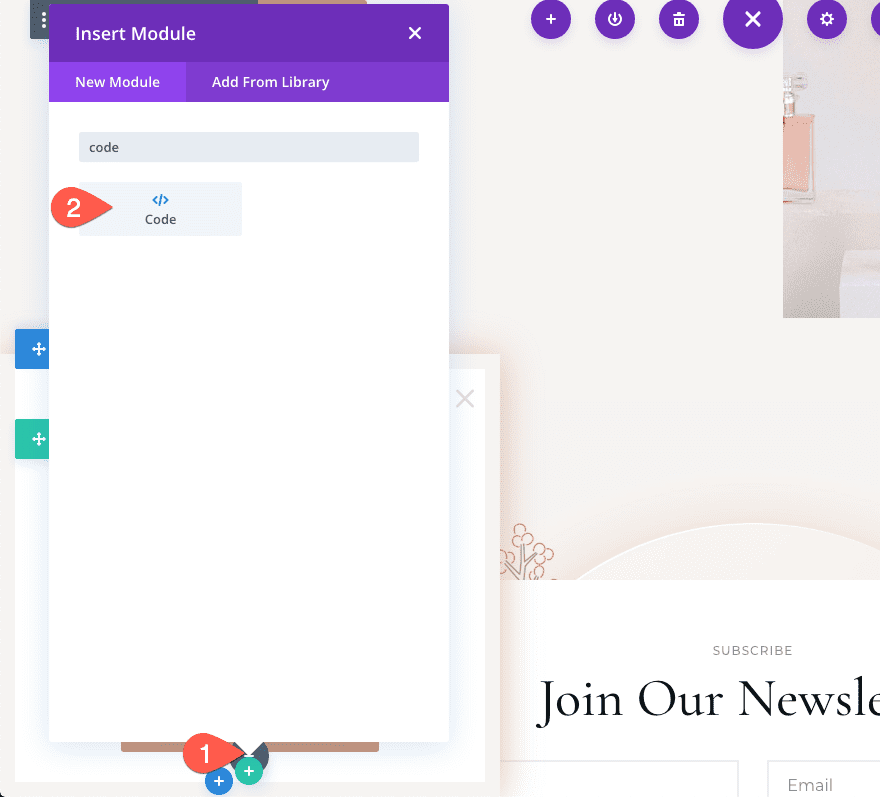
To create the content material for the promo popup, we’re going to add 4 modules:
- A blurb module with a clickable X icon so customers can shut the popup
- A textual content module for the title and physique textual content
- One other textual content module for the promo code
- And a button module that can redirect to the checkout web page so customers can full the acquisition.
Creating the “X” Icon to Shut the Popup
The Row for the Icon
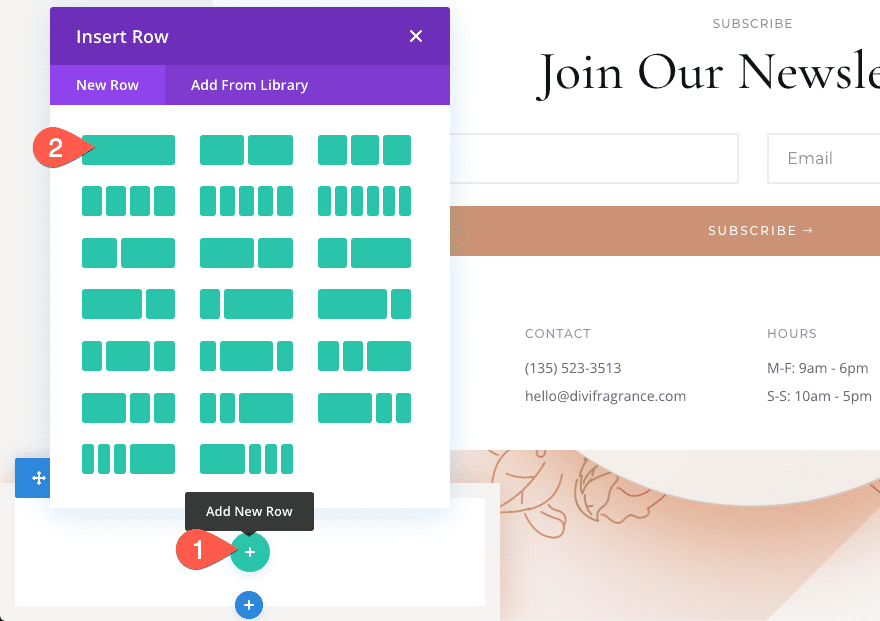
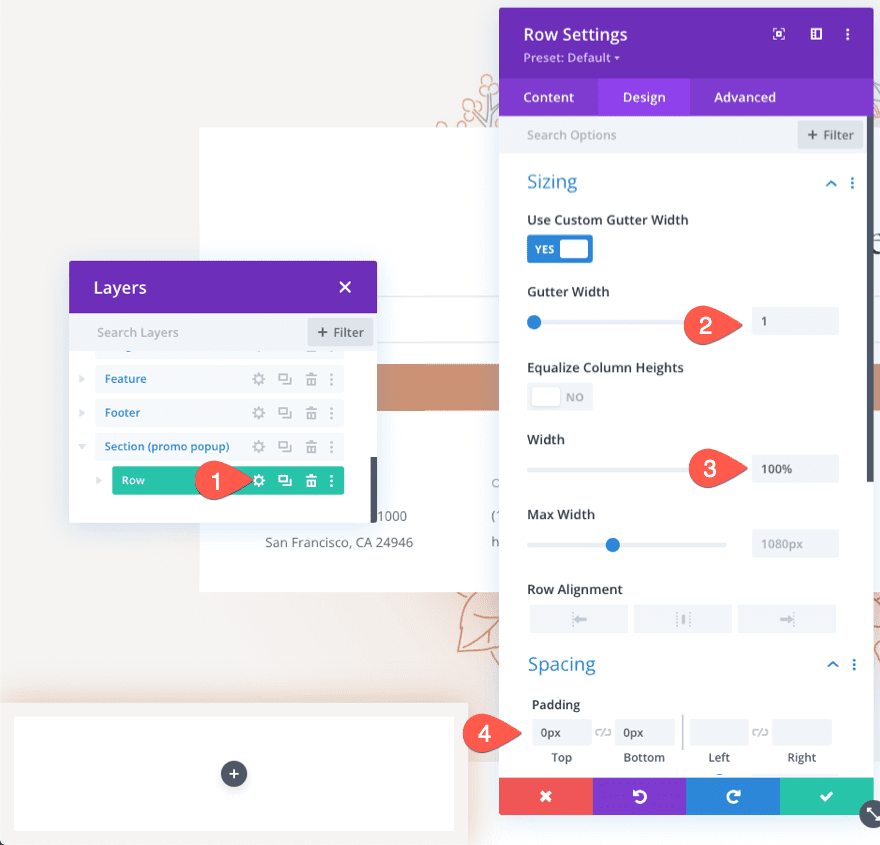
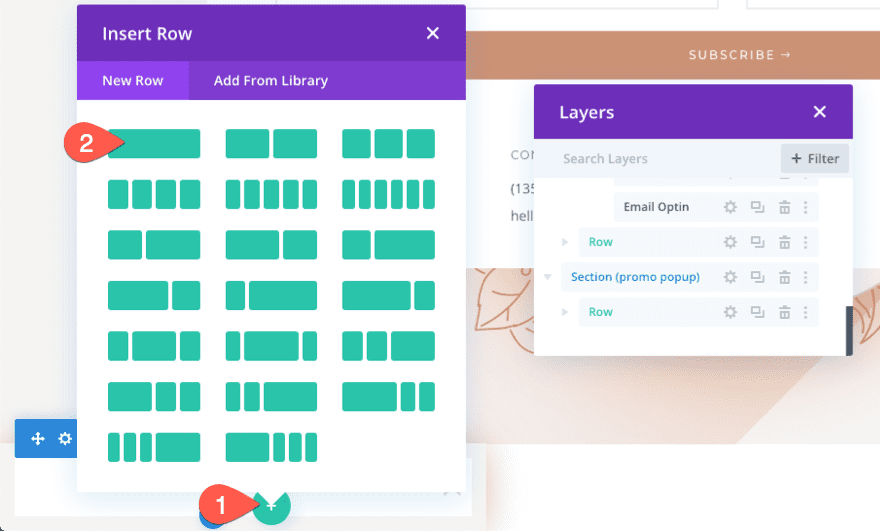
Earlier than we add the “X” icon blurb, add a brand new one-column row to the part.

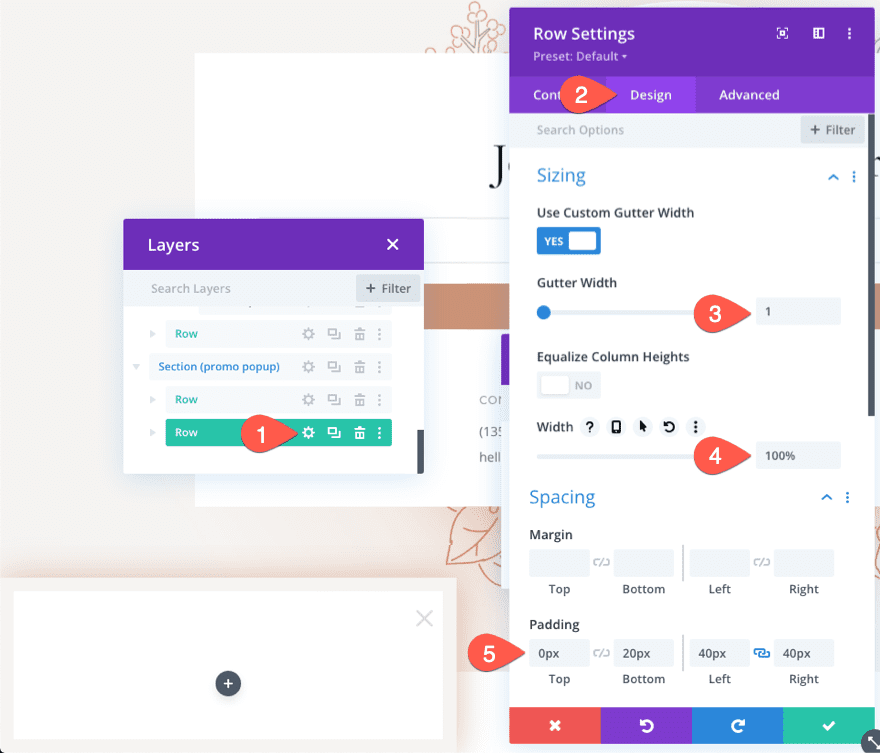
Replace the row settings as follows:
- Gutter Width: 1
- Width: 100%
- Padding: 0px prime, 0px backside

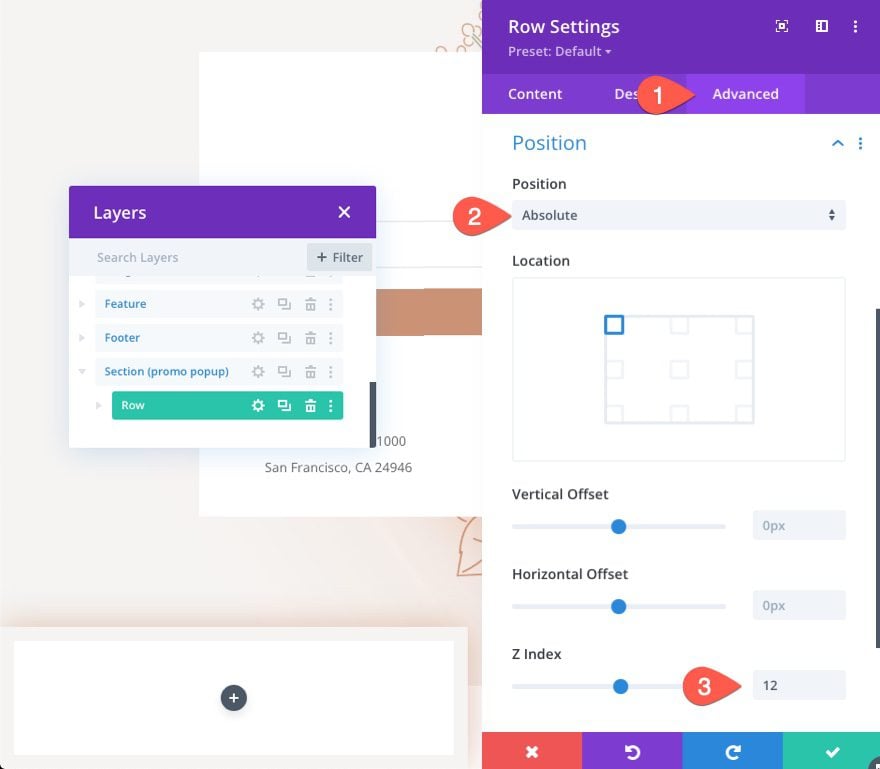
Then give the row an absolute place with the next z index as follows:
- Place: Absolute
- Z Index: 12

The Icon
To create the “X” icon to shut the popup, add a brand new blurb module contained in the row.
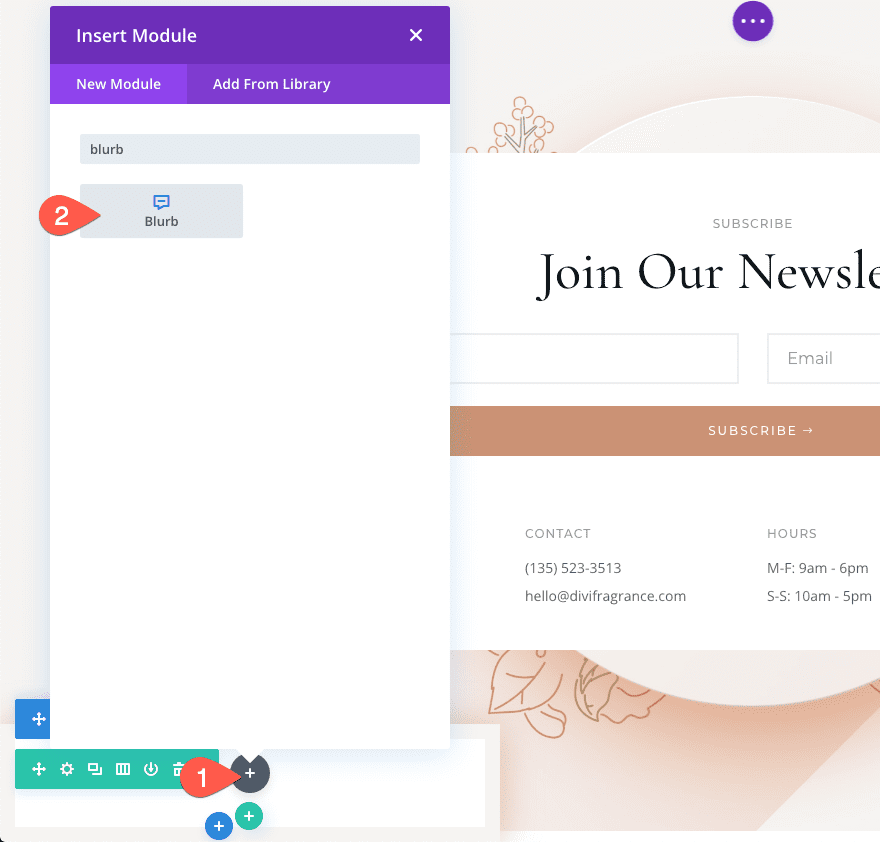

Take out any default Title or Physique textual content from the blurb content material. Then click on to make use of the X icon for the blurb.
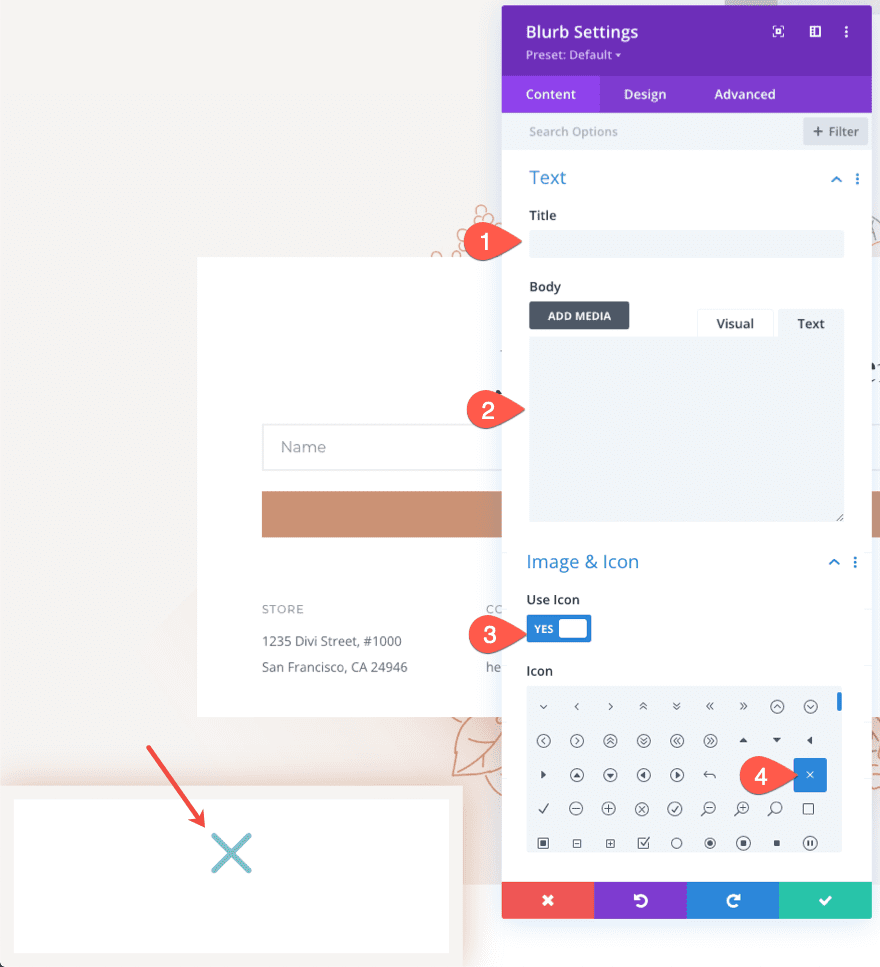

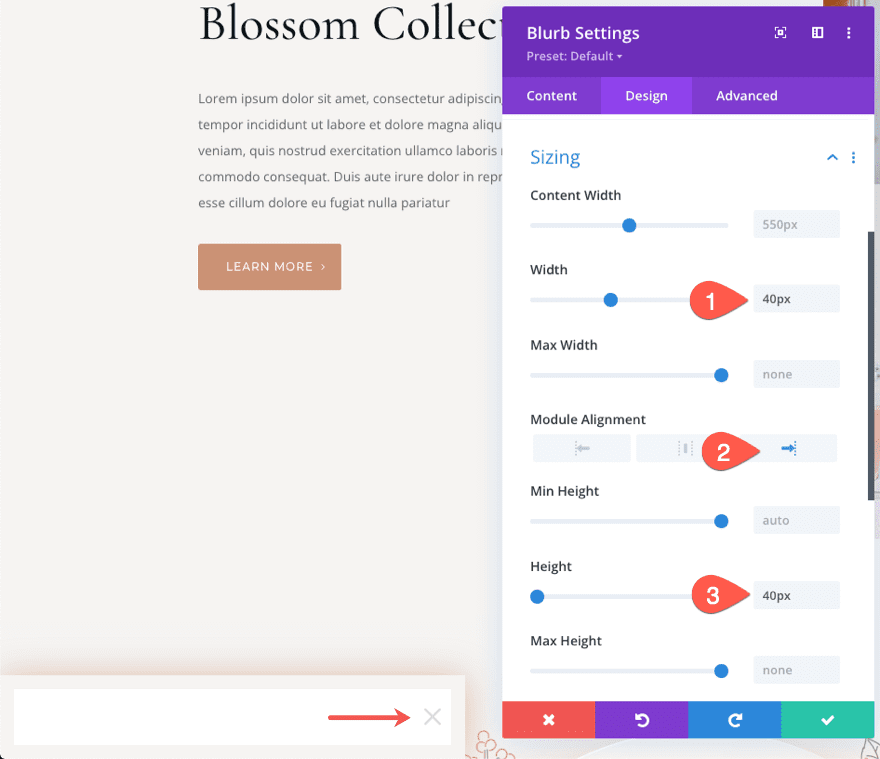
Underneath the design tab, replace the next:
- Icon Shade: #ddd
- Icon Font Dimension: 40px

- Width: 40px
- Module Alignment: proper
- Peak: 40px

Underneath the Superior tab, add the next customized CSS class to the blurb:
- CSS Class: et-close-popup-icon
We might want to goal this class with our jQuery later.


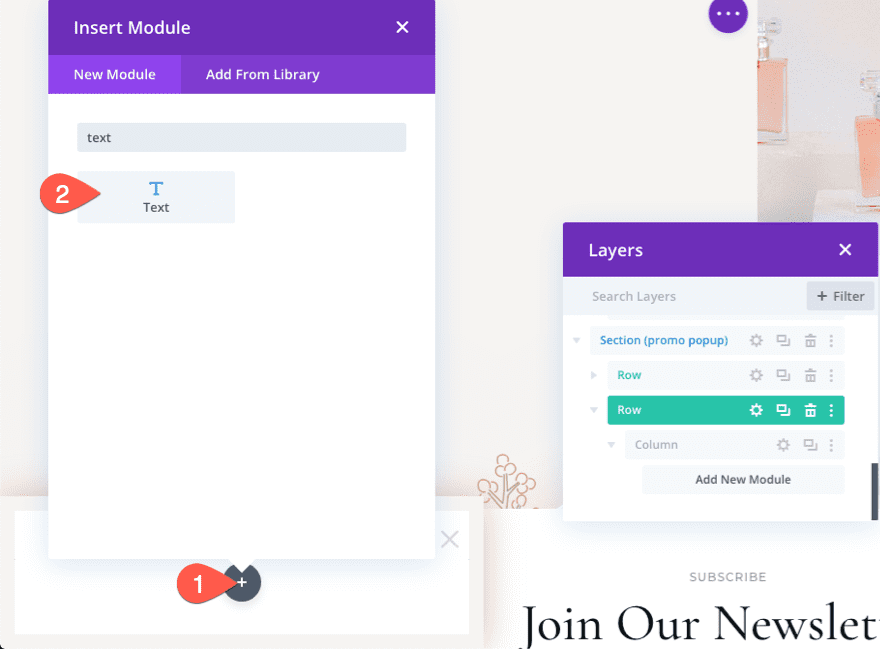
Creating the Title and Physique Textual content for the Popup
The opposite modules we’re going to add will want a separate row. Add a brand new one-column row underneath the earlier row containing the blurb icon.

Then replace the row settings as follows:
- Gutter Width: 1
- Width: 100%
- Padding: 0px prime, 20px backside, 40px left, 40px proper

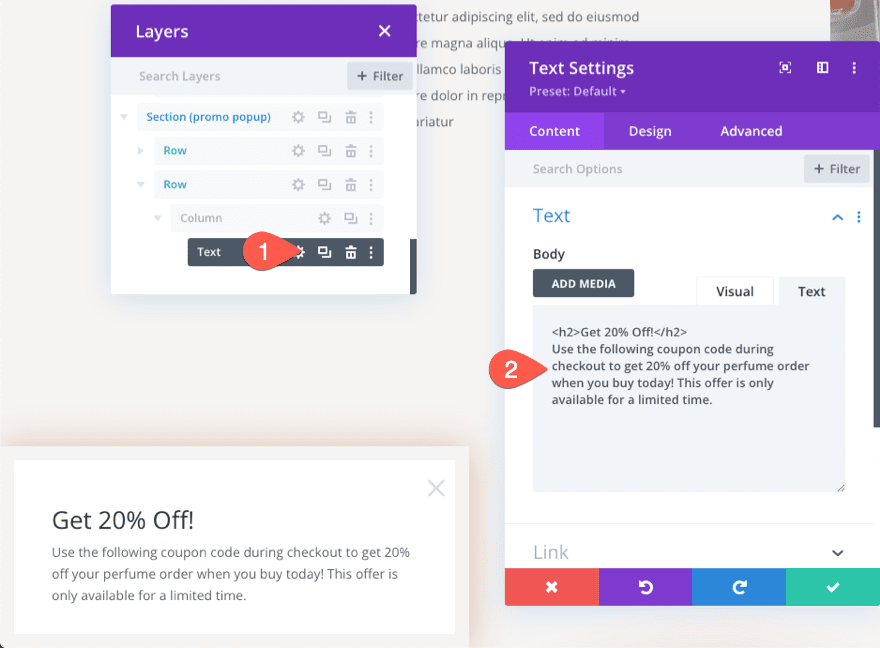
So as to add the Title and Physique content material, add a brand new textual content module inside the brand new row.

Replace the content material contained in the physique space with the next HTML:
<h2>Get 20% Off!</h2>
Use the next coupon code throughout checkout to get 20% off your fragrance order once you purchase at the moment! This supply is barely out there for a restricted time.

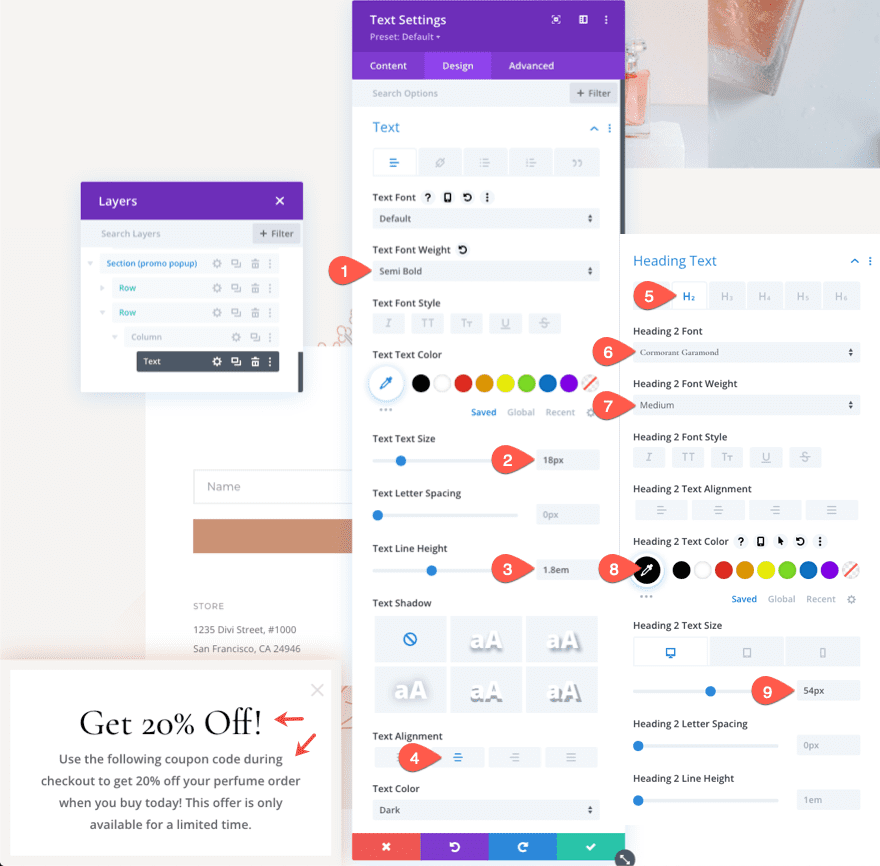
Underneath the design tab, replace the textual content kinds as follows:
- Textual content Font Weight: Semi Daring
- Textual content Textual content Dimension: 18px
- Textual content Line Peak: 1.8em
- Textual content Alignment: Middle
- Heading 2 Font: Cormorant Garamond
- Heading 2 Font Weight: Medium
- heading 2 Textual content Shade: #000
- Heading 2 Textual content Dimension: 54px (desktop), 38px (pill and cellphone)

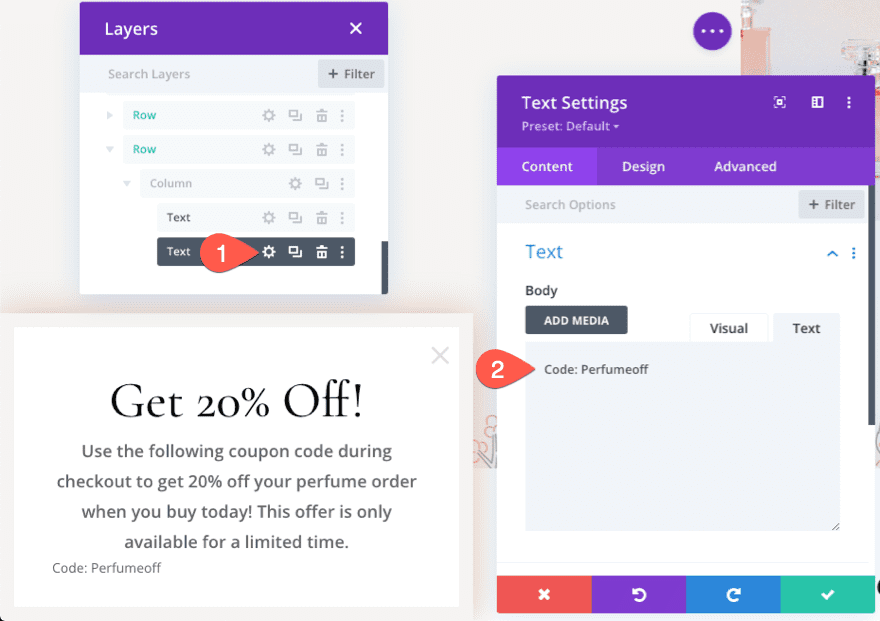
Creating the Promo Code for the Popup
To create the promo code, add a brand new textual content module underneath the earlier one.

Replace the physique space with the textual content “Code: Perfumeoff”
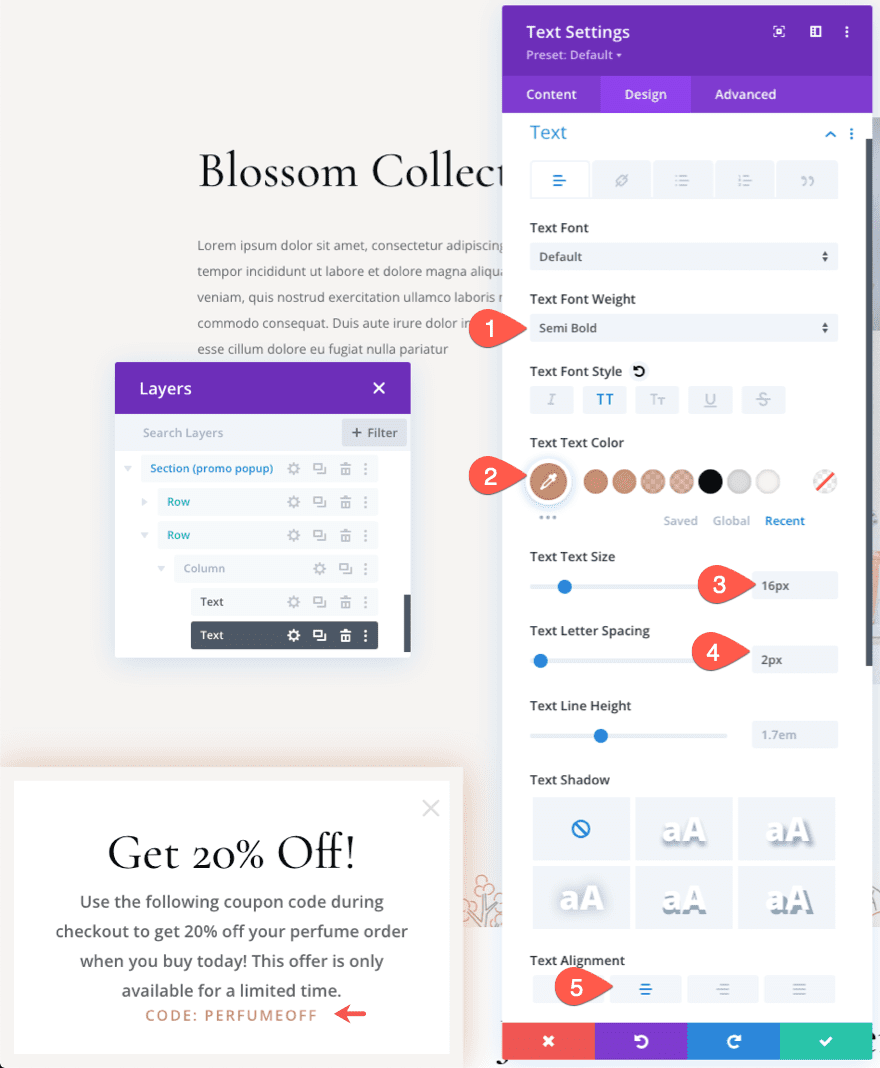
Underneath the design tab, replace the next:
- Textual content Font Weight: Semi Daring
- Textual content Textual content Shade: #cb9274
- Textual content Textual content Dimension: 16px
- Textual content Letter Spacing: 2px
- Textual content Alignment: Middle

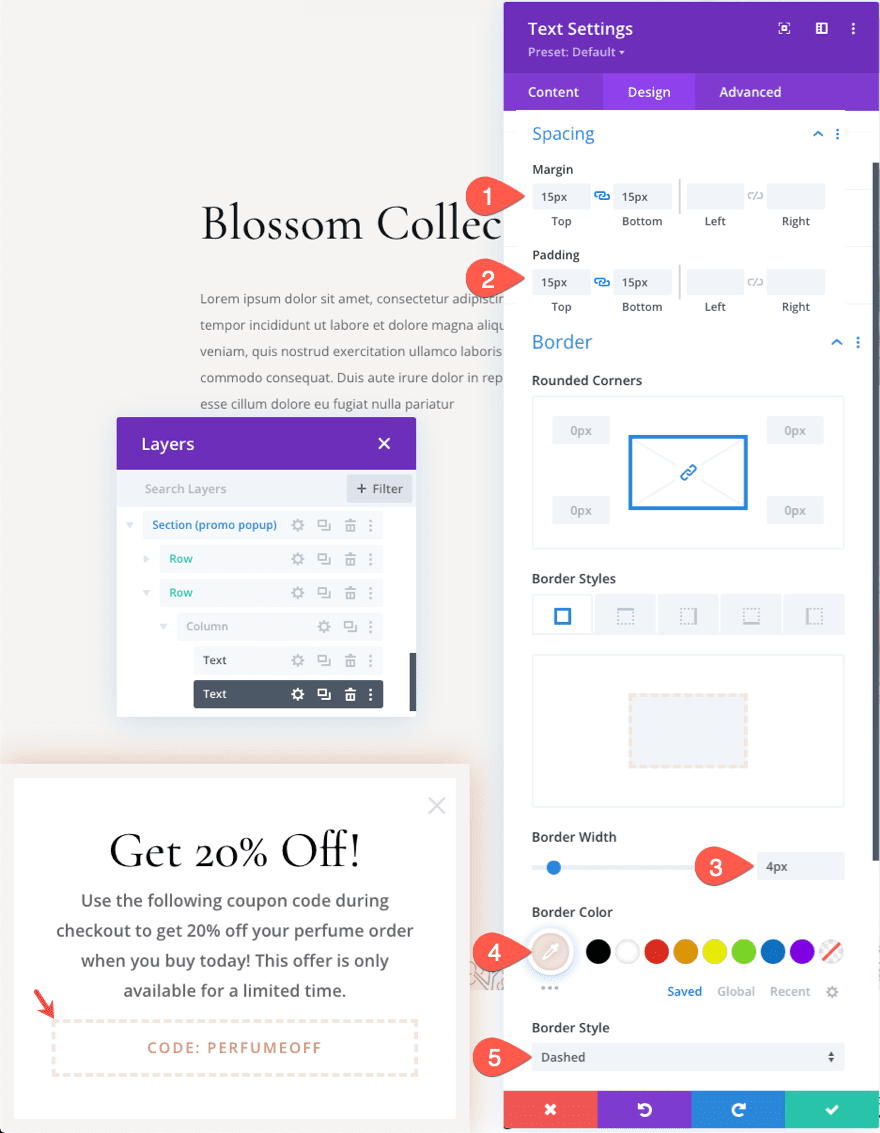
- Margin: 15px prime, 15px backside
- Padding: 15px prime, 15px backside
- Border Width: 4px
- Border Shade: #f4e8dc
- Border Model: Dashed

Creating the Button for the Popup
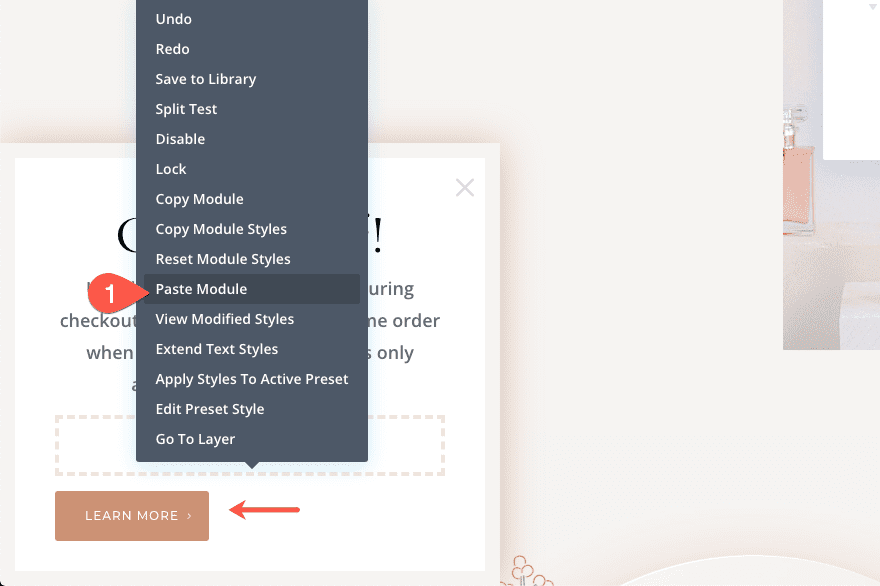
As a way to create the button, copy the button module of one of many present buttons on the premade structure.
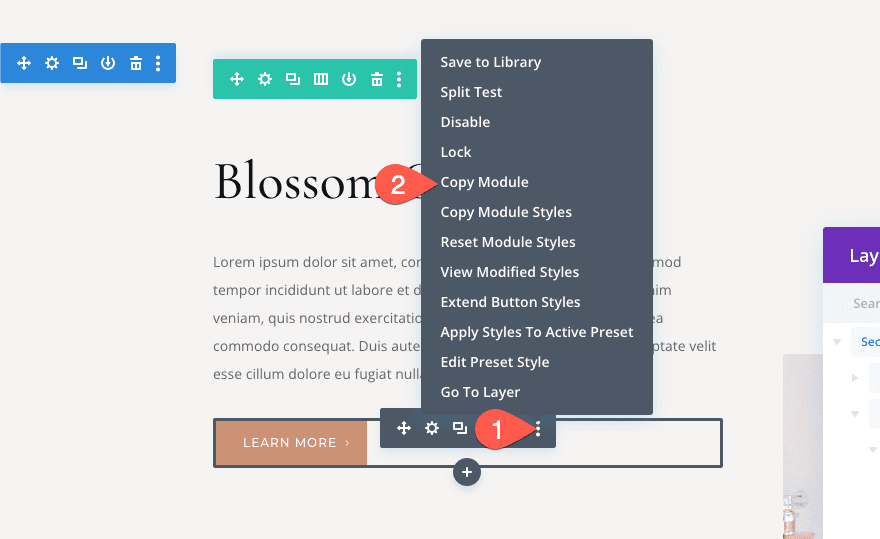

Then previous the button module underneath the promo code textual content module.

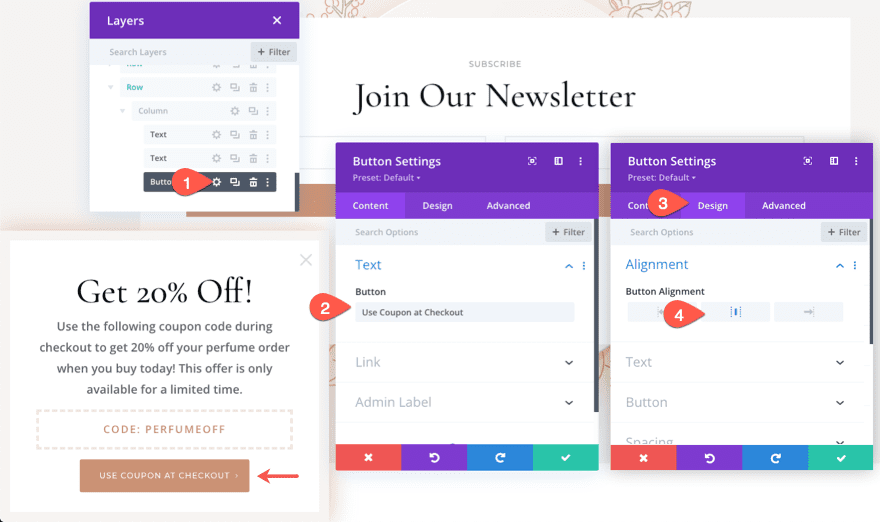
Replace the button textual content and alignment as follows:
- Button Textual content: Use Coupon at Checkout
- Button Alignment: Middle

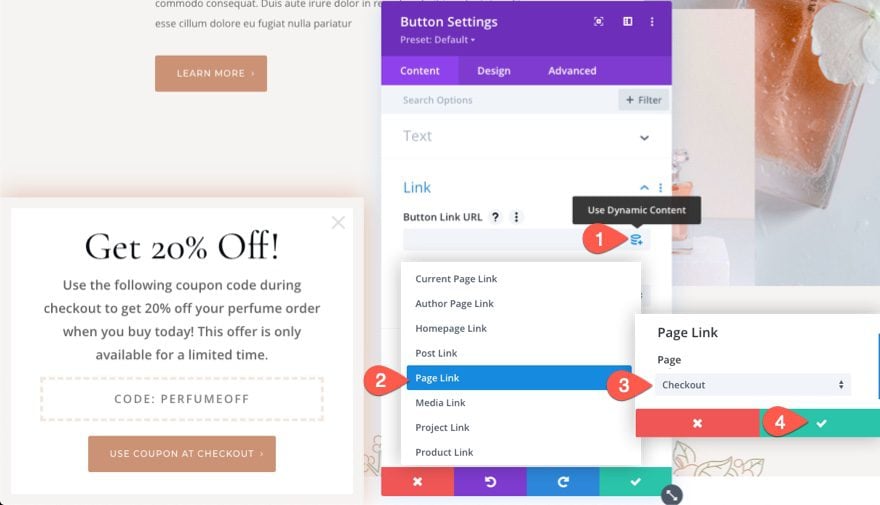
Don’t neglect so as to add a hyperlink to the checkout web page. To do that, you should utilize add a dynamic web page hyperlink because the button hyperlink URL to your present checkout web page.

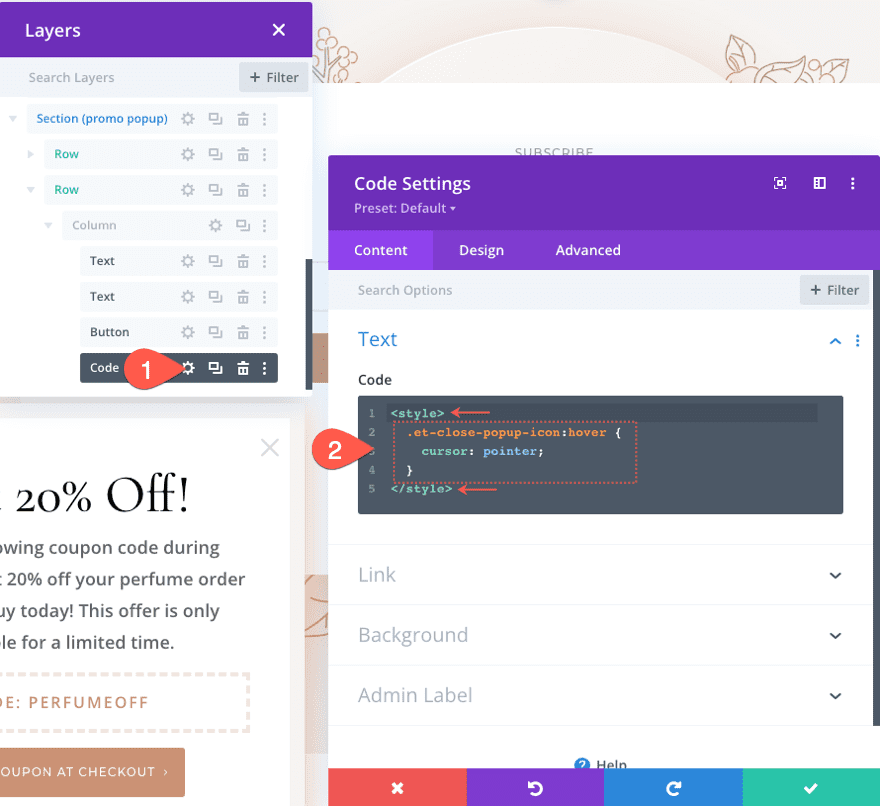
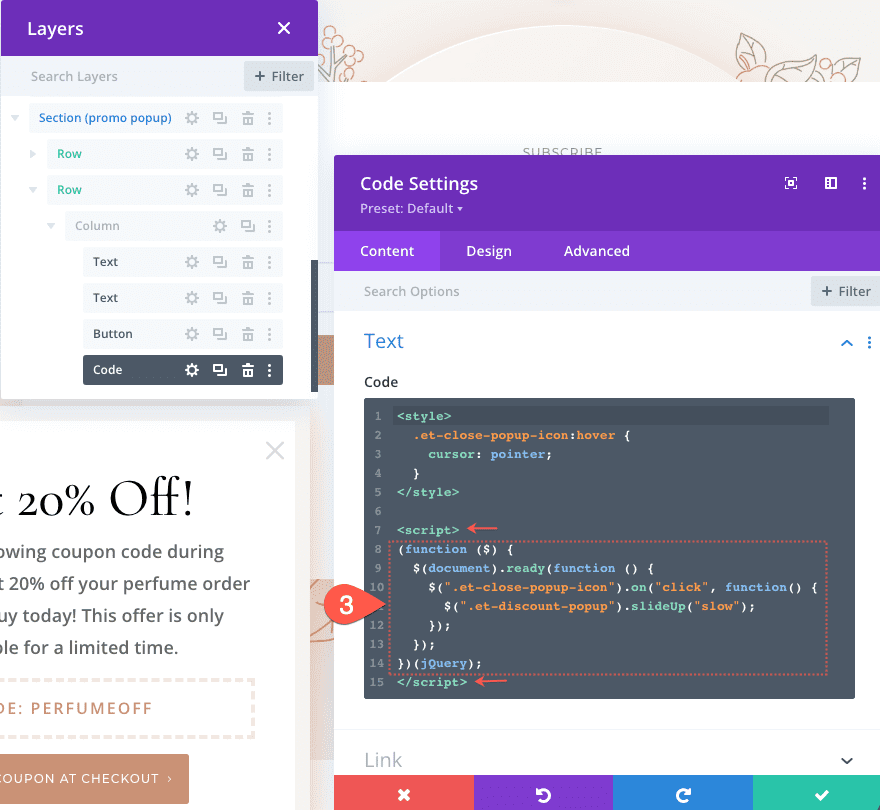
Customized Code to Shut the Popup When Clicking the “X” Icon
For our last step, we have to add a fast snippet of CSS and jQuery to shut the popup when clicking the “X” icon.
So as to add the code, add a brand new code module underneath the button.

Then paste the next CSS ensuring to wrap the code within the needed model tags.
.et-close-popup-icon:hover {
  cursor: pointer;
}

Underneath the final model tag containing the CSS snippet, paste the next jQuery ensuring to wrap the code with the required script tags.
(perform ($) {
  $(doc).prepared(perform () {
    $(".et-close-popup-icon").on("click", perform() {
      $(".et-discount-popup").slideUp("slow");
    })
  });
})(jQuery);

Last Consequence
At present, the promo popup will stay hidden till you may have efficiently met each circumstances set with Divi’s situation choices on the part. This implies you’ll have to add a product to your cart after which go to the checkout web page. After that, return to the touchdown web page we simply constructed and you will notice the promo popup 3 seconds after web page load.
Here’s what the promo popup seems like when visiting the web page after assembly the circumstances.
Right here is the popup on cell.
And right here is an instance of the method a person would undergo earlier than seeing the promo that efficiently retargets them to complete the checkout course of.
Last Ideas
Divi’s conditional choices open the door for tons of alternatives to show content material in strategic methods. The promo popup that we constructed on this tutorial is nice for retargeting deserted carts. However there are such a lot of extra methods to fine-tune the circumstances to suit your personal wants or construct a totally new course of for retargeting deserted carts. I’d love to listen to your concepts!
I sit up for listening to from you within the feedback.
Cheers!
.inline-code{padding: 0px 4px; coloration: crimson; font-family: Monaco,consolas,bitstream vera sans mono,courier new,Courier,monospace!vital} video.with-border {border-radius: 8px;box-shadow: 0 8px 60px 0 rgba(103,151,255,.11), 0 12px 90px 0 rgba(103,151,255,.11);show:block;margin: 0 auto;}
The submit Tips on how to Retarget Deserted Carts with a Promo Popup Utilizing Divi’s Situation Choices appeared first on Elegant Themes Weblog.