

Looking for a WordPress PayPal donation plugin so that you can accept one-time or recurring donations on your site?
In this post, we’ll show you how to create a WordPress donation form that connects to PayPal (or other payment gateways, too, if you so desire).
You’ll be able to accept preset donation amounts or let visitors enter their own custom donation amount. And, as we mentioned above, you’ll be able to do this for either a one-time or recurring donation.
You’ll also be able to collect and manage details on all of your donors from your WordPress dashboard. And your donors will also be able to view and manage their donation history from the front-end of our site, including canceling recurring donations if needed.
Here’s an example of the PayPal WordPress donation form that you’ll be able to create by the end of this post:

Ready to get started? Let’s dig in…
What You’ll Be Building In This Tutorial
Before we get into the meat of this tutorial, let’s quickly go over a more in-depth example of the type of PayPal donation functionality that you’ll be able to set up if you follow this tutorial.
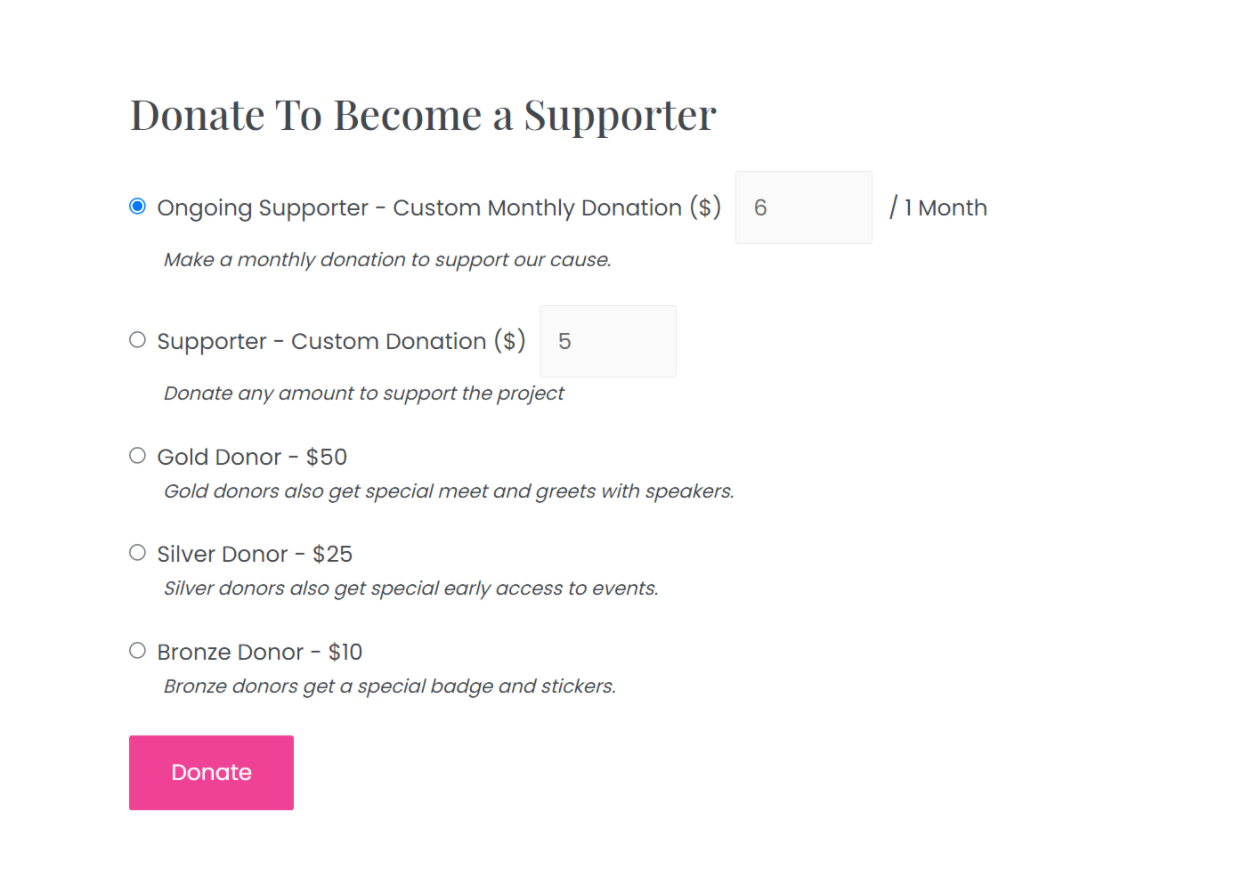
It all starts with the example form that we showed you above. You can offer preset donation amounts, let people enter their preferred donation, or a mix of both.
Visitors will also be able to choose between making their donation one-time or setting up a recurring donation. Here, you can see that we’ve offered some pre-set one-time donations along with the option for people to enter a custom donation amount on either a one-time or recurring basis:
Once they submit the form, they’ll be taken to PayPal to complete their donation. You have the option of using PayPal Standard or PayPal Express:

Donors will then be able to make their payments using the regular PayPal payment interface.
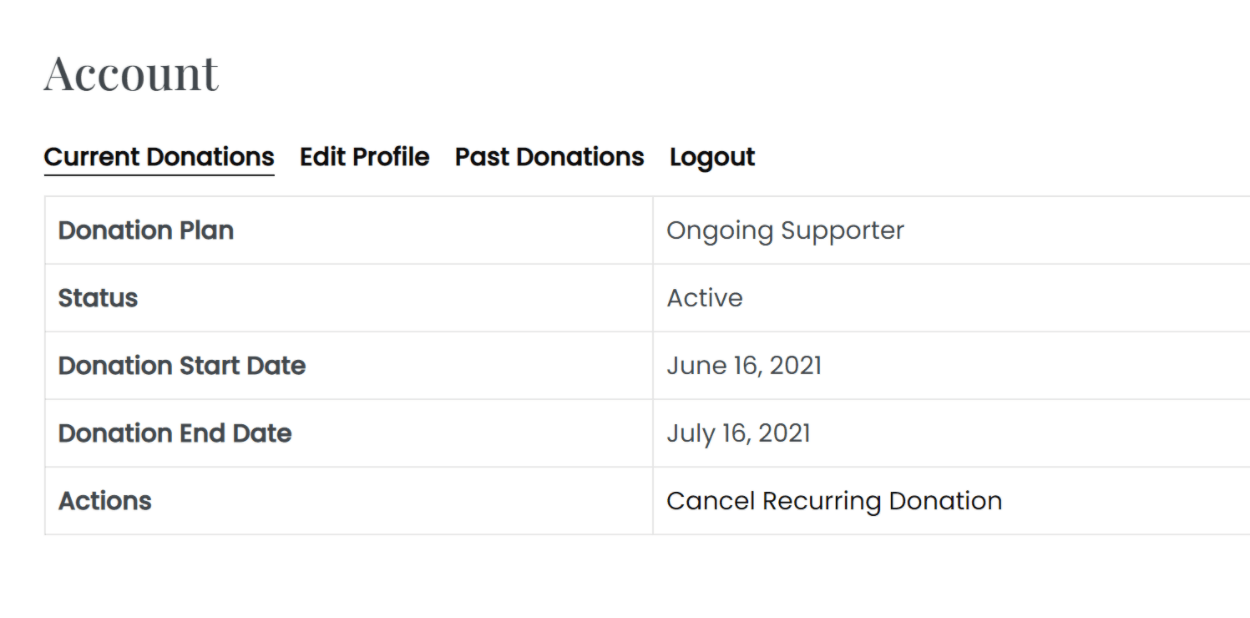
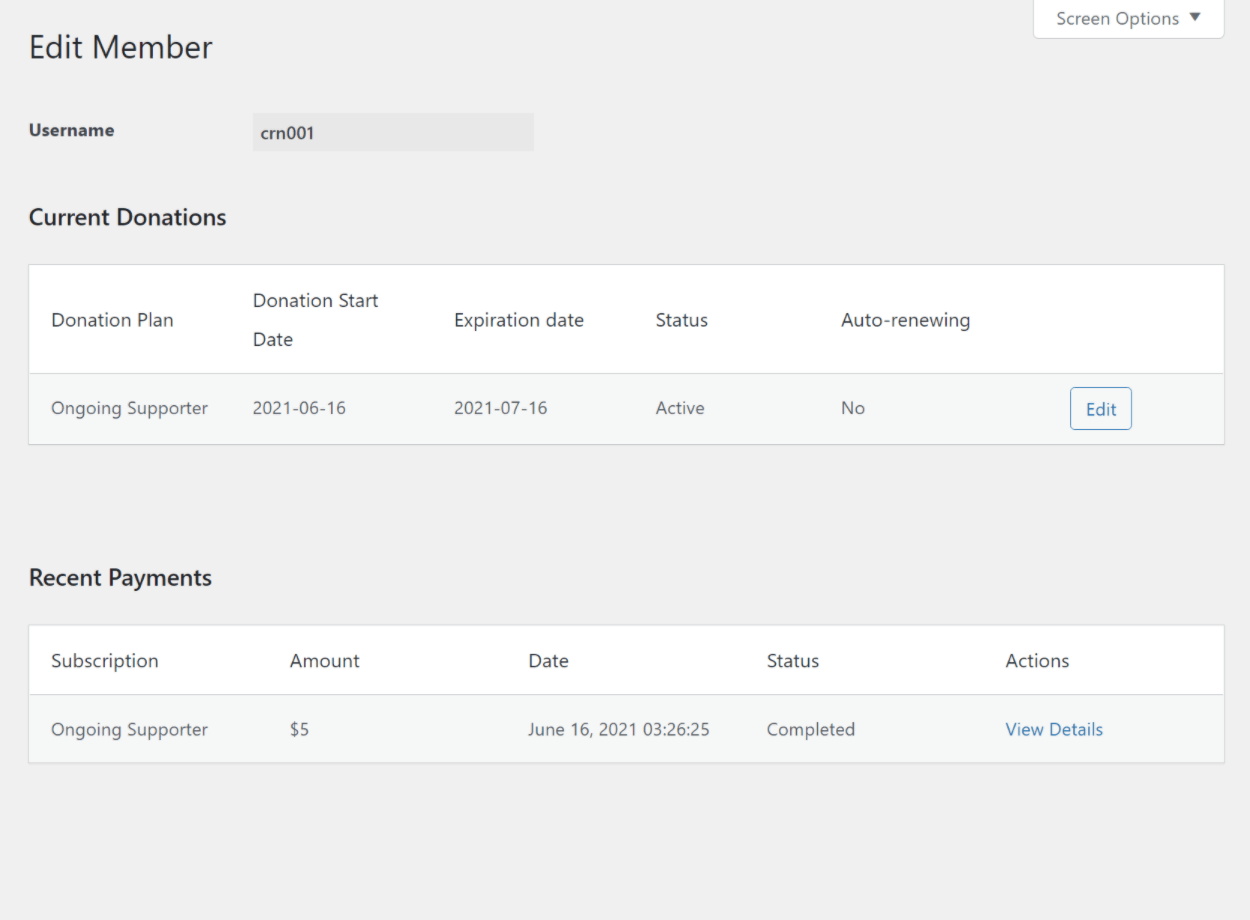
Once they make their donation using PayPal, visitors will be able to view their full donation history from a dashboard on the front-end of your site. For recurring donations, they’ll also be able to stop their donation if needed:

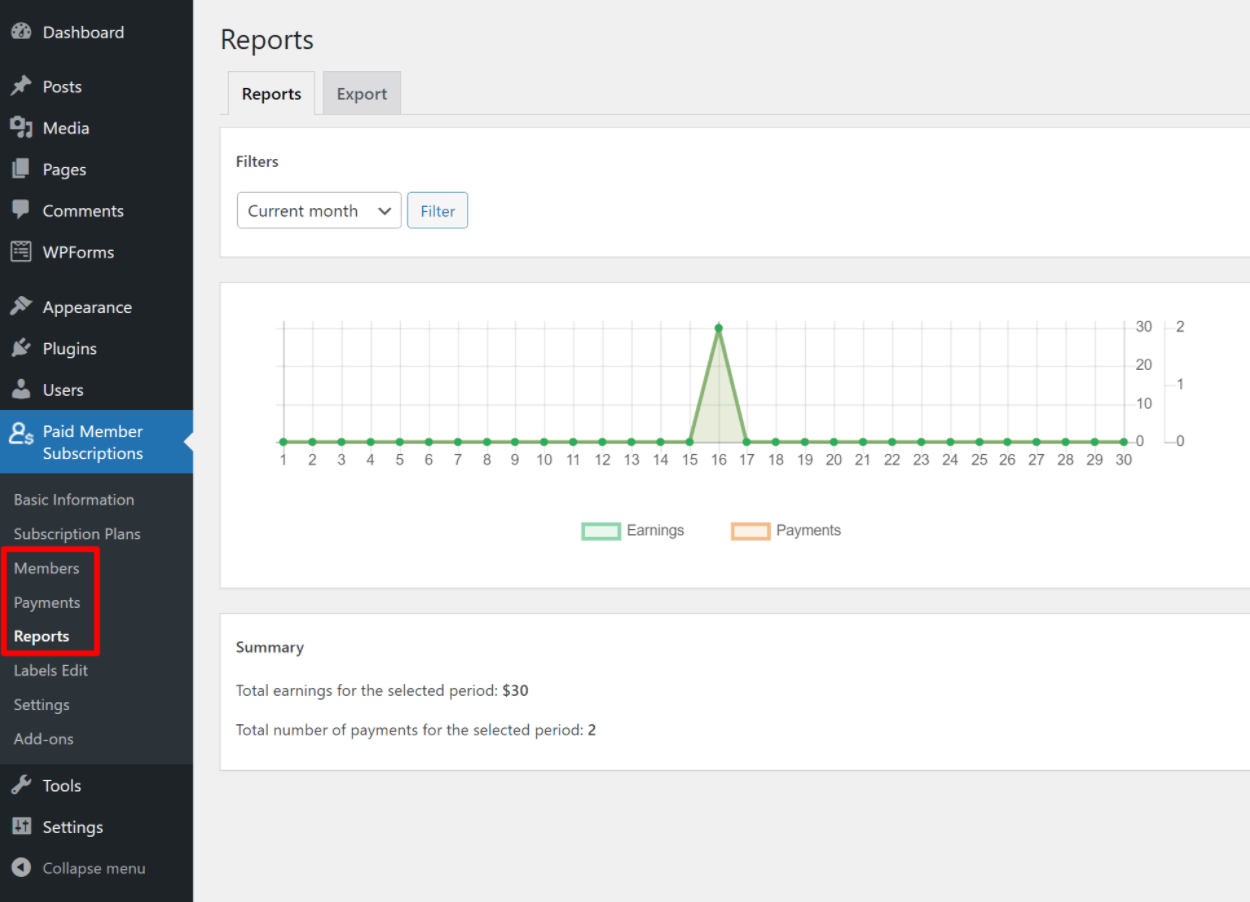
On the backend, you’ll be able to view a list of all your donors and individual donations in the WordPress dashboard. You can also view reports to track how many donations you receive:

You can also manually edit any donor information if needed. For example, you could manually cancel someone’s recurring donation:

You can also restrict access to content on your site based on a donor’s level. For example, you could offer special content bonuses for higher-level donors to encourage higher donation amounts.
And that’s a basic look at how the WordPress PayPal donation plugin works. Now, let’s start moving into the tutorial.
Introducing the WordPress PayPal Donation Plugin That You’ll Use
To start accepting donations via PayPal, you can use the Paid Member Subscriptions plugin.
Paid Member Subscriptions is a flexible WordPress membership plugin that you can use both for for-profit businesses or for non-profit donations.
With just the Paid Member Subscriptions plugin and its various add-ons, you’ll be able to set up all of the functionality that we showed you in the example above and use PayPal to accept payments.
You can set up a simple one-time donation form using just the free version of Paid Member Subscriptions at WordPress.org. You’ll also be able to change all of the labels on the form and in the interface, which helps you optimize the interface for donations (instead of using generic terms like “Submit Order”).
However, you’ll probably want the premium version of Paid Member Subscriptions if you’re accepting donations because the premium version lets you:
- Accept recurring donations;
- Give donors the option to enter their own custom donation amount (on a one-time or recurring basis);
- Provide invoices if you need to give donors proof of their donations;
- Use PayPal Express (the free version only lets you use PayPal Standard).

Paid Member Subscriptions Pro
The best WordPress PayPal donation plugin for creating a fundraising form.
How to Set Up Paid Member Subscriptions as a PayPal Donation WordPress Plugin
Now, let’s get into the tutorial and we’ll show you how to set up your PayPal donation form.
In this first part, we’ll show you how to create a form that lets you accept one-time PayPal donations. Then, in the next section, we’ll show you how you can accept recurring donations.
For one-time donations, you can use just the free version of Paid Member Subscriptions at WordPress.org. However, we recommend purchasing at least the Hobbyist license so that you can access the Pay What You Want add-on, which lets people enter their own custom donation amount in addition to any preset amounts that you want to offer.
In the tutorial, we’ll be sure to note which parts require the paid add-ons.
1. Set Up Basic Settings in Paid Member Subscriptions
To get started, install and activate the Paid Member Subscriptions plugin.
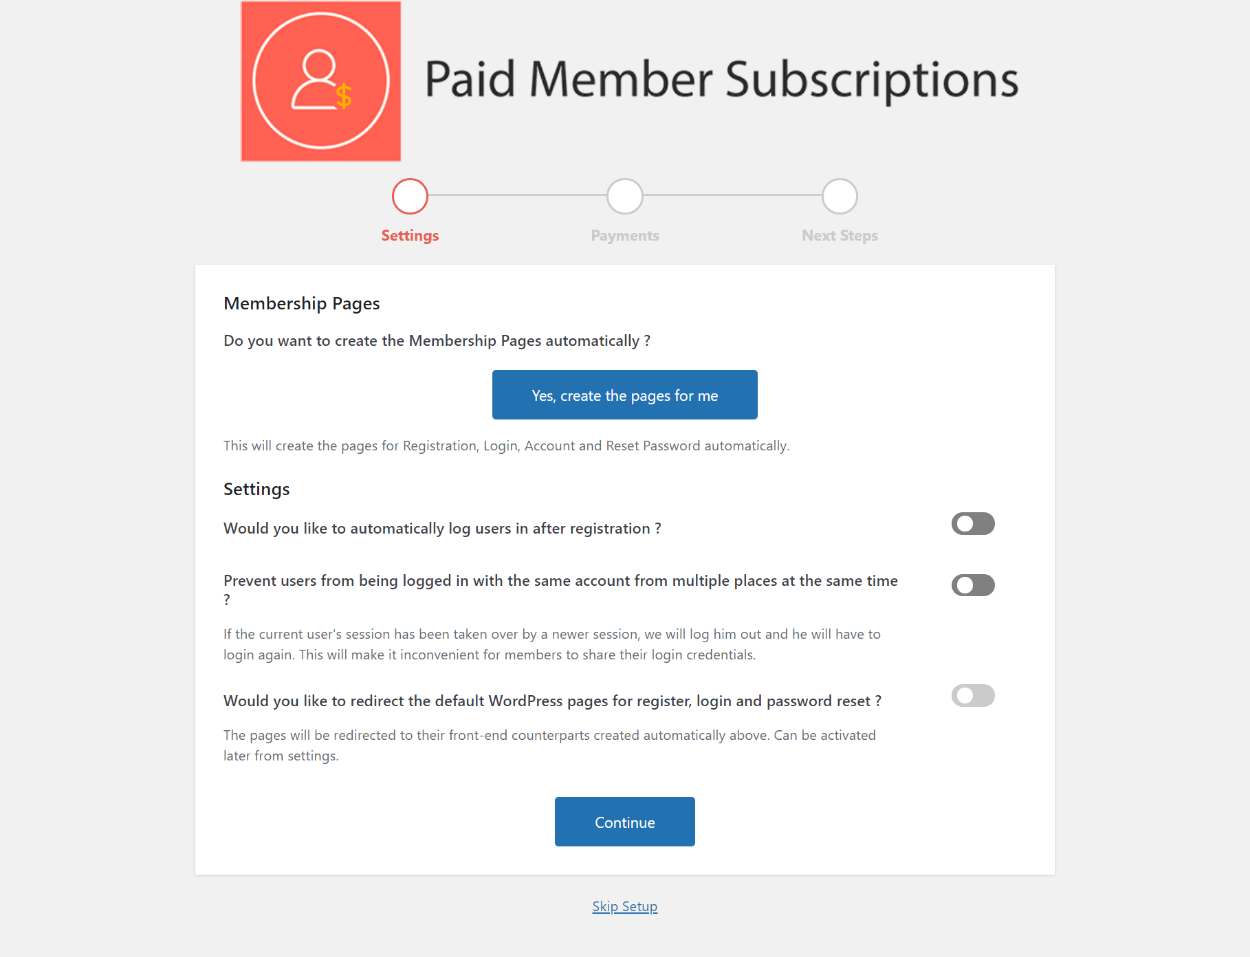
Once you activate the plugin, it should automatically launch a setup wizard that will help you configure some important basic settings for your donations.
To begin, make sure to click the button to create pages, which are the pages that people will use to make donations and manage their donation histories:

On the next screen, you can set up PayPal Standard. With the Pro license of Paid Member Subscriptions, you can also use PayPal Express, which we’ll cover in the next section:


That’s all for the basic setup wizard. However, there’s one more step to configure PayPal.
You’ll need to also generate a PayPal IPN URL and add it to the Paid Member Subscriptions plugin settings. The PayPal IPN URL is what allows your WordPress site to verify payment success with PayPal.
To learn how to set up your PayPal IPN URL, you can follow the tutorial in this help documentation.
2. Set Up Your Donation Levels
Next, you’ll want to set up your donation levels. For example, you might set it up like this:
- Bronze tier – $10 donation
- Silver tier – $25 donation
- Gold tier – $50 donation
Paid Member Subscriptions calls these donation levels “Subscription Plans”.
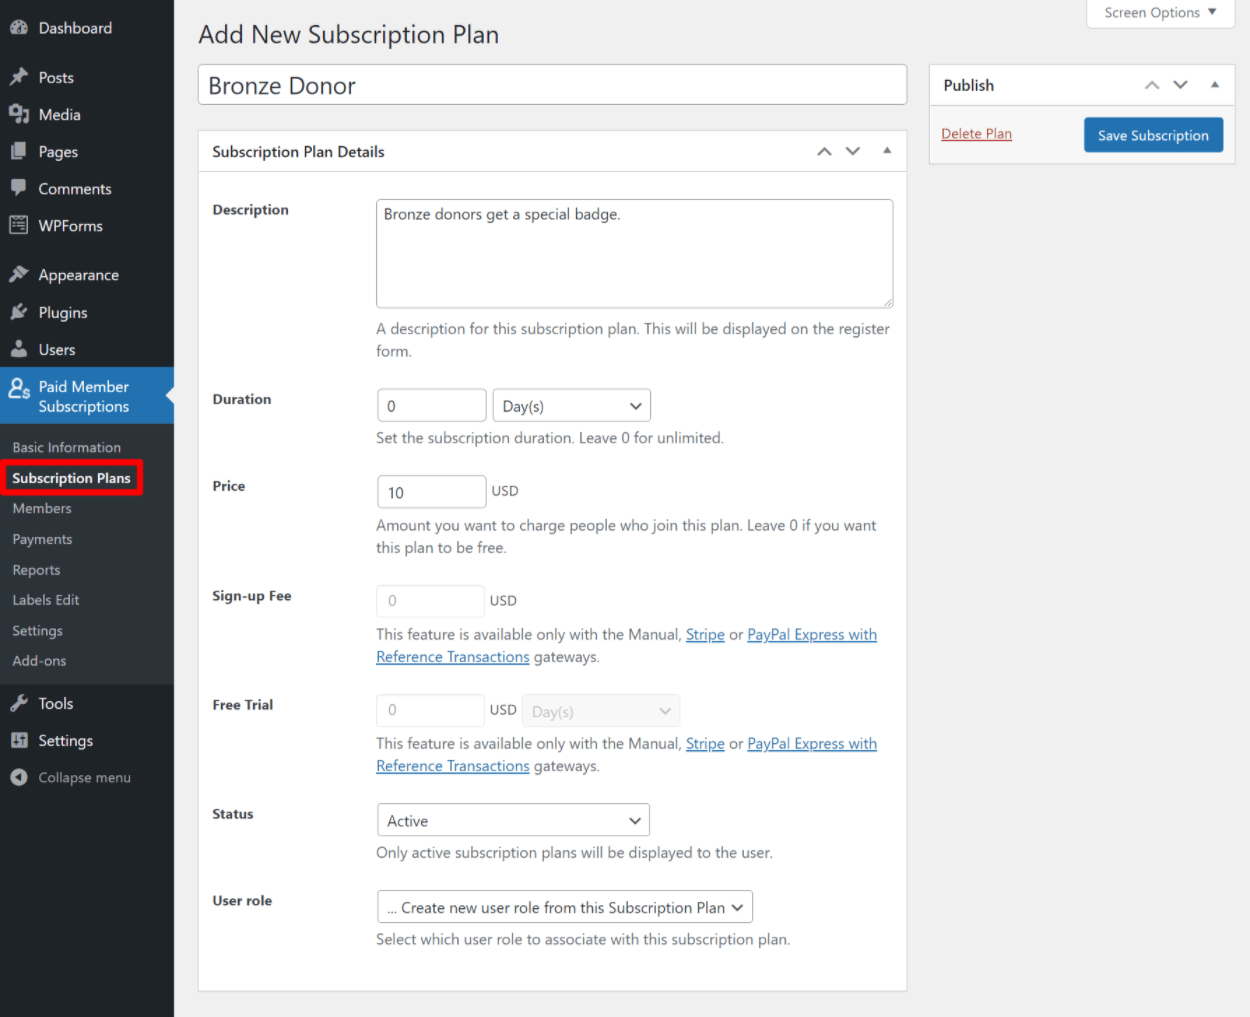
To create one, go to Paid Member Subscriptions → Subscription Plans → Add New. Then, enter the following information:
- Title – the name of the donation level. This will display on the donation form.
- Description – optional – you can use this to describe the donation level or perks. If you add text here, it will also display on the donation form.
- Duration – leave as “0” for unlimited.
- Price – the price of the one-time donation.
- Status – Active
- User role – leave as “Create new user role from this Subscription Plan”. This will be helpful if you want to give certain types of donors access to special content.
Then, click Save Subscription:

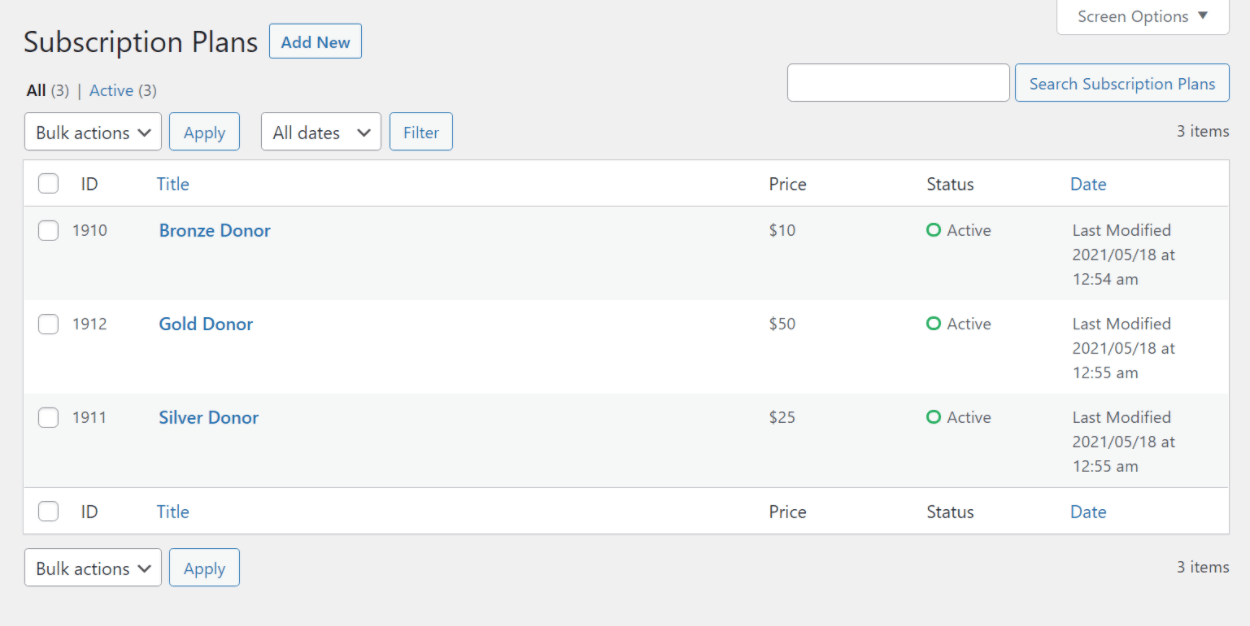
You can then repeat the process to add as many donation levels as needed. All of these donation levels will appear as options on the donation form.
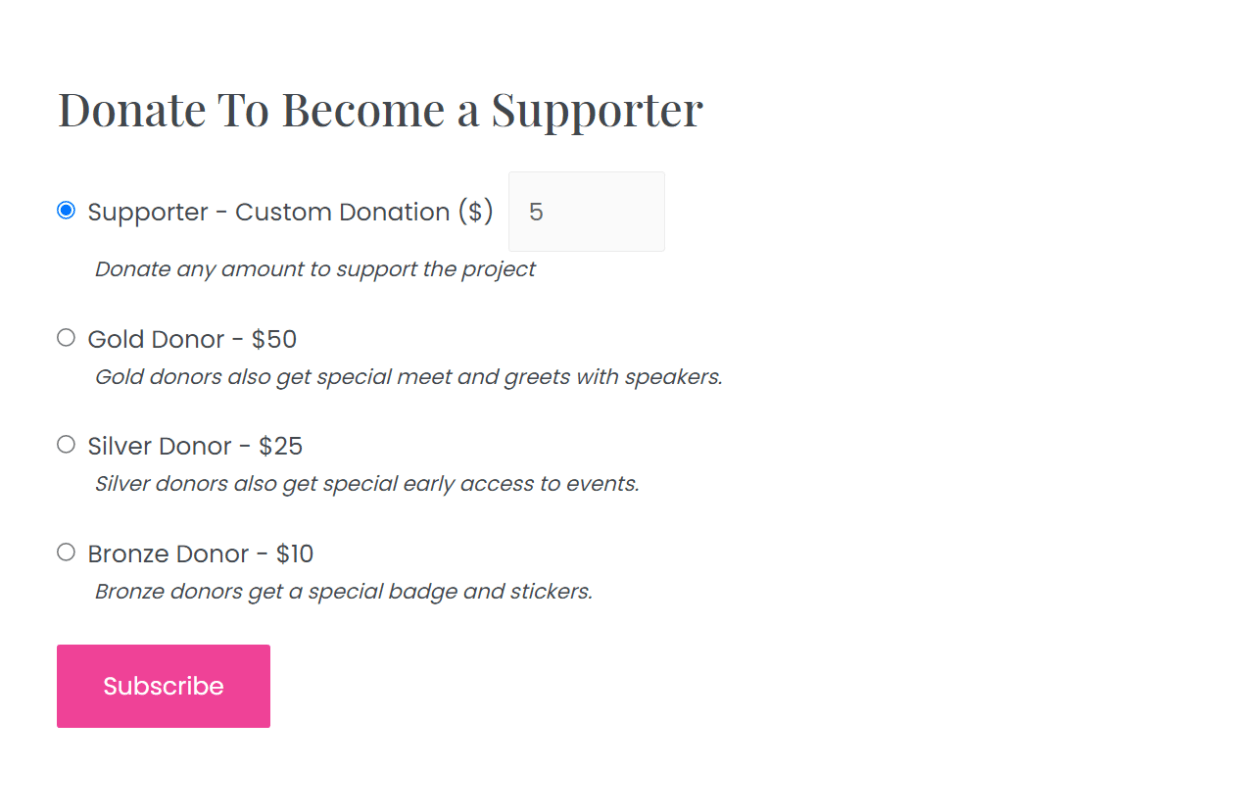
When you’re finished, it might look something like below. You can see that we have three different donation tiers:

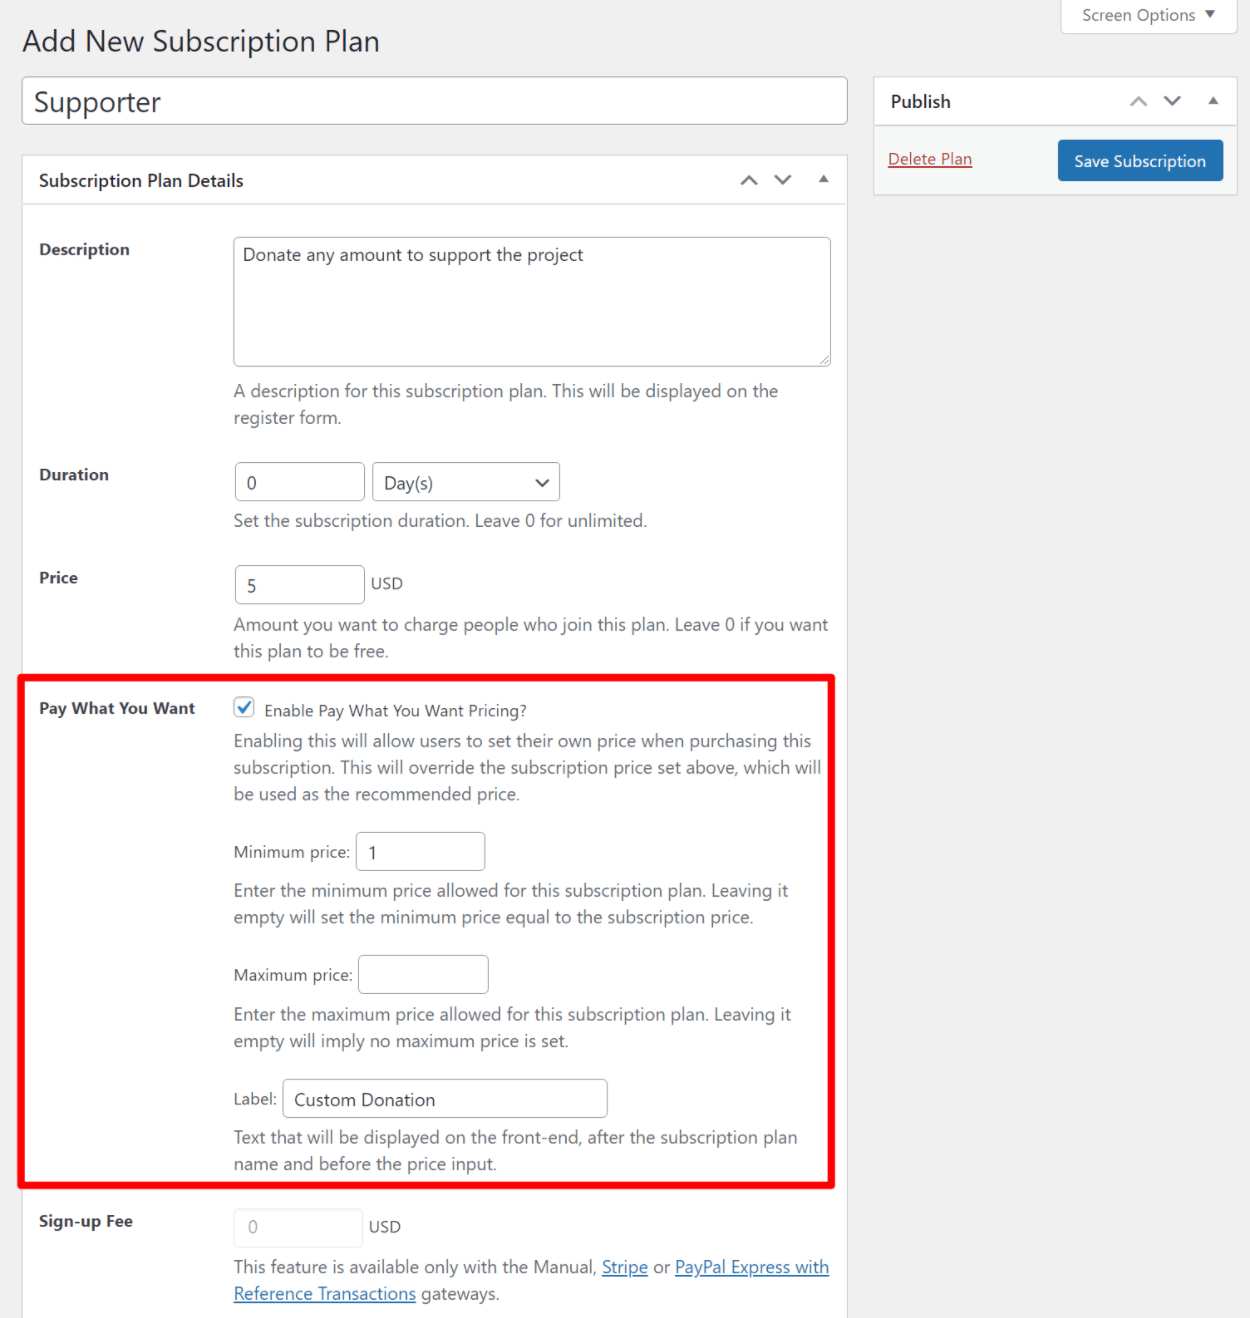
If you want to add an option to let donors choose their own donation amount, you’ll need to install the Pay What You Want add-on, which you can access by purchasing the Hobbyist license of Paid Member Subscriptions.
Once you activate the add-on, you can enable Pay What You Want when you create a subscription plan. The Price that you set will become the “Suggested Donation” but donors will be able to choose their own amount within the optional minimum and maximum prices that you enter:

3. Customize the Donation Form Labels
At this point, you have a working donation form. However, the labels on the form aren’t quite optimized for donations.
For example, you can see that the button says “Subscribe”, which is a little confusing for a donation form:

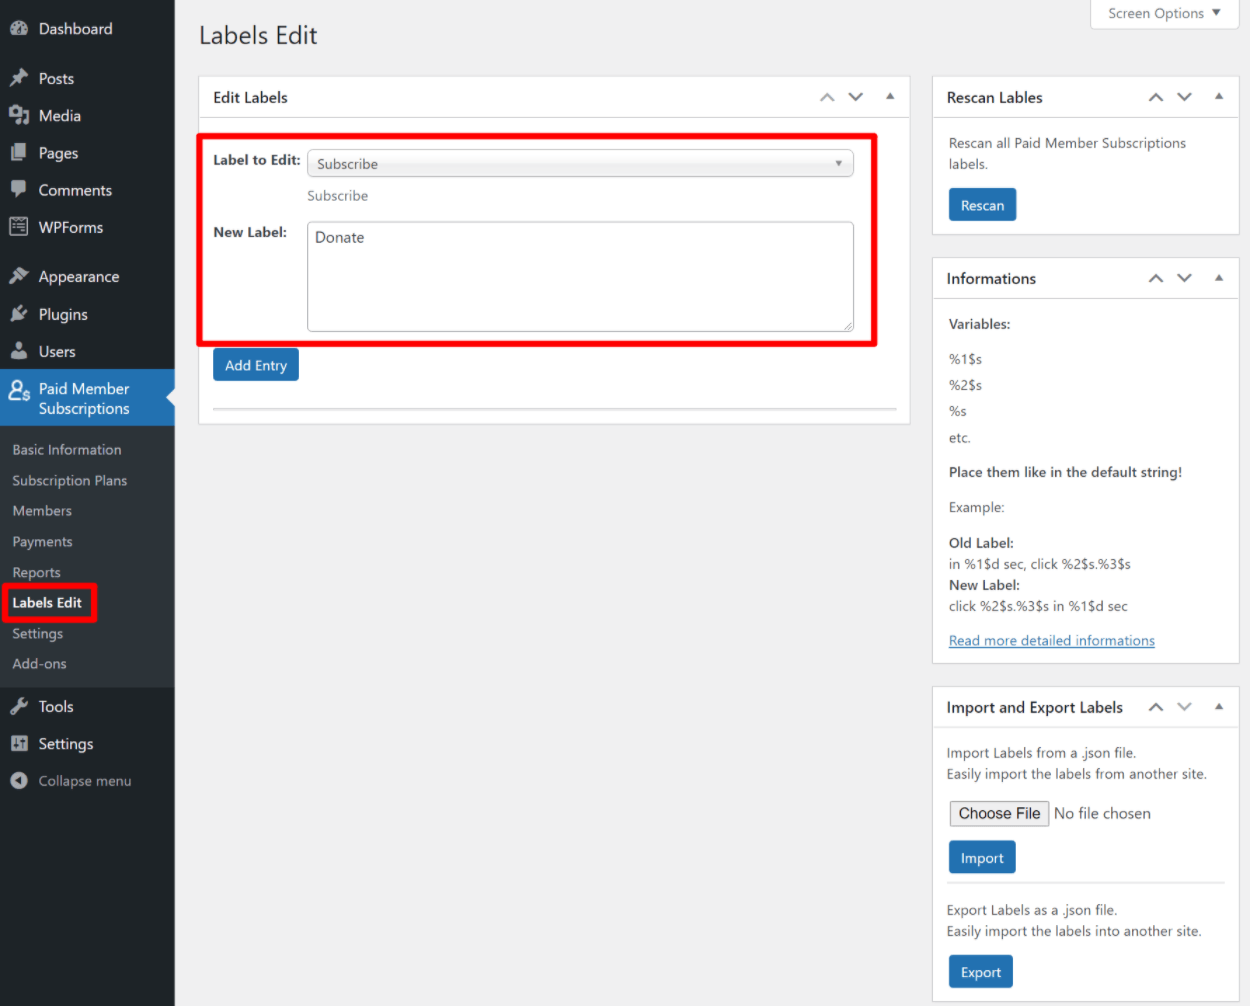
To fix this, you can use the Paid Member Subscriptions Labels Edit add-on, which you can download for free from this page.
Once you install and activate the add-on, go to Paid Member Subscriptions → Labels Edit to start customizing.
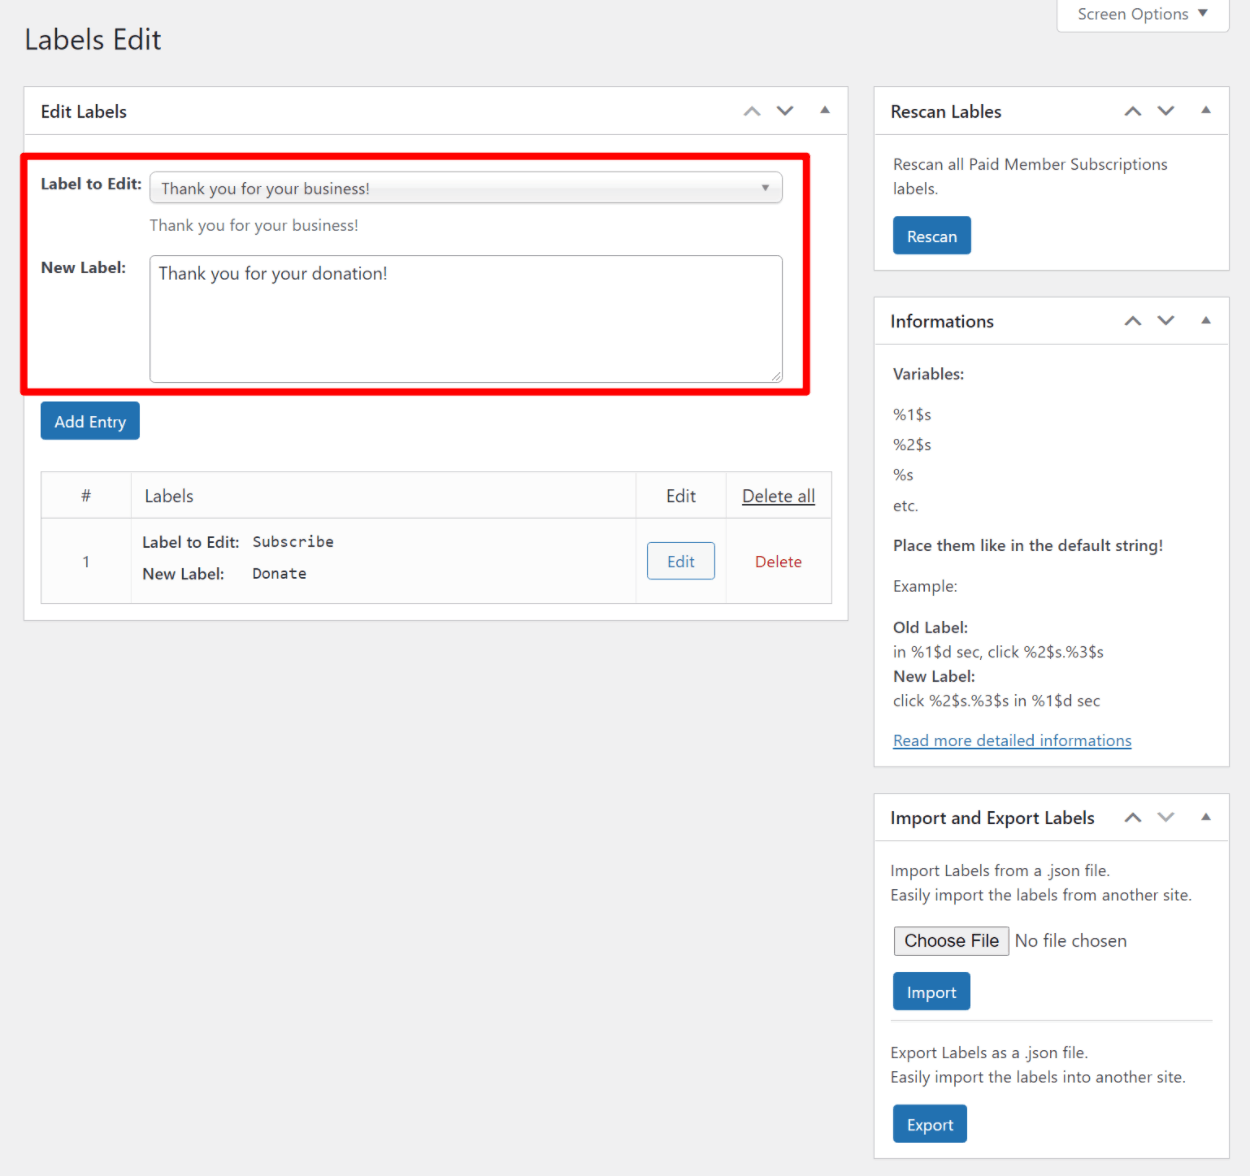
Use the drop-down to search for and select “Subscribe”. Then, enter the new label that you want to use. For example, “Donate”.
Once you’ve done that, click Add Entry to save your changes:

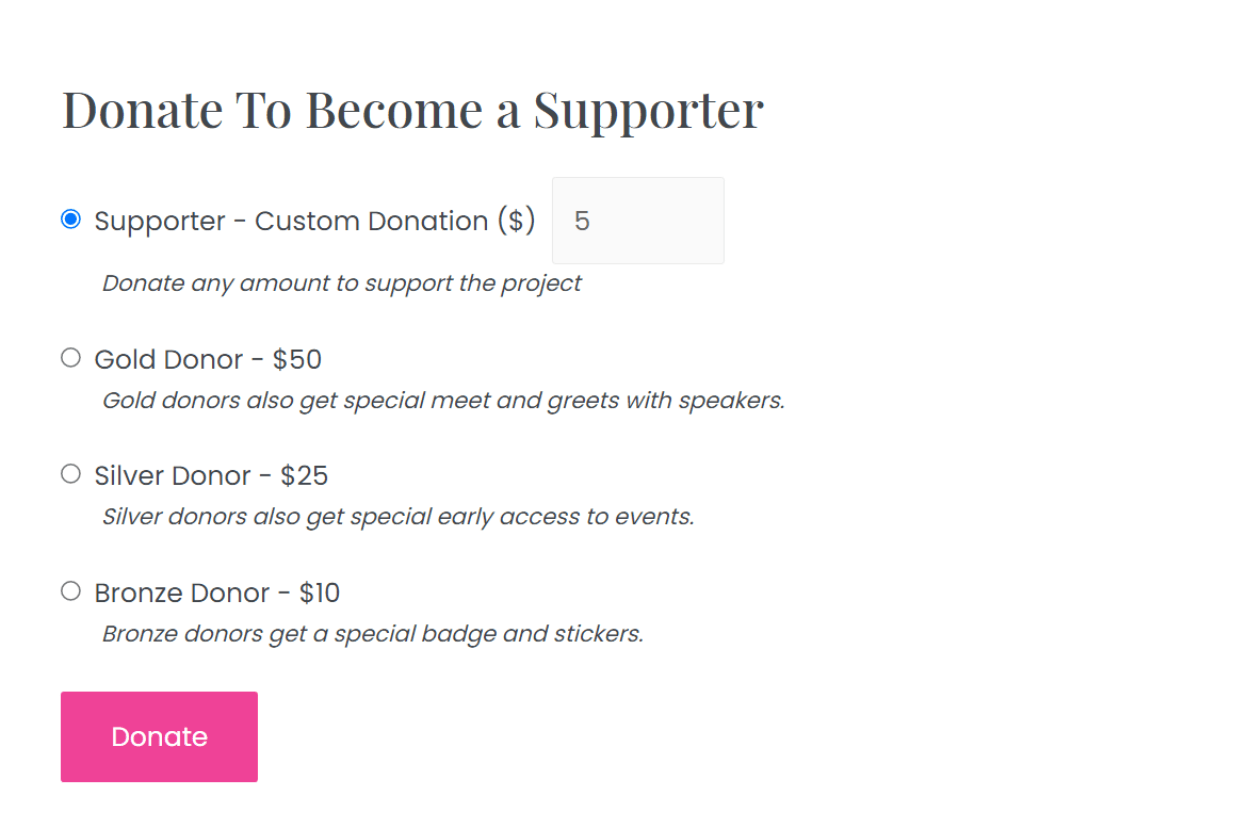
Now, your donation form will use the much more user-friendly “Donate” terminology:

You might want to also use the labels edit feature to adjust other text. For example, you can customize the front-end dashboard that donors use to manage their donations. Or, you might want to adjust the confirmation message that appears after users make a donation.
If you search for “Thank you…”, you’ll be able to edit all of the confirmation messages. For example, you can change “Thank you for your business!” to “Thank you for your donation!”:

You can always come back to this area in the future if you want to change anything about your donation system.
How to Set Up Recurring PayPal Donations
Now that you know how one-time donations work, let’s build on the tutorial above and get into how you can accept recurring donations using either PayPal Standard or PayPal Express.
To set this up, you’ll need to purchase the Pro license of Paid Member Subscriptions, as this license is what gives you access to recurring payments.
You’ll then need to install the add-on for your preferred version of PayPal:
- Recurring Payments for PayPal Standard – lets you accept recurring donations via PayPal Standard. For most setups, this option is fine as donation forms are unlikely to need the features in PayPal Express.
- PayPal Pro and PayPal Express – lets you use PayPal Express for recurring payments. One of the advantages of PayPal Express is that you can offer free trials or one-time signup fees. However, for donations, these advantages probably aren’t that applicable so you should be fine with PayPal Standard.
For this tutorial, we’ll focus on using PayPal Standard, but the basic process will be the same for PayPal Express.
1. Configure PayPal Payment Option for Recurring Payments
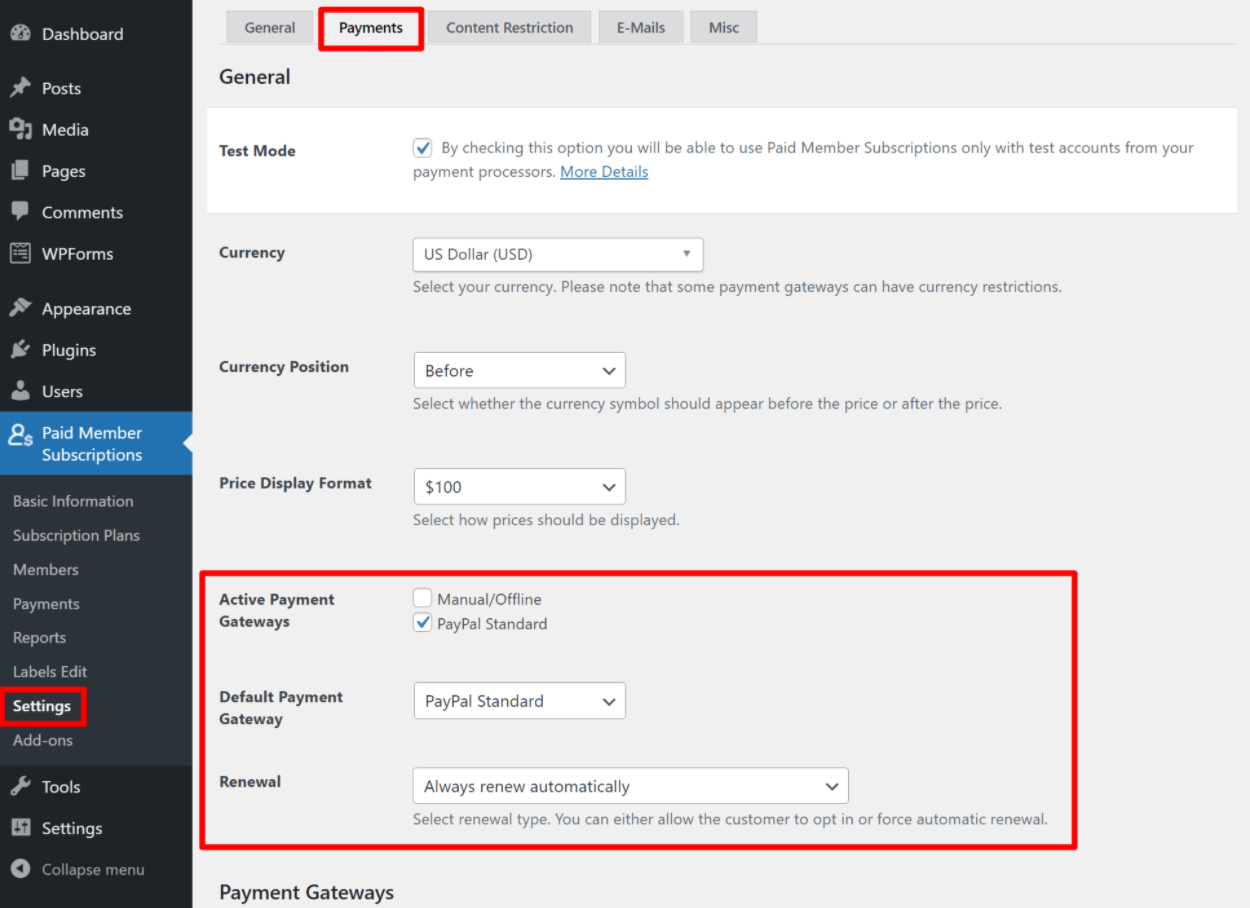
To get started, you’ll need to configure your site’s PayPal gateway for recurring payments. To do this, go to Paid Member Subscriptions → Settings → Payments.
At the top, you can configure your active and default payment gateway (PayPal Standard in this case). You can also choose renewal behavior for donations. You have three options:
- Donors need to manually opt-in for the automatic donation.
- Donations always automatically renew until canceled.
- Donors need to manually make their donations each month.
You’ll probably want to choose one of the first two options:

Further down the page, you’ll need to enter your PayPal API information to process the recurring payments. For help on how to do this, you can follow this help document for live payments or this help document if you want to set up the test gateway (or both).
2. Create a Recurring Donation Plan
Now, you need to create a subscription plan for your recurring donation, just like you did for one-time donations above.
To begin, go to Paid Member Subscriptions → Subscription Plans → Add New.
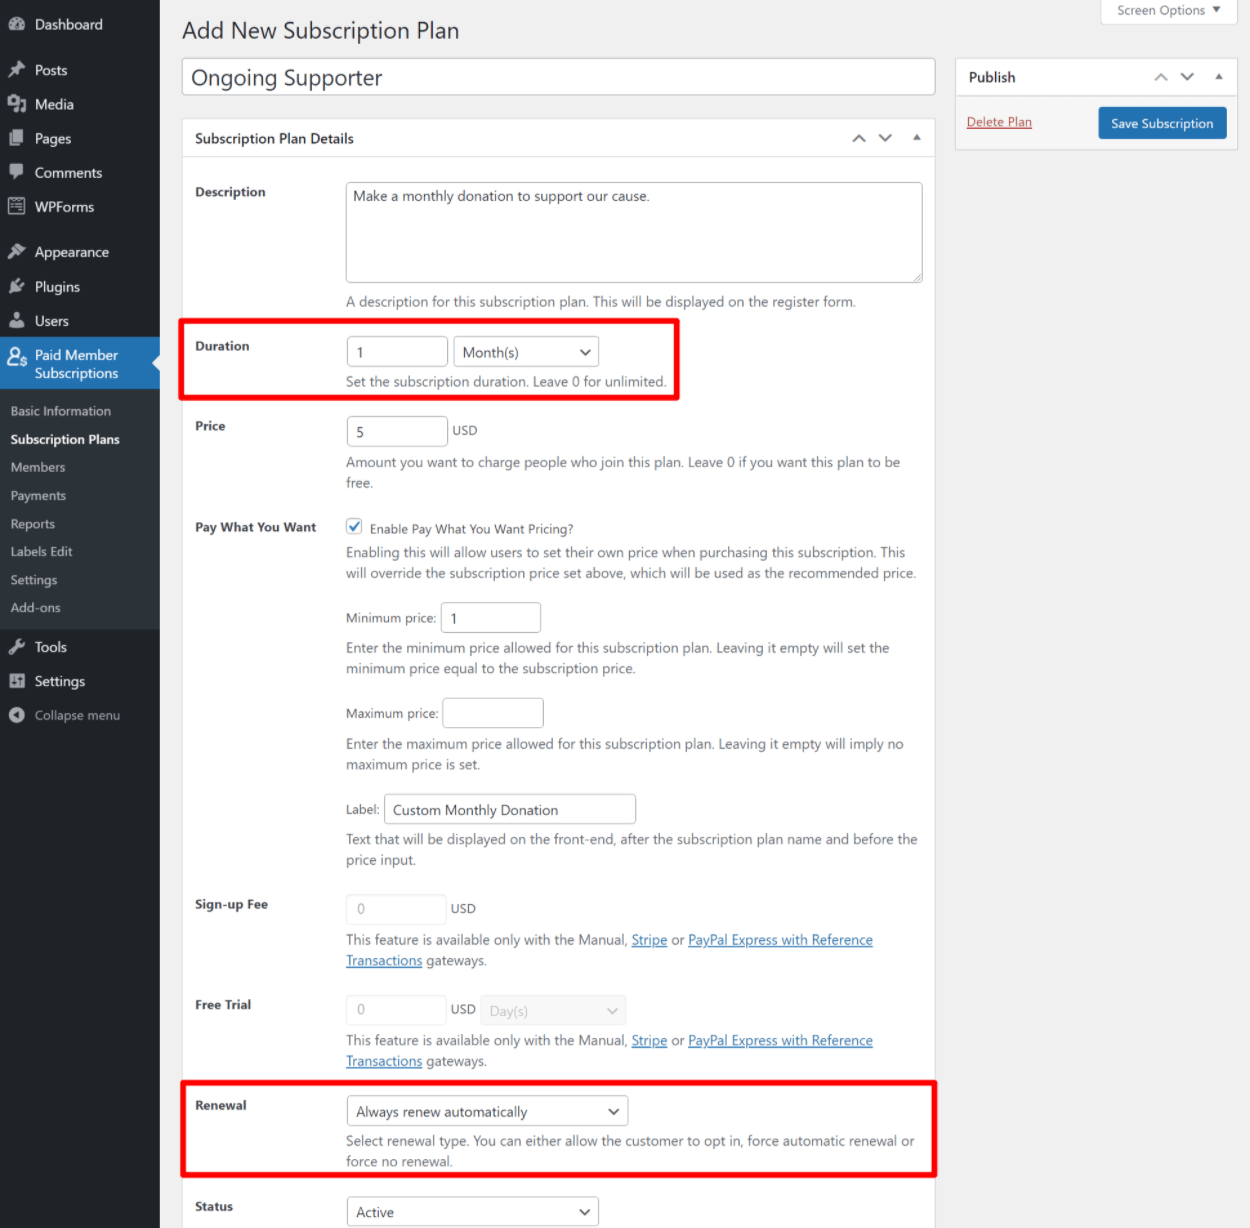
You can fill out the same information as before. But this time, you’ll want to set the Duration equal to your desired length. For example, “one month” if you want to set up a monthly donation.
For the price, enter the price that you want people to donate every month. With the Pay What You Want add-on, you can also let people enter their own custom recurring donation, just like you did with one-time donations.
With the Renewal drop-down, you can also manually override the automatic renewal behavior for this specific donation level.
Below, you can see that we’ve configured a customizable donation with a suggested donation amount of $5 per month (but donors can enter their own monthly amount):

And now, you can see that there’s a new recurring donation option mixed in with the one-time donation tiers on the form:
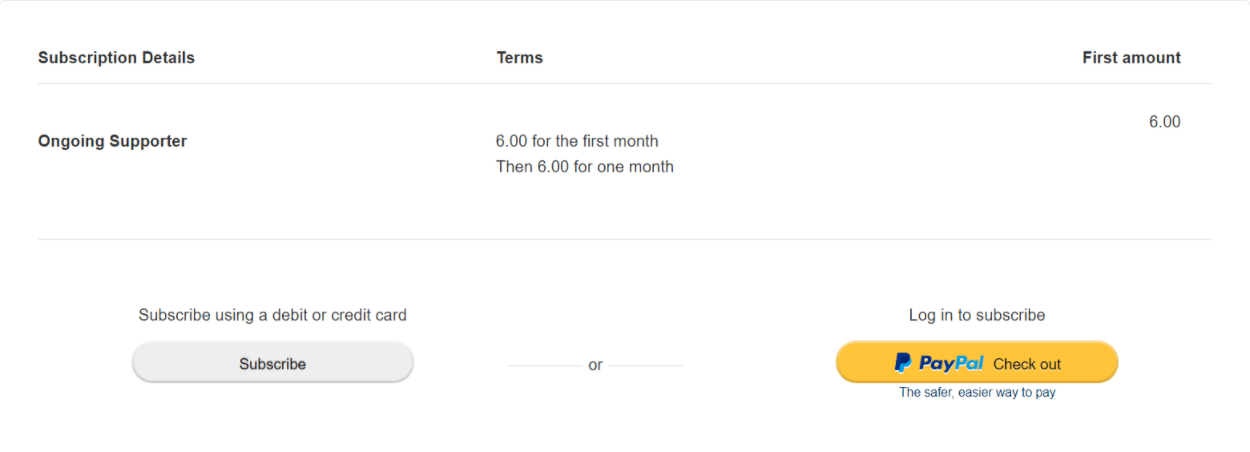
If a user chooses that option, they’ll see a summary of their recurring donation when they go to PayPal to check out:
Start Accepting PayPal Donations on WordPress Today
If you’re looking for a flexible WordPress PayPal donation plugin, Paid Member Subscriptions gives you everything that you need to accept one-time or recurring donations.
While Paid Member Subscriptions is a full WordPress membership plugin, you can easily use the Label Edits add-on to customize the entire interface to match your donation use case.
Your donors can choose from preset donation amounts or enter their own custom values. They’ll also be able to manage their donation history and recurring donations from the front-end of your site.
If you just need to accept simple one-time donations via a form, you might be fine with the free version of Paid Member Subscription at WordPress.org.
However, to unlock the full flexibility of Paid Member Subscriptions for donations, you’ll probably want to upgrade to one of the premium plans so that you can access useful features like:
- Recurring donations, via either PayPal Standard or PayPal Express (or even Stripe if you want a non-PayPal option);
- Custom donation amounts for one-time or recurring donations (pay what you want);
- Donation invoices via the Invoices add-on.
Paid Member Subscriptions Pro
The best WordPress PayPal donation plugin for creating a fundraising form.
Do you still have any questions about using Paid Member Subscriptions as a WordPress fundraising plugin? Let us know in the comments section!
The post WordPress PayPal Donation Plugin: How to Create a Donation Form appeared first on Cozmoslabs.