

If your online business manages subscriptions on a WordPress-powered web site, a WordPress Stripe cost plugin is perhaps precisely what you want.
There are many cost gateways on the market for WordPress customers, however they don’t seem to be all equal. All of them goal totally different wants and other ways of constructing funds in WordPress. What’s nice when utilizing Stripe, in comparison with different obtainable choices, is that it’s going to assist you to deal with transactions instantly in your website, with no redirects, making funds an absolute breeze in your web site’s customers.
On this publish, we’ll present you tips on how to unlock this performance in your personal membership web site and add a Stripe cost gateway to your website, utilizing an easy-to-use WordPress plugin. So let’s dive in!
What You’ll Have to Set Up Your WordPress Stripe Cost Plugin
So, earlier than you get to establishing the Stripe cost gateway, there are a couple of extra steps you’ll must undergo. Particularly, a few plugins.
Paid Member Subscriptions
Paid Member Subscriptions is a strong WordPress membership plugin that lets you simply arrange a membership website and handle subscription plans. It seamlessly integrates with any WordPress web site, giving it membership functionalities.
The plugin affords a free model at WordPress.org, and two paid variations for prolonged performance. The Professional plan gives entry to eight Professional Add-ons, which embody the Stripe cost gateway Add-on that you simply’ll be needing to allow Stripe cost in your membership website.
The Stripe Professional Add-on
The Stripe Add-on from Paid Member Subscriptions is offered within the Professional model of the plugin and it makes for higher consumer expertise and improved conversion charges. Your customers will be capable to simply make credit score and debit card funds, each one-time and recurring, instantly in your website with out being redirected wherever else. Stripe meets the very best requirements of safety within the funds business, and is licensed as a PCI Service Supplier Stage 1. With the plugin, it’s also possible to add a Signal-up Payment and permit a Free Trial interval to your subscription plans.
Whereas there are a lot of cost gateways available on the market, the Stripe cost gateway is a wonderful selection as a result of it meets Sturdy Buyer Authentication necessities and helps new authentication strategies like 3D Safe 2, which gives frictionless authentication. With its ease of use and availability in 46 nations around the globe, the extension is a helpful addition to any membership web site.
The right way to Set Up the WordPress Stripe Cost Plugin
After your buy is full, now you can begin establishing your WordPress Stripe Cost Plugin. So, allow us to stroll you thru the method of doing this with the assistance of the Paid Member Subscriptions plugin.
Step 1: Set up the Paid Member Subscriptions Plugin
Step one of the method is to arrange Paid Member Subscriptions, which could be accomplished in three easy steps: Obtain, Set up, and Activate.
Begin off by going to your personal Account web page and obtain each the principle plugin and the Professional extension as .zip information.
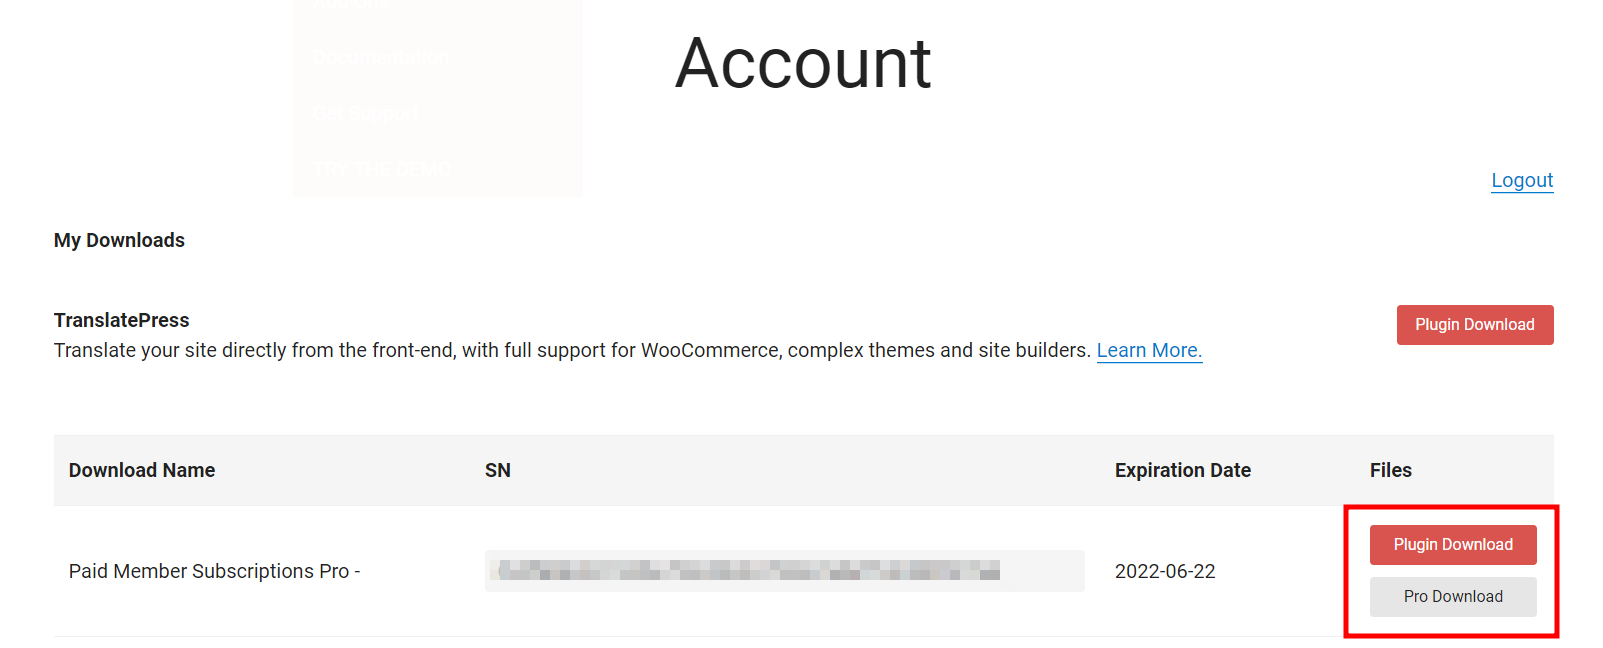

Now, inside your WordPress admin interface, go to Plugins → Add New and click on on the higher proper button labeled Add Plugin.
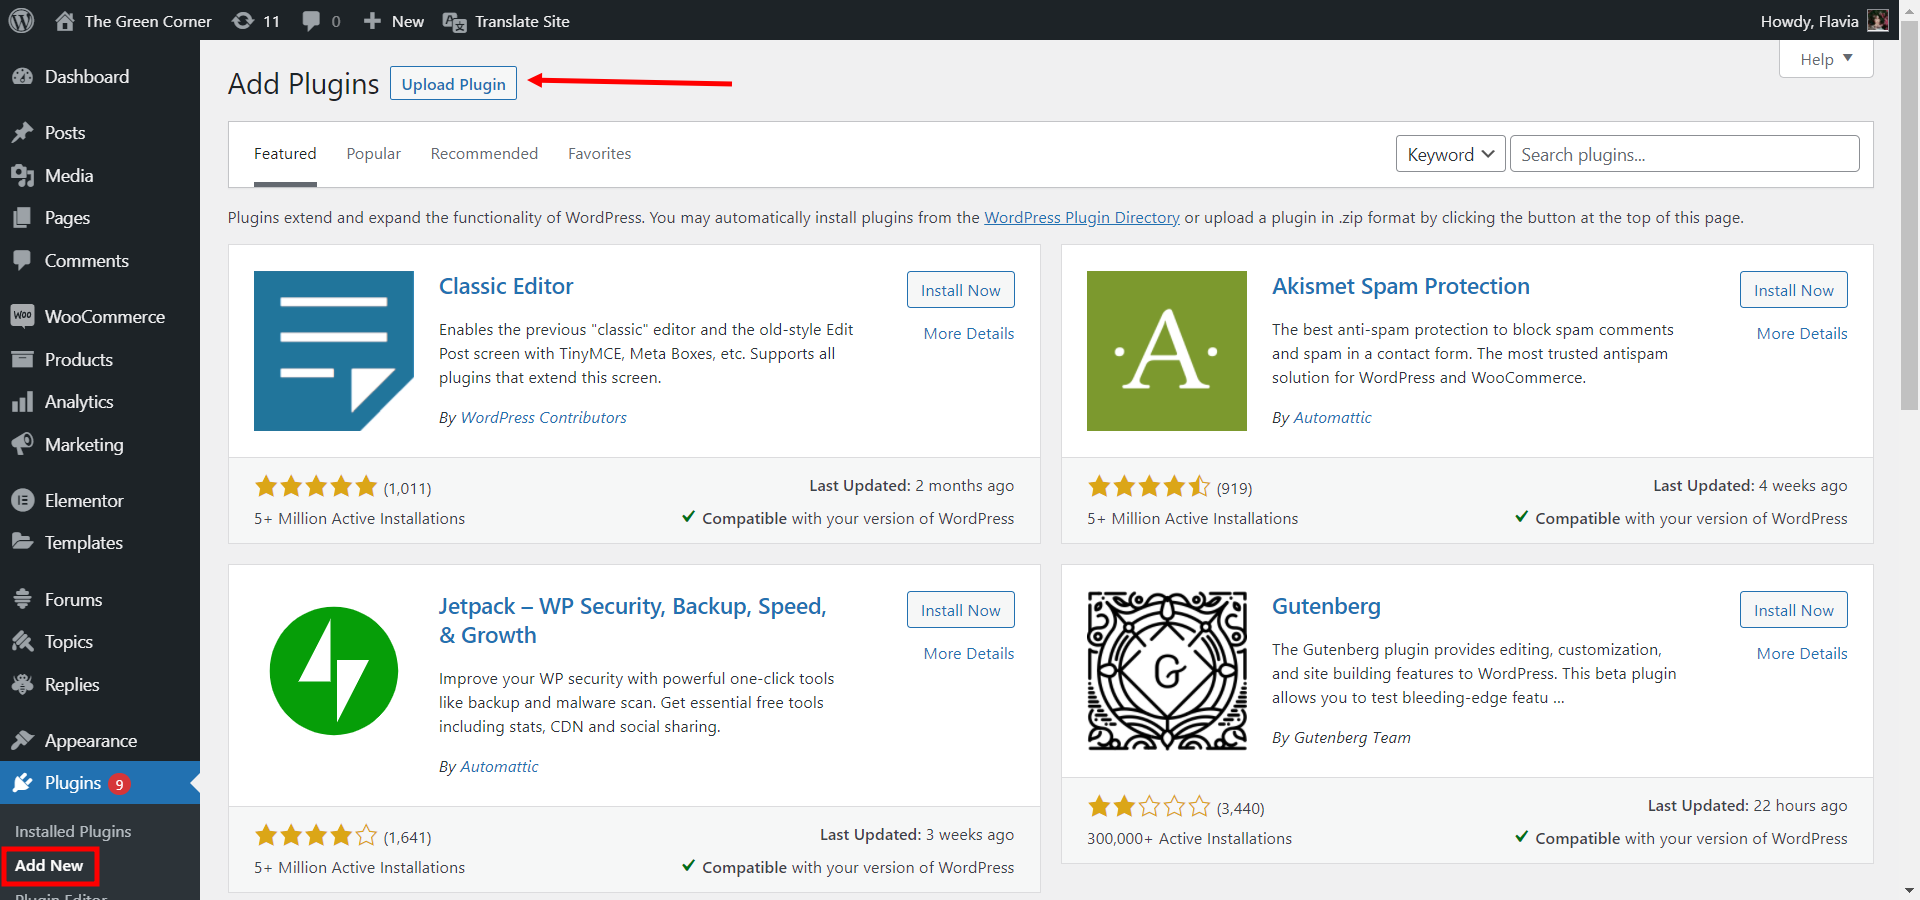

Subsequent, use the Select File button to pick your beforehand downloaded essential plugin .zip file after which click on on Set up Now. After set up, don’t neglect to Activate the plugin. Repeat the method yet one more time, this time ensuring to add the Professional plugin.
Now it’s best to be capable to start establishing the Paid Membership Subscriptions plugin, together with creating pages with shortcodes, establishing your cost particulars, creating subscription plans, and proscribing your premium content material. For a extra detailed information on tips on how to do all of this, you may observe the steps in this tutorial.
Step 2: Set up the Stripe Add-on
After your membership website is all arrange, you might be able to combine the Stripe add-on, which is offered solely with the PRO model of the WordPress membership plugin.
Necessities
Earlier than configuring the Stripe plugin, nevertheless, be certain that you meet the next necessities, as they’re mandatory with a view to have the plugin operate easily:
- Your Paid Member Subscription should be model 1.5.0 or greater since that will likely be mandatory so the Stripe add-on works correctly;
- You might have an SSL certificates put in in your area. That is mandatory if you’re utilizing Stripe to course of bank card funds. Right here’s extra information on that.
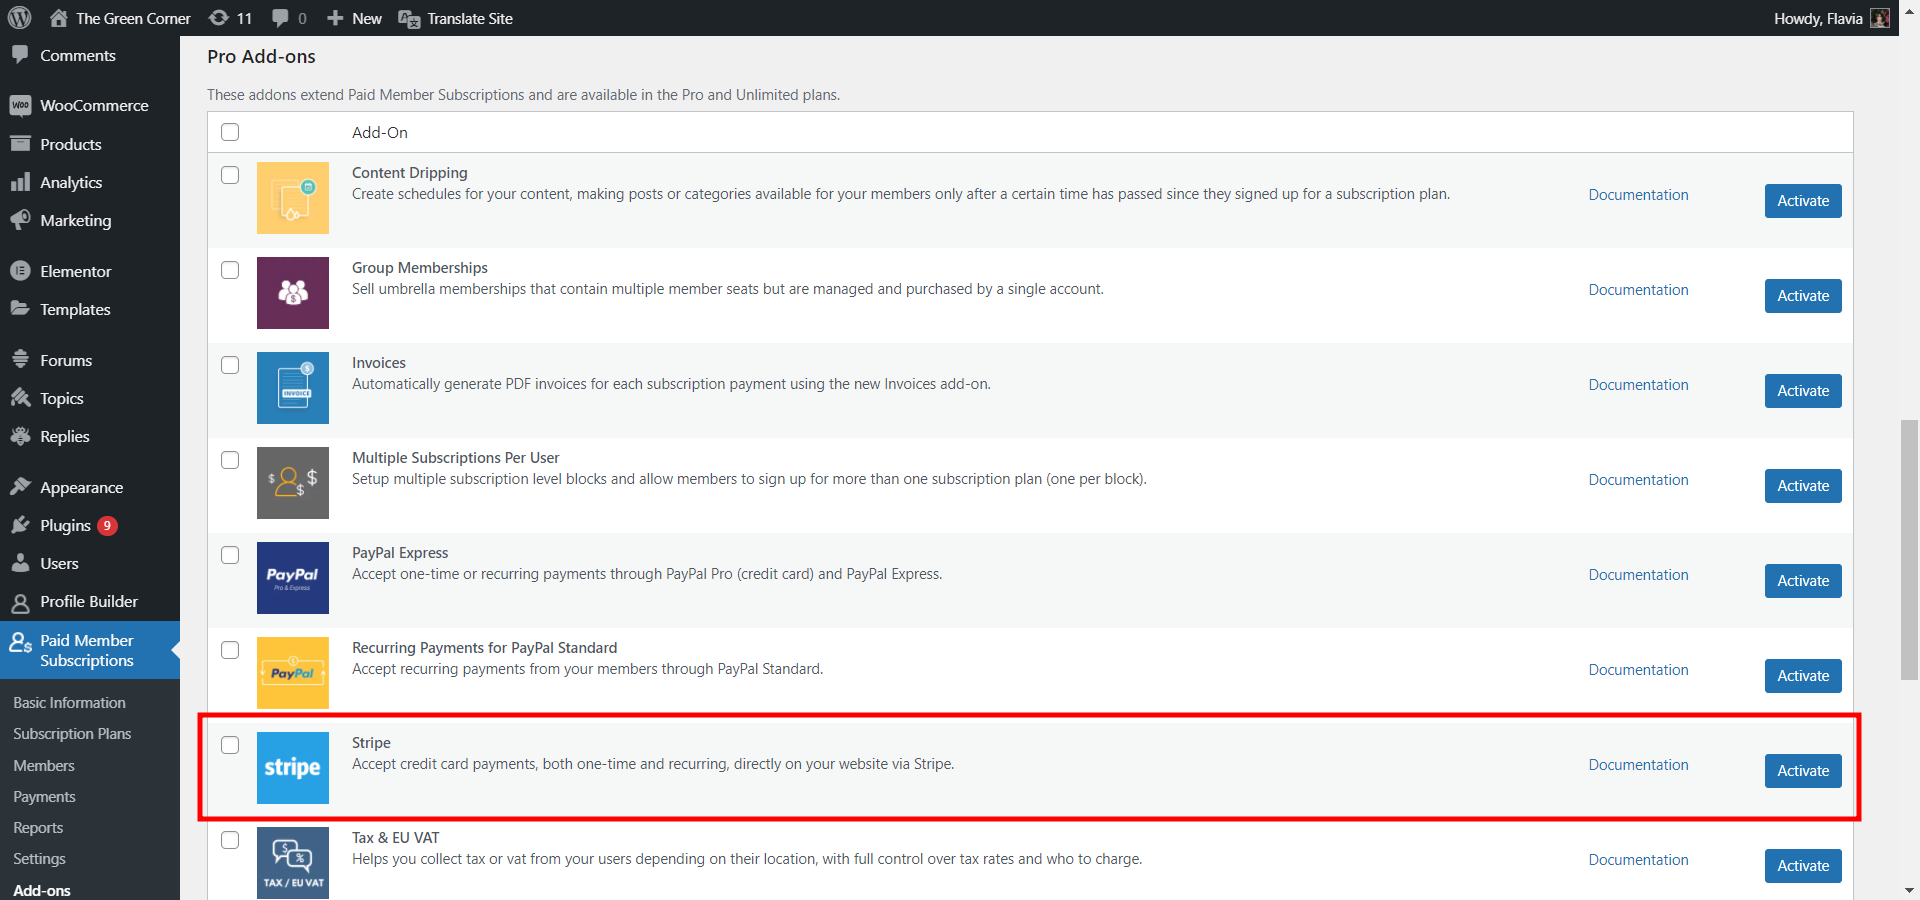
Set up the Add-on
To entry the Stripe Cost Gateway plugin, navigate to Paid Member Subscriptions → Add-ons out of your WordPress dashboard. Scroll down on this web page and discover the Stripe Add-on within the supplied listing. When you’ve recognized it, click on the Activate button.
Get Your Stripe API Credentials
To ensure that your web site customers to have the ability to make funds by way of Stripe utilizing credit score or debit playing cards, you’ll must enter your Stripe API credentials. Listed here are the steps to acquire your credentials and add them to your WordPress website.
First, log into your Stripe Account and ensure it has been activated. Subsequent, go to the Builders tab and choose API keys from the left sidebar.
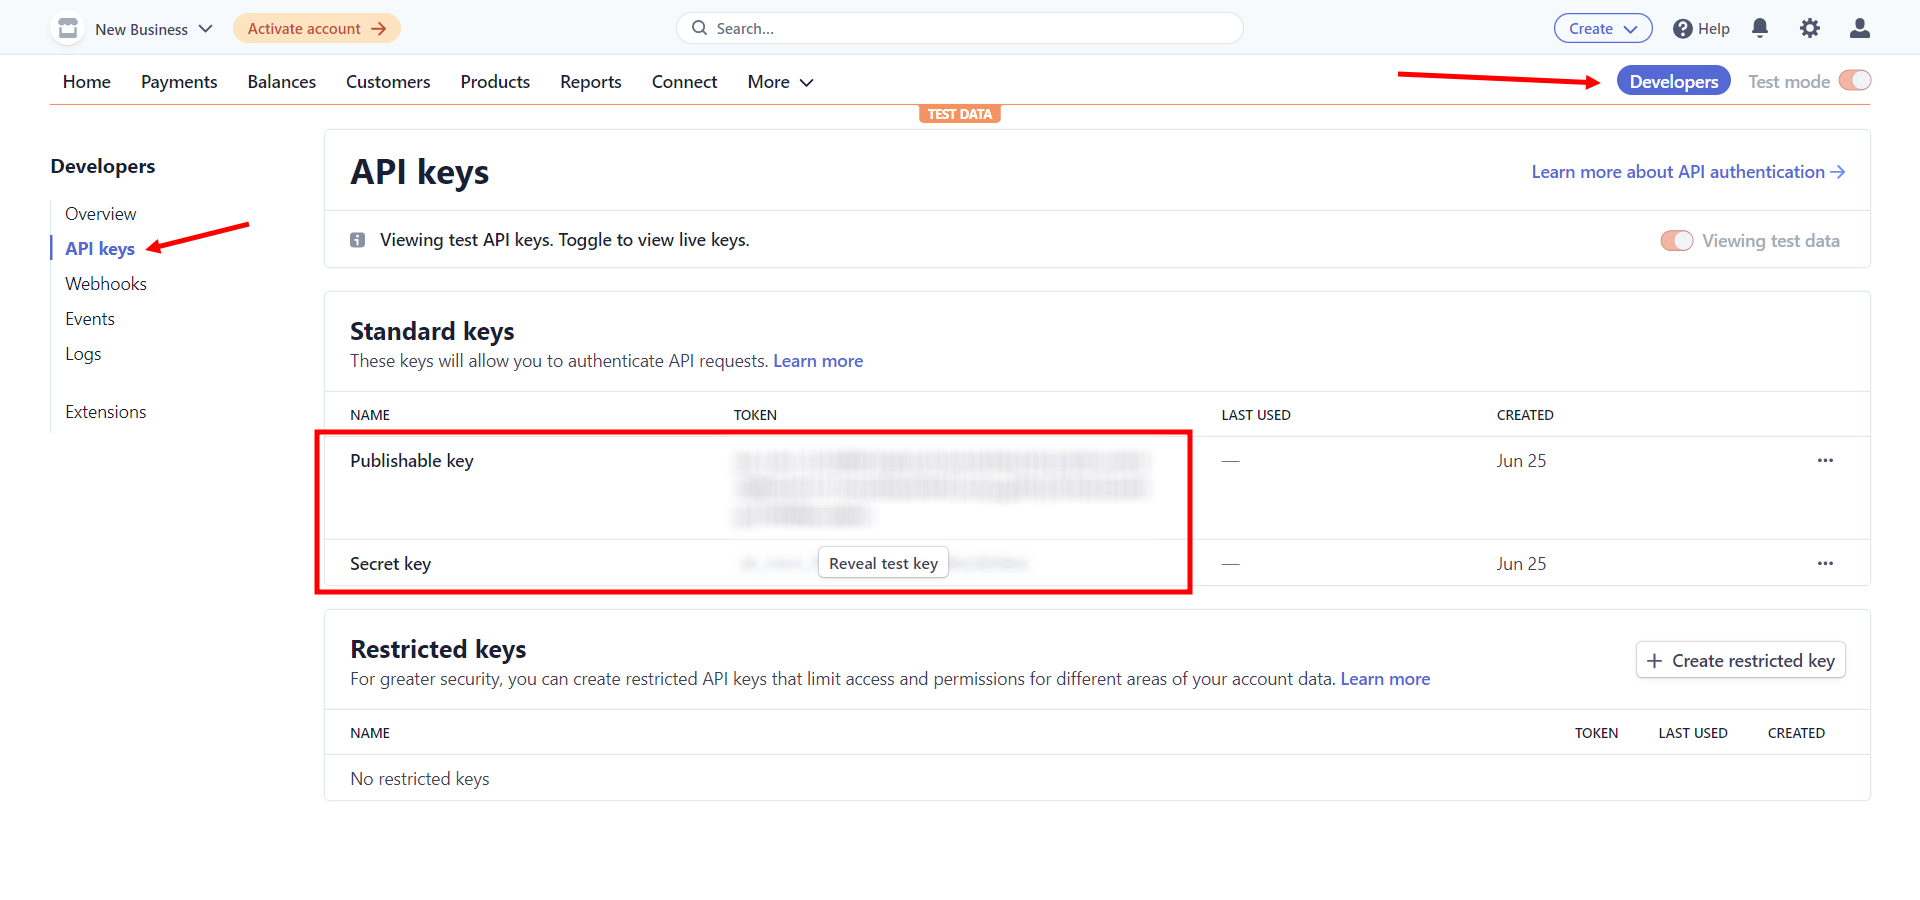
Within the instance above solely the check information is offered, for the reason that account just isn’t energetic. When activated, it is possible for you to to additionally retrieve the dwell information by switching one of many radio switchers from the higher proper facet of the display screen.
Now, merely copy these credentials (Publishable key and Secret key) and let’s get them onto your WordPress website.
Step 3: Configure Stripe Funds with Paid Member Subscriptions
In your WordPress dashboard, navigate to Paid Member Subscriptions → Settings after which choose the Funds tab. Now, from the Lively Cost Gateways part, choose one of many Stripe choices (you may nonetheless maintain different kinds of cost gateways energetic if you want so).
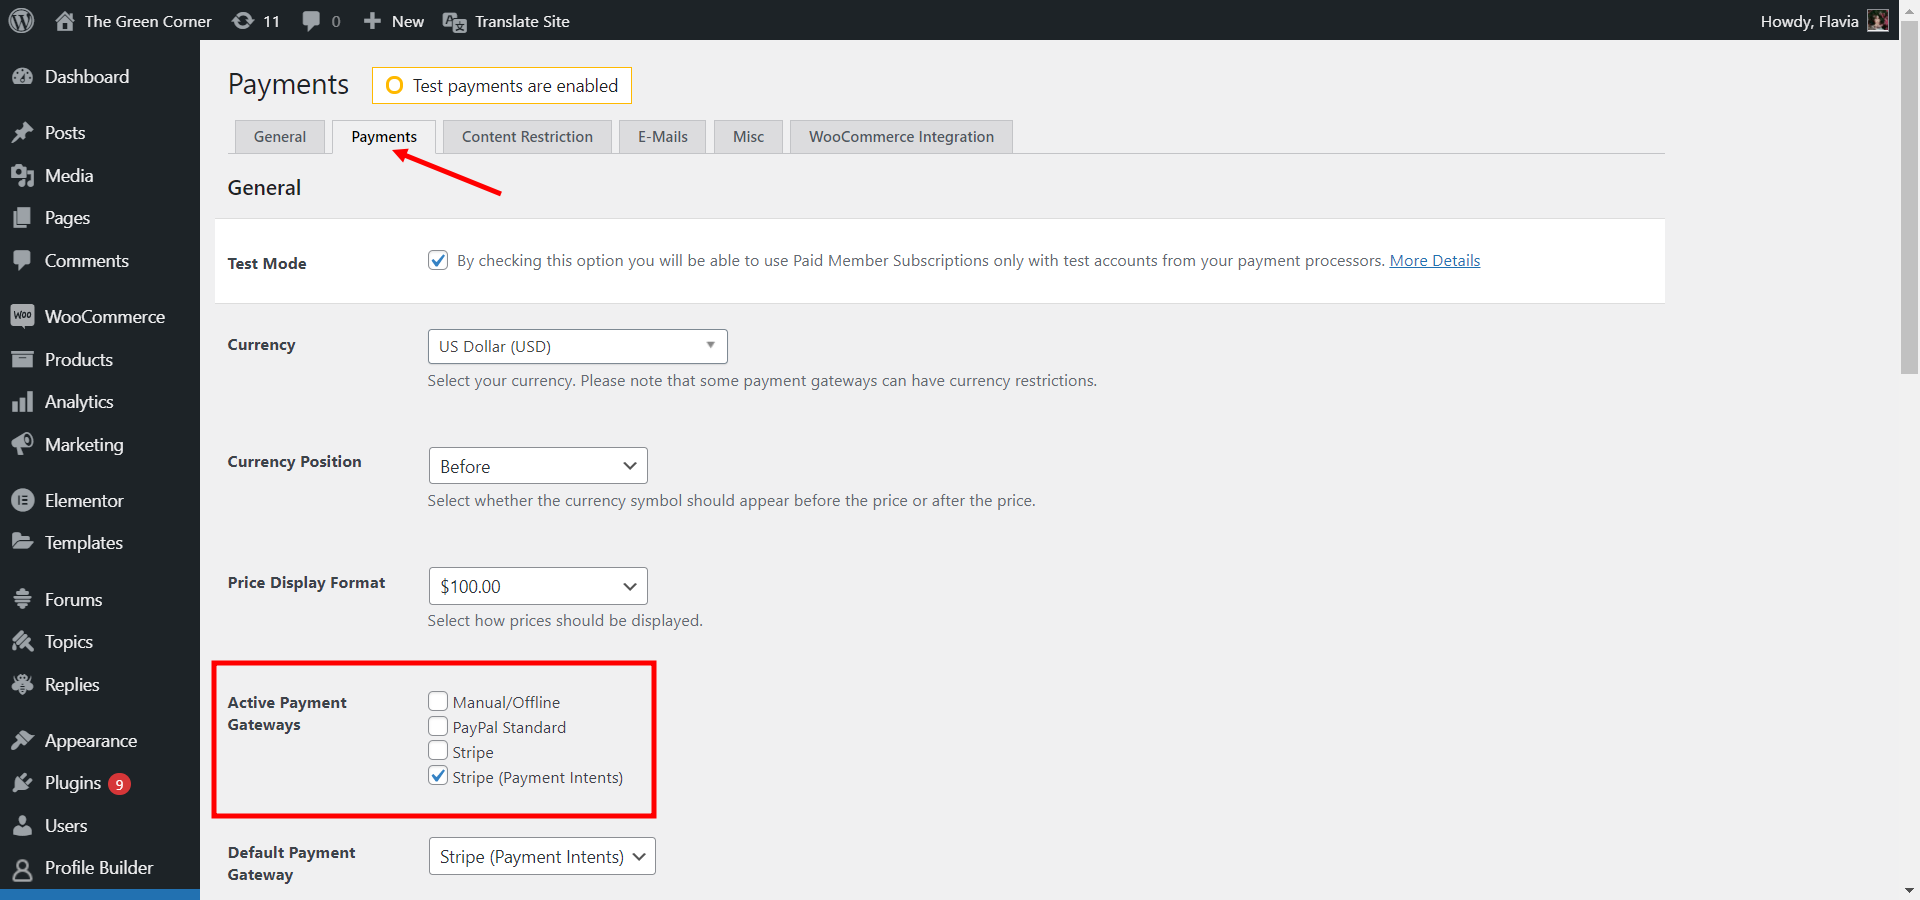
The principle distinction between the 2 obtainable Stripe choices is that Stripe (Cost Intents) is SCA compliant because it helps funds made with further authentication (3D Safe, 3D Safe 2). We strongly advocate that you simply go along with this selection with a view to help EU-issued bank cards.
On this identical web page, it’s also possible to configure some extra choices:
- Check Mode will limit the Paid Member Subscriptions to solely check accounts for cost processors.
- The Forex drop-down will permit you to choose your forex (i.e. US greenback), and Forex Place will permit you to designate the forex image to both seem earlier than or after the numerical worth. Discuss with forex restrictions.
- You too can select your most well-liked Worth Show Format right here.
- Default Cost Gateway will permit you to choose which kind of cost gateway ought to be chosen by default within the registration type.
- You too can choose the Renewal kind, which can permit for recurring funds (extra on this within the subsequent part).
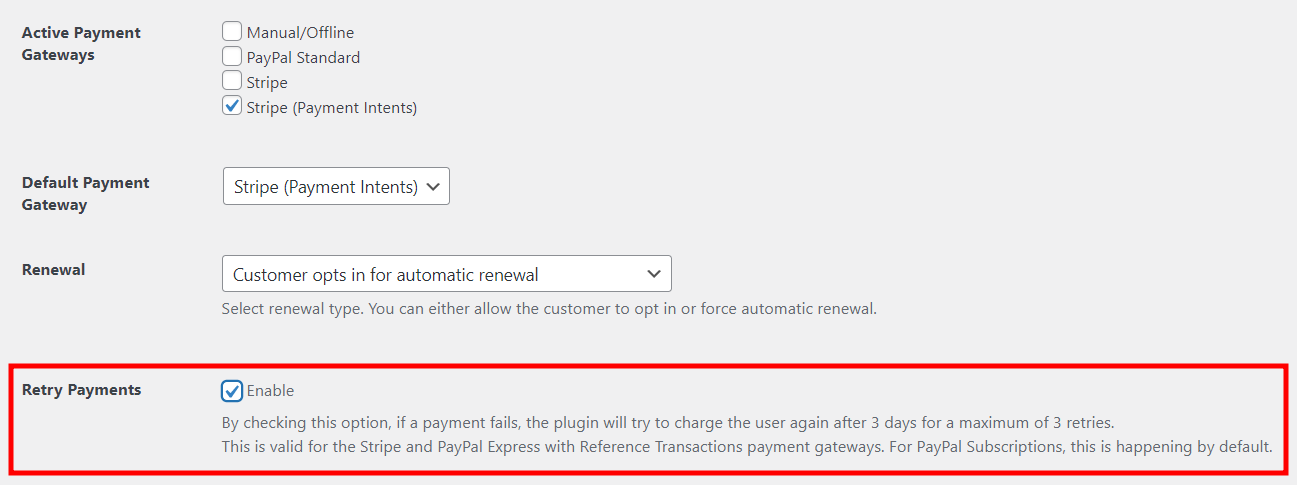
- The Retry Funds choice makes Paid Member Subscriptions attempt to cost a consumer with a failed cost once more, after 3 days, for a most of three retries.
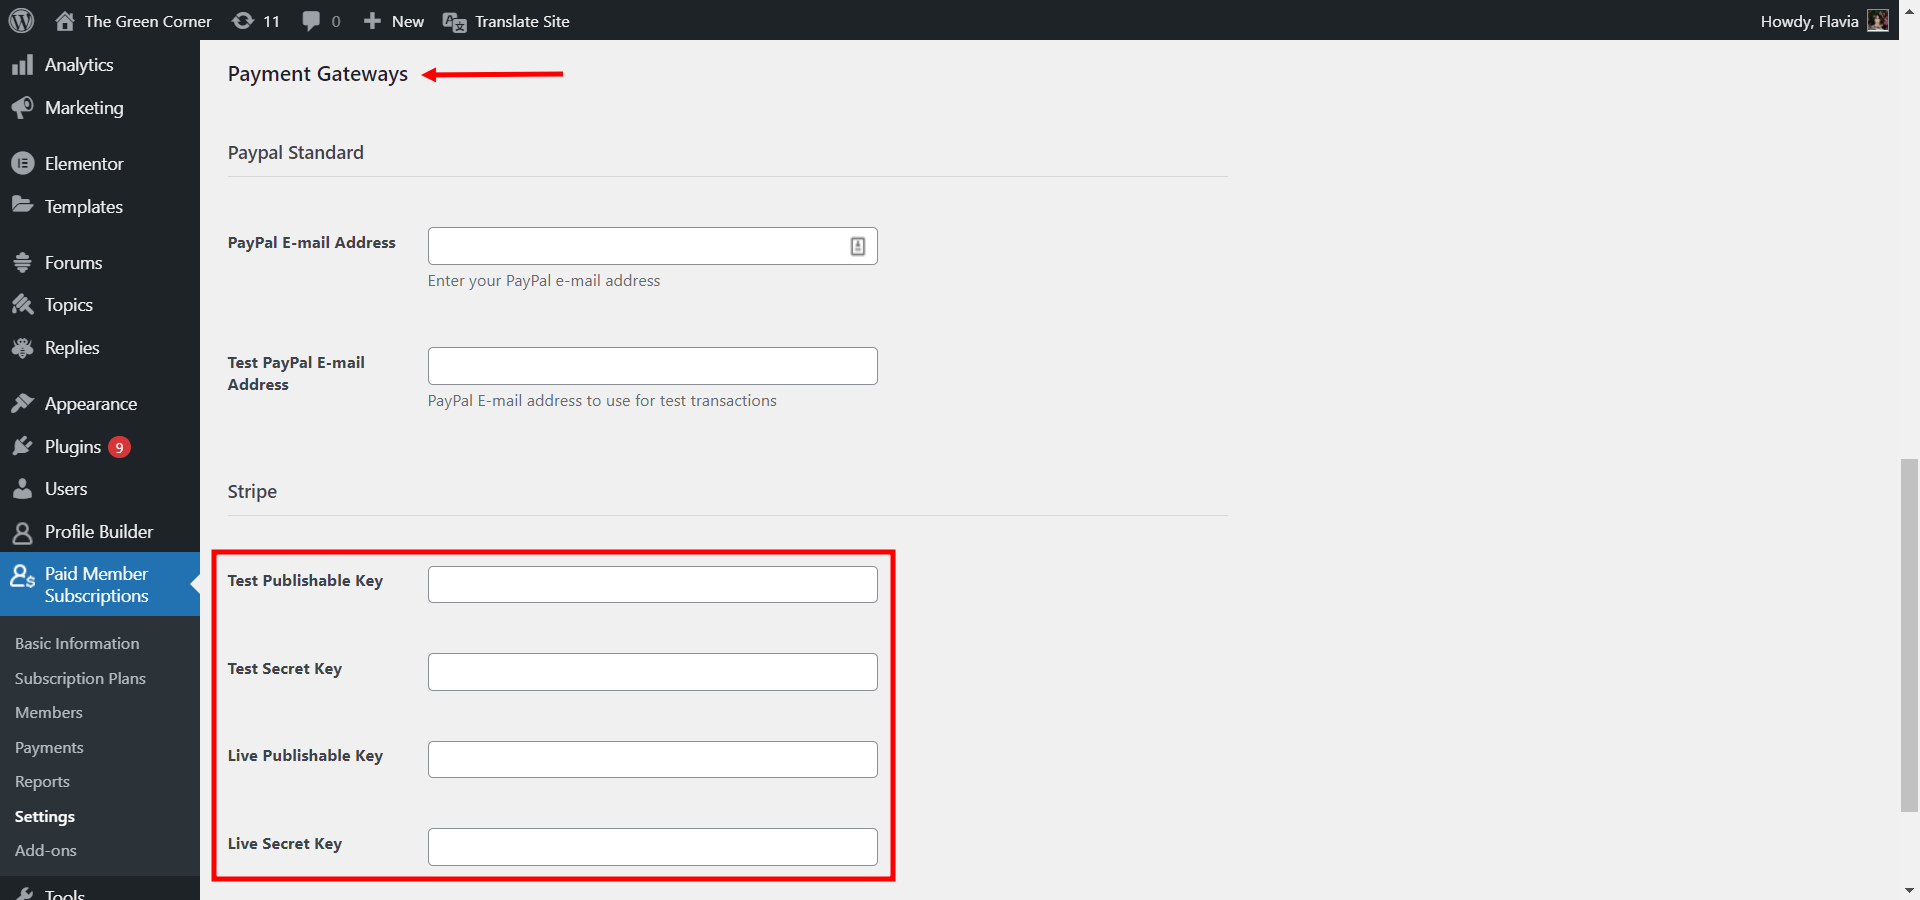
Subsequent, scroll all the way down to the Cost Gateways part so as to add your credentials beneath the Stripe sub-section. Merely paste the credentials you may have copied out of your Stripe account in these fields:
As soon as the Stripe cost gateway has been activated, the Paid Member Subscriptions registration type will embody this cost technique as properly.
Step 4: Additional Customise Your WordPress Stripe Cost Plugin
After you’ve gone by way of the principle setup for the Stripe cost gateway, you may go the additional mile and customise it much more.
Stripe Recurring Funds for WordPress
Handle recurring funds in your area with the Stripe Cost Gateway. You possibly can arrange Renewals by navigating to Paid Member Subscriptions → Settings → Funds tab. Right here, you’ll discover the beforehand talked about Renewal part, the place you may select between 3 Stripe recurring cost choices:
- The “Customer opts in for automatic renewal” offers the consumer the pliability in deciding between a one-time cost vs. recurring funds. To make the cost a recurring cost with this selection, the brand new consumer might want to full a further step within the registration type and examine the “Automatically renew subscription” checkbox;
- The “Always renew automatically” choice will render all funds to be recurring funds;
- The “Never renew automatically” choice will be certain all funds are one-time funds.


To check a cost with Stripe, you are able to do it utilizing Paid Member Subscriptions in Check Mode. You should utilize any of those check playing cards:


Computerized Cost Retry
The plugin additionally affords an choice to deal with failed funds made by way of the Stripe cost gateway. Choose the Allow checkbox beneath Retry Funds, which is disabled by default, to activate this selection. When the automated cost retry choice is enabled, the plugin mechanically makes an attempt to retake the cost 3 days after a failed try. A complete of three automated retry makes an attempt might happen earlier than the subscription is taken into account expired.

Signal-Up Payment and Free Trial Intervals
The choices to arrange a sign-up price and a free trial interval for recurring funds are additionally obtainable with Paid Membership Subscription Professional plan.
- The Signal-Up Payment will permit you to decide a flat price quantity to cost customers after they subscribe to a sure subscription plan.
- The Free Trial choice lets you decide the period of time the free trial will likely be energetic till the primary cost will get charged for recurring funds.
These choices could be configured by going to Paid Member Subscriptions → Subscription Plans and selecting an obtainable plan to edit. On the subscription plan edit web page, you’ll be capable to see these two choices and their configurations:

Safety
Stripe has been licensed as a PCI Service Supplier Stage 1, which is the very best customary of certification within the funds business.
As talked about earlier, you’ll need to have an SSL/TLS certificates in case you want to make funds by way of Stripe, since this can set up a safe encrypted connection. The value of such a certificates can range so much relying in your wants and your chosen supplier, however there are free TLS certificates suppliers on the market as properly, corresponding to Let’s Encrypt.
Ensure that the TLS of your SSL Certificates is a minimum of TLS v.1.2, per the Stripe SSL Necessities (all interactions between your server and Stripe should use TLS v1.2).
After you have put in the SSL Certificates in your area, you’ll need to configure your settings to make sure your web site runs over HTTPS. To uphold the very best safety requirements, Stripe forces HTTPS for all providers utilizing TLS. Right here’s extra data on this topic, supplied by Stripe.
Set Up WordPress Stripe Funds Plugin At present
Safe, simple to make use of, and fashionable. It doesn’t matter what your particular person enterprise wants are, you may relaxation assured that this WordPress Stripe funds plugin will handle the cost course of for you with ease and safety so to focus in your product and meet all your online business targets.
Your web site guests will thanks as properly since this performance makes for the best method of on-line credit score or debit card cost.

Paid Member Subscriptions Professional
Settle for (recurring) funds, create subscription plans and limit content material in your web site. Simply setup a WordPress membership website utilizing Paid Member Subscriptions.
Do you continue to have questions on establishing your Stripe cost gateway in WordPress? Ask away within the feedback part under.
The publish WordPress Stripe Cost Plugin – The right way to Set it Up on Your Web site appeared first on Cozmoslabs.